INTRODUCTION
As you all know, I frequently visit a lot of cloud infrastructure discussion boards, almost as frequently as I see people out there wondering what would be the best way to create a cluster in the Azure portal or configure S2D (Storage Spaces Direct) storage. Therefore, this article will be dedicated to creating a cluster in Azure and configuring S2D on this cluster. I have to warn you that within the article, I’ll use resources that become available after free online registration.
Right before we get started, you’ll have to sign in to your Microsoft Azure account. If for some reason, you don’t have a subscription or just don’t want to use your working environment for experimenting, you can get a free account here.
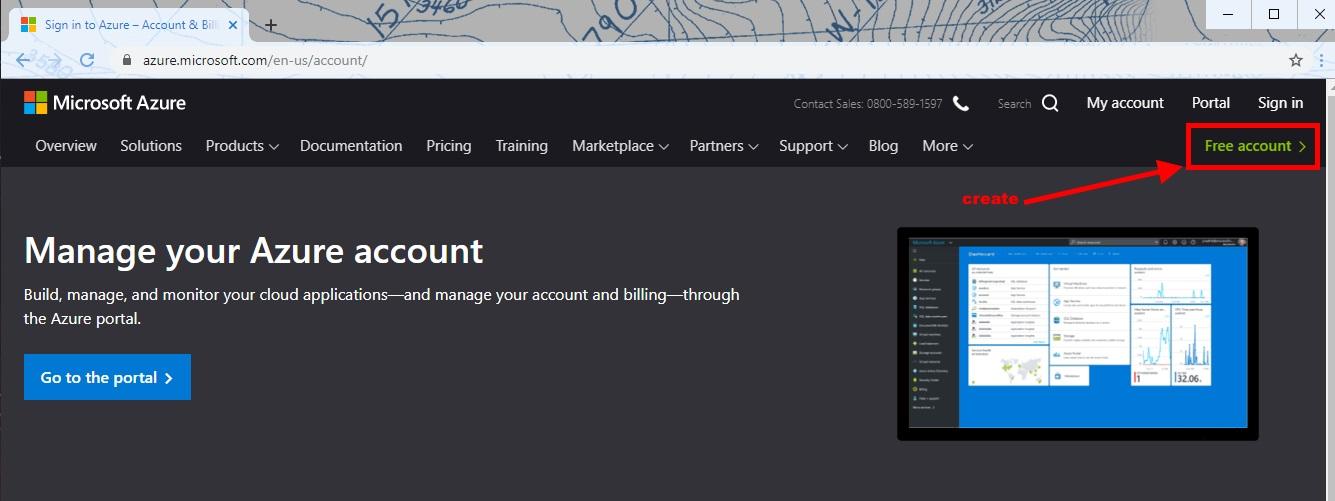
The only con here is that you must provide your bank card details. For account activation purposes, 1 USD will be automatically blocked on your card for the solvency check. When you’re done with registration, you’ll see start screen offering you to create a necessary resource. Do remember, however, that S2D was designed for two deployment options, converged and hyperconverged (more information here).
There can also be several options to create the necessary resources. Of course, you can always count on manual deployment, but in this case, I’ll be using ARM (Azure Resource Manager) Templates.
Attention:
- Materials below are for educational and informational purposes only and may not correspond to your specific situation.
GET STARTED
I’ll use an already existing template from the Azure library for installation. Nonetheless, this scenario will still need a little bit of fine-tuning.
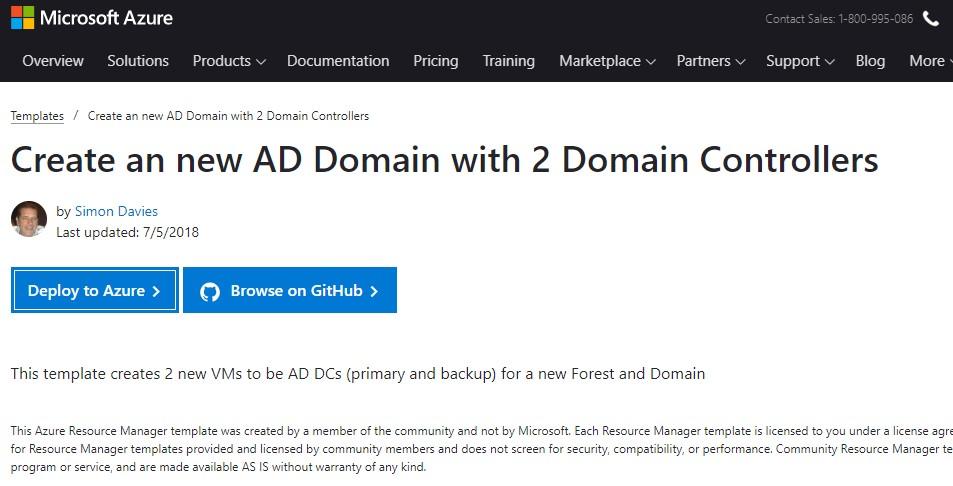
Click on Deploy to Azure and fill out the required fields.
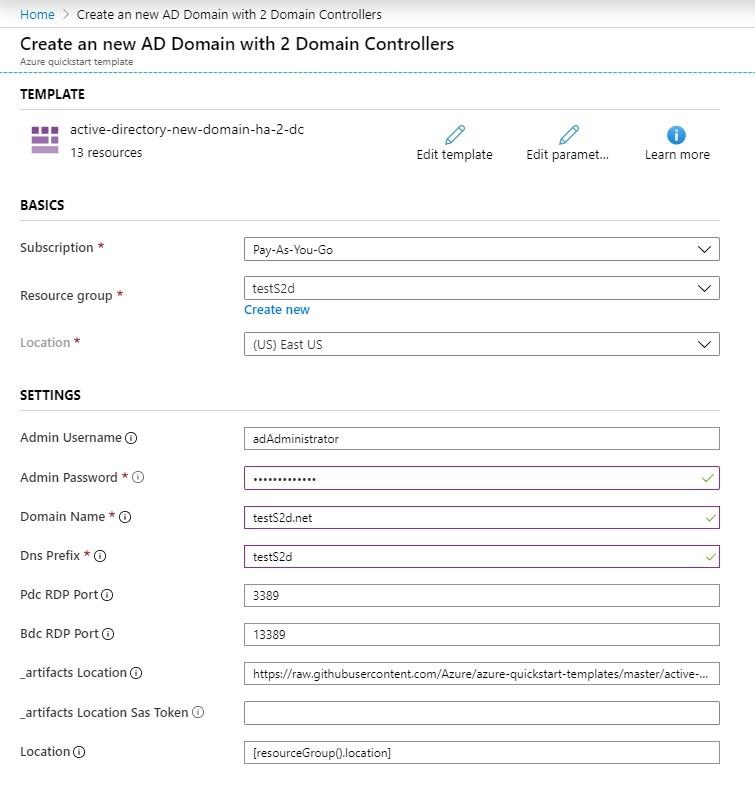
Settings fields:
♦ BASICS:
- Subscription “Pay-As-You-Go” – pricing and billing;
- Resource group “testS2d” – general resource group that enables you to decide which resources belong in a resource group based on what makes the most sense;
- Location “(US) East US” – storage and server location where the project resources will be stored.
♦ SETTINGS:
- Admin Username “adAdministrator” – local and domain administrator account user name;
- Admin Password – local and domain administrator password, password must contain 12 characters, uppercase and lowercase letters, digits;
- Domain Name “testS2d.net” – full domain name of an AD domain;
- Dns Prefix “testS2d” – DNS prefix for the public IP-address for the load balancing;
- Pdc RDP Port “3389” – public RDP port for the PDC VM;
- Bdc RDP Port “13389” – public RDP port for the BDC VM;
- _artifacts Location – the location of the DSC templates and modules for this template;
- _artifacts Location Sas Token – the sasToken is required to access the “_artifactsLocation”;
- Location – the location for all resources.
Please, do pay attention to the fact that part of the required resources will be applied with the set parameters. Upon deployment of this template, it will have the following preset components:
- “storageAccountType”: “Premium_LRS” – type of Azure managed VM disks (more details up here);
- “adPDCVMName”: “adPDC” – name of the first VM with Active Directory role and DNS;
- “adBDCVMName”: “adBDC“- name of the second VM with Active Directory role and DNS;
- “imagePublisher”: “MicrosoftWindowsServer” – OS;
- “imageOffer”: “WindowsServer” – OS release;
- “imageSKU”: “2016-Datacenter” – OS edition;
- “adAvailabilitySetName”: “adAvailabiltySet” – resource group name to set the domain controllers availability (more information here);
- “publicIPAddressName”: “ad-lb-pip” – resource group name for public IP addresses for the domain controllers (examples are here);
- “adVMSize”: “Standard_DS2_v2” – type of the VM size. More details on how to pick up VM sizes correctly and what to do with them are here;
- “adLBFE”: “LBFE” – the name of external interface public IP address pool for Load Balancer;
- “adLBBE”: “LBBE” – the name of backend address pool for Load Balancer (more details here);
- “adPDCRDPNAT”: “adPDCRDP” – the name of NAT rule for”adPDC” domain controller;
- “adBDCRDPNAT”: “adBDCRDP” – the name of NAT rule for “adBDC“domain controller;
- “virtualNetworkName”: “adVNET” – the virtual network name;
- “virtualNetworkAddressRange”: “10.0.0.0/16” – address range for internal routes;
- “adSubnetName”: “adSubnet” – virtual subnet name;
- “adSubnet”: “10.0.0.0/24” – address range for “adSubnet” subnet;
- “adPDCNicName”: “adPDCNic” – the name of network interface for “adPDC” domain controller;
- “adPDCNicIPAddress”: “10.0.0.4” – the IP address of network interface for “adPDC” domain controller;
- “adBDCNicName”: “adBDCNic” – the name of network interface for “adBDC” domain controller;
- “adBDCNicIPAddress”: “10.0.0.5” – the IP address of network interface for “adBDC” domain controller.
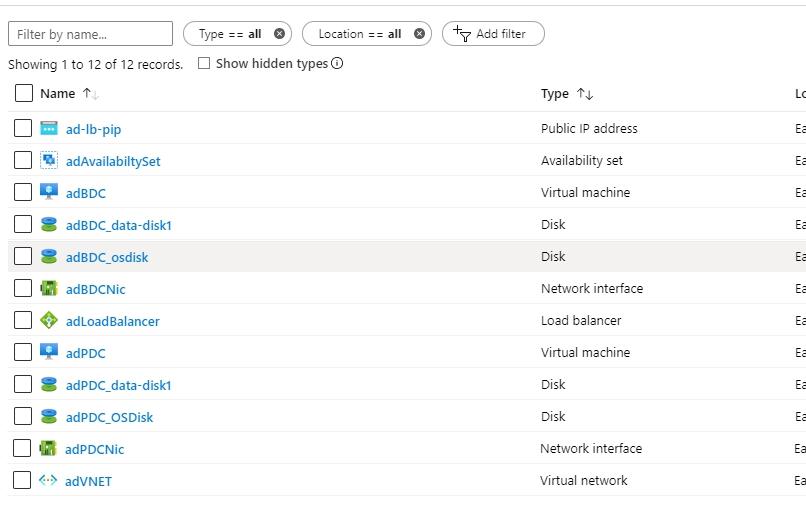
Also, each domain controller gets two disks which are “adPDC_OSDisk“, “adPDC_data-disk1“, and “adBDC_osdisk“, “adBDC_data-disk1“. As their names imply, one is for OS, another is for data.
If there’s a necessity for such changes as VM name, OS, virtual network address range (VNET), or any other parameter, just click on Edit template and choose whatever you need from variables.
Since I’m about to deploy Windows Server 2019 S2D, there’ll be a few things to do first:
1. Click on Edit template.

2. Find “imageSKU” in variables and change it to “2019-Datacenter.”
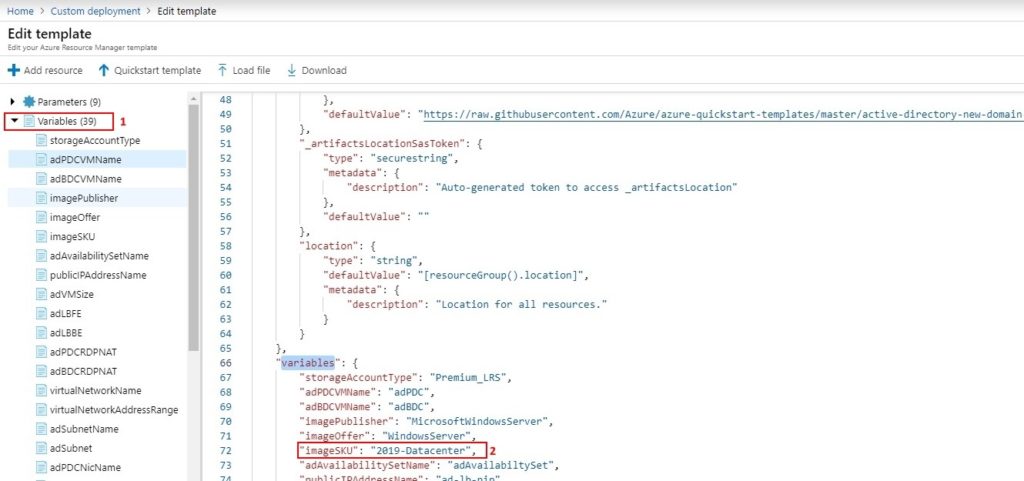
3. Press “Save”.

Be attentive and always double-check the data you enter, settings you choose, and, of course, the parameters you have already set in the template configuration!
After making the necessary changes to the template and checking the changes, make a note of agreement with the terms and conditions, and then click the “Purchase” button.

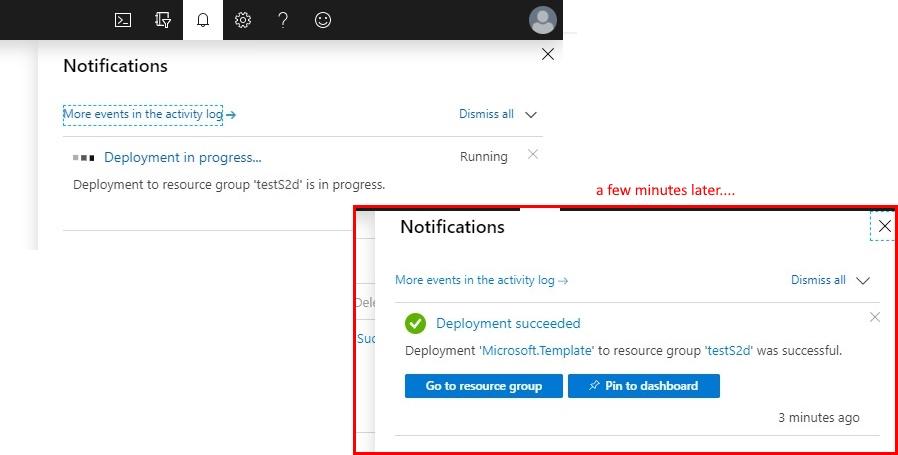
Now, when the infrastructure is created, you ought to check if all the services are deployed and working. The first step is going to “Resource groups.” Then, choose the resource group you listed while configuring the template (mine is “testS2d”). The only thing left to do now is to check if “Deployments” in “Overview” is listed as “Succeeded.” If for whatever the reason might be, this parameter shows an error, you’ll have to figure out what went wrong and start over. You must either delete everything or create a new resource group for the next effort. Don’t forget to change the domain name and DNS prefix as well.

Furthermore, in this tab, you can also observe resources created specifically upon deployment, such as the virtual network (VNET) or the open IP address to connect to the VM through RDP, load balancer, VM disks, etc.
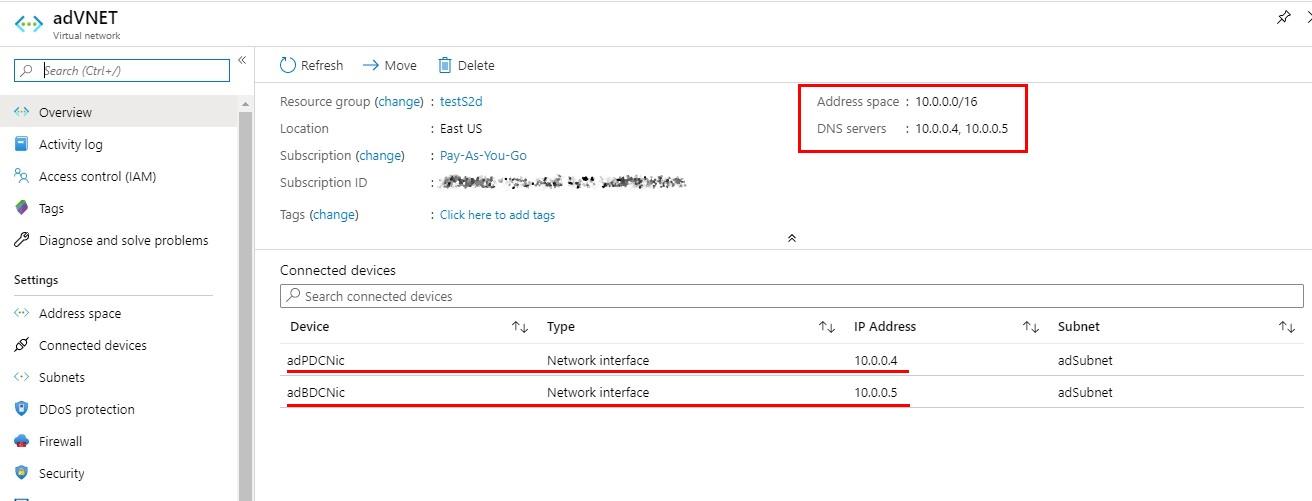
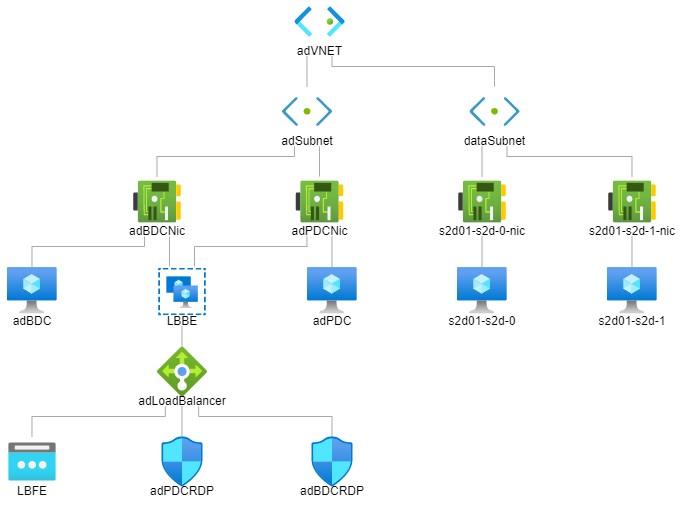
Now, time to go to adVNET, where there are two network interfaces connected to the VM that act as domain controllers. As a particular stage in deployment from this template, both these IP addresses were added as DNS-servers for VNET so that when creating storage in cluster nodes, VM could connect to AD correctly.
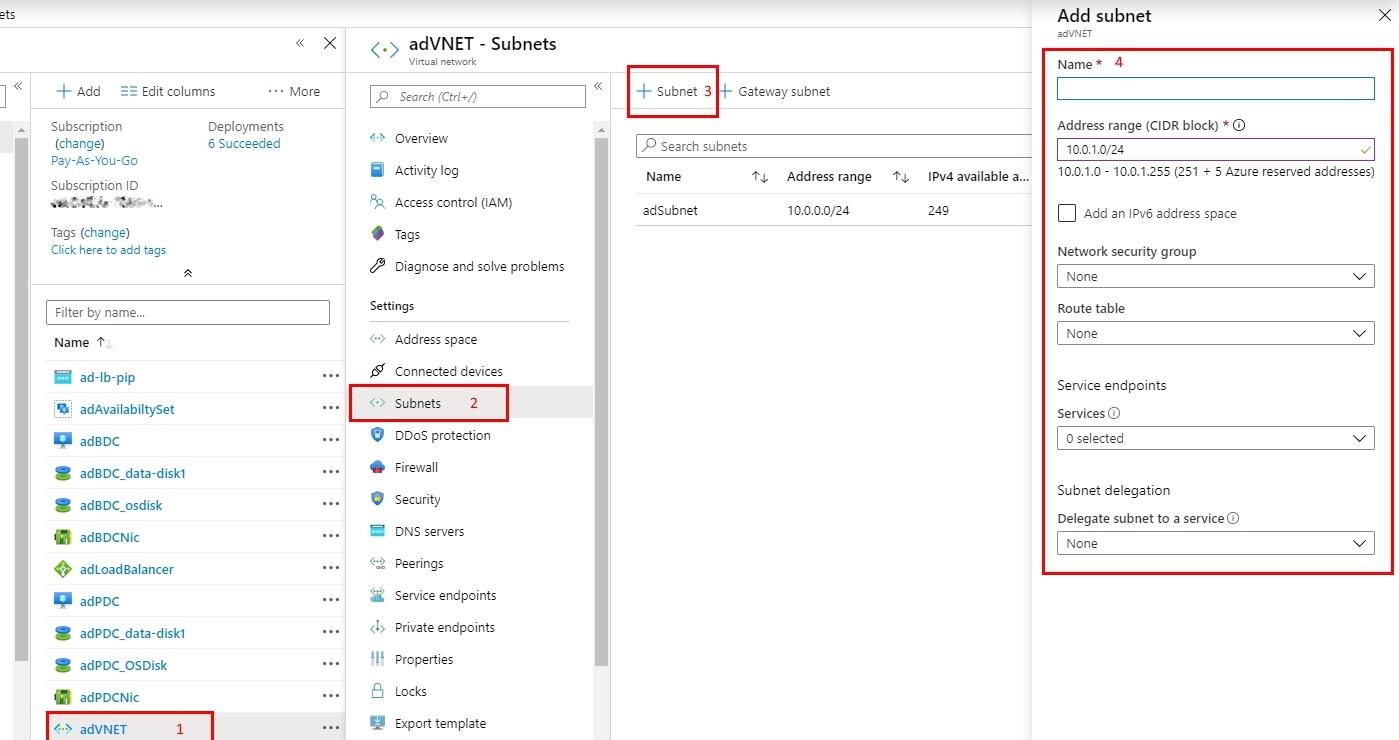
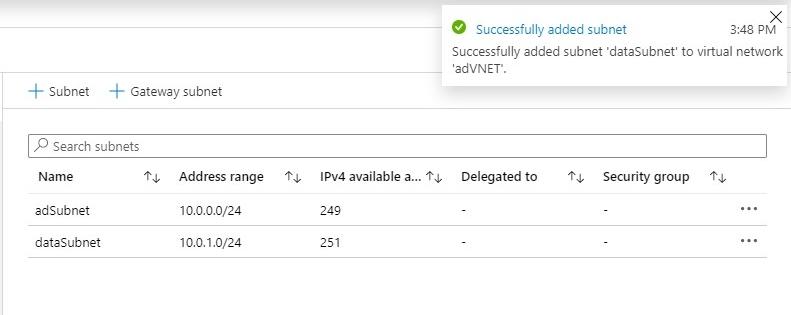
The next step is adding a subnet so that those interfaces could be used in S2D cluster nodes. Here we go directly to “Subnets” and click on Add subnet, where you enter its name. Change address range or any additional parameters, if necessary. Click Ok to continue.
Congratulations, the subnet is successfully added to virtual network!
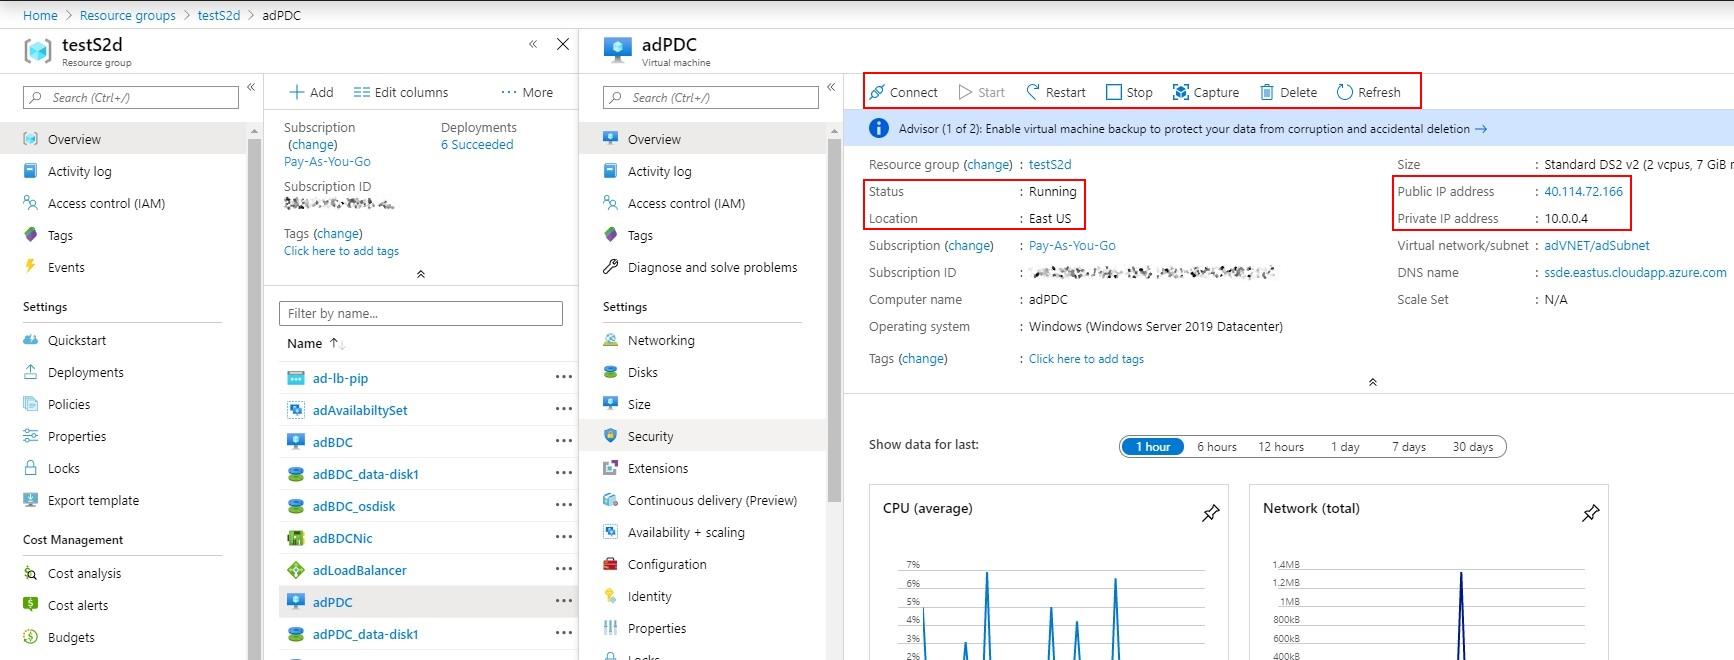
Now, let’s get on with the created VM (mine is “adPDC”). In the working area, you can see control options (connect, start, restart, etc) as well as the status of the VM along with the IP addresses: public one (if you have one) and private.
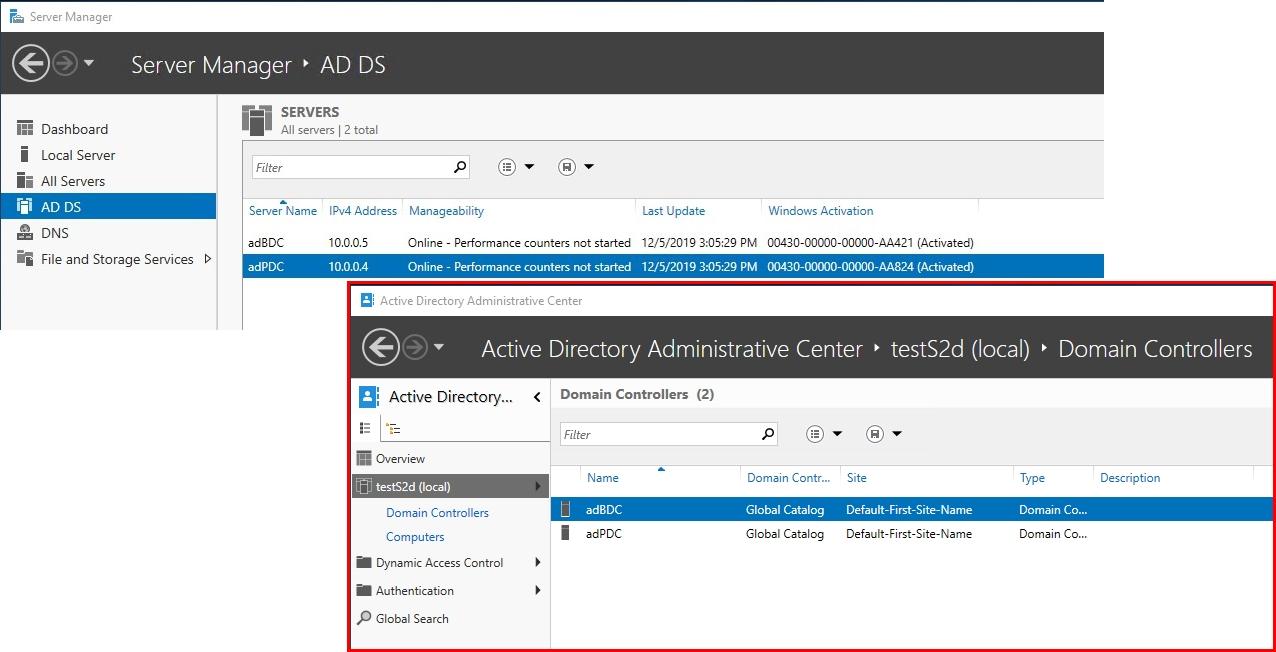
Time to connect to the domain controller via RDP, with specified port, and in control panel tab AD DS, you’ll see the created VMs as domain controllers. In AD panel, both of these VMs will be connected as domain controllers, too, respectively.
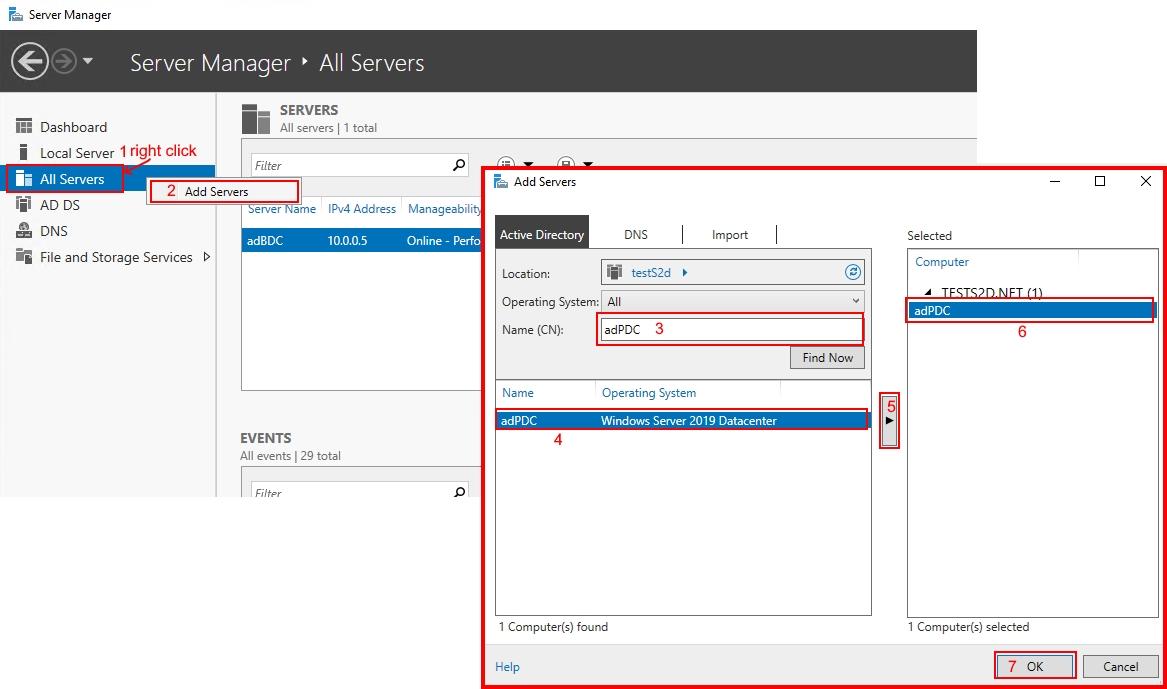
- Notification!
In case when upon connecting to the VM, you don’t see the second domain controller, check if the other server is connected to the control panel. If not, then just add it!
When you have made sure that everything’s alright, time to move on with the next stage, namely creating and configuring storage. Let’s just use another template from the Azure library so that we won’t lose time. To do so, in search box type “s2d” and pick “Windows Server 2016 Storage Spaces Direct (S2D) SOFS cluster” or just look here!
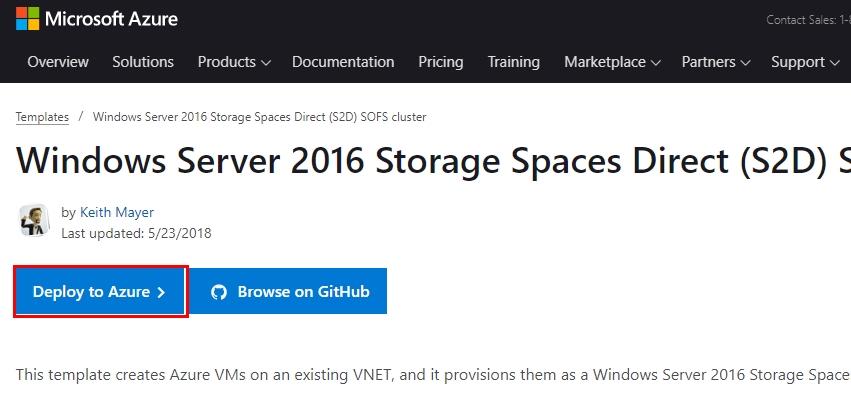
You’re also more than welcome to check the template listing on GitHub or look up the list of parameters you are free to edit. You’ll need that since when preparing your template for deployment, its parameters must be specified.
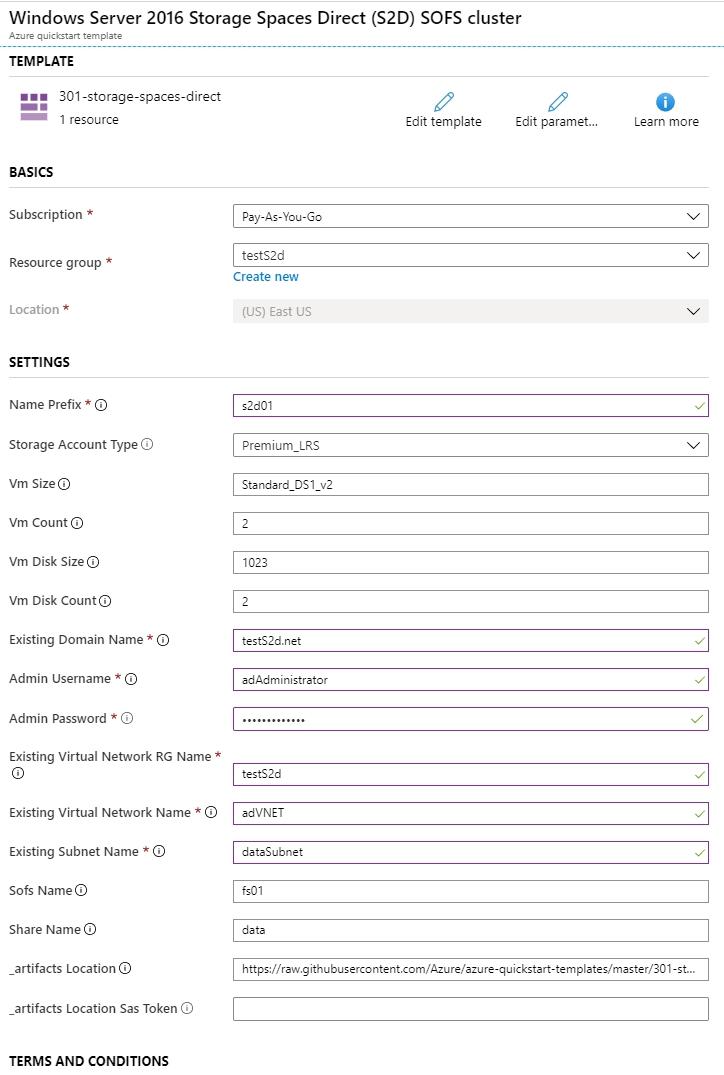 ♦ BASICS:
- Subscription “Pay-As-You-Go” – pricing and billing;
- Resource group “testS2d” – same resource group as in the previous template;
- Location “(US) East US” – Choosing the storage and server location where the project resources will be stored is unavailable since it depends on whether you use the same resource group or create a new one.
♦ SETTINGS
- Name Prefix “s2d01” – This prefix will serve as a few first symbols for any resource inside the Resource group (mine is testS2d) for which we prepare this SD2 cluster;
- Storage Account Type “Premium_LRS” – type of the Azure storage account;
- Vm Size “Standard_DS1_v2” – type of the VM size;
- Vm Count “2” – the amount of VMs in the S2D cluster (minimum 2, maximum 3);
- Vm Disk Size “1023” – each VM disk size in GB (minimum 128, maximum 1023);
- Vm Disk Count “2” – each VM disk amount (minimum 2, maximum 32). Don’t forget to check if the VM size that you did choose with support the preferred amount of disks;
- Existing Domain Name “testS2d.net” – the name of the domain that we have created in the first template;
- Admin Username “adAdministrator“- username of the domain admin that we have created in the first template;
- Admin Password – domain admin account passwords;
- Existing Virtual Network RG Name “testS2d” – the name of the resource group that will supply resources for the new template;
- Existing Virtual Network Name “adVNET” – the name of the virtual network that will supply data for the new template;
- Existing SubnetName “dataSubnet” – the name of the subnet that will be used for the cluster and existing VMs;
- Sofs Name “fs01” – the name of the SOFS (Scale-Out File Server) cluster role that will be used as the SMB (Server Message Block) server;
- Share Name “data” – shared resource name;
- _artifacts Location – the location of such resources as templates and S2D modules for this template;
- _artifacts Location Sas Token – the sasToken is required to access the “_artifactsLocation”;
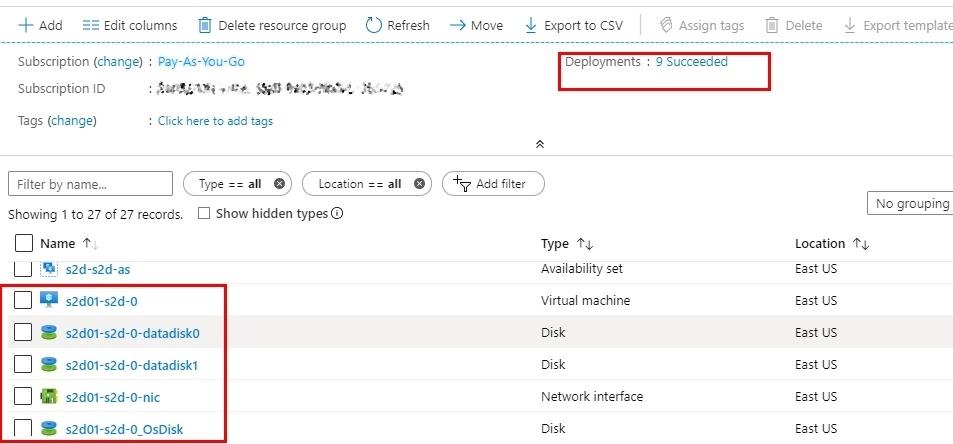
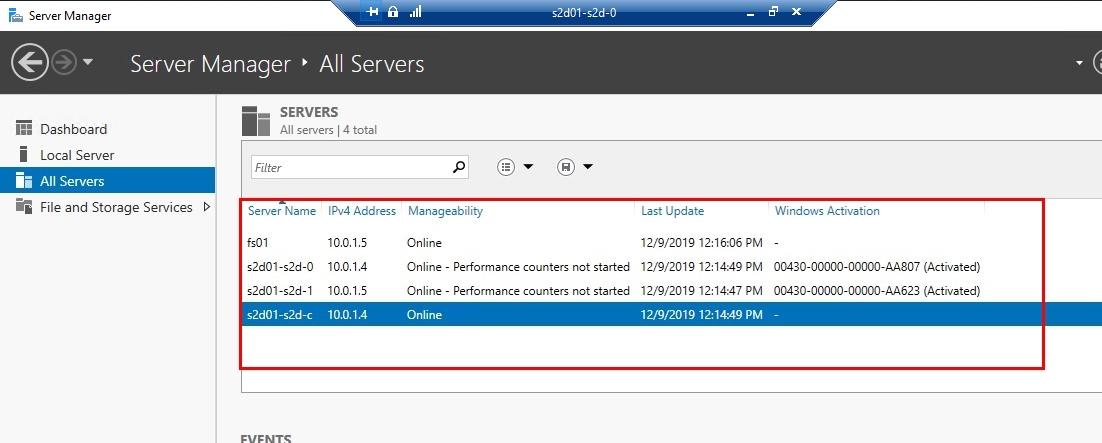
Two VMs with their respective names “s2d01-s2d-1” and “s2d01-s2d-0” will also emerge in the process, as well as the “s2d01-s2d-c.testS2d.net” cluster with all necessary roles and connected disks. You’ll see it all in the screenshots below.
First, sign the Terms and Conditions agreement, then deploy.
Well, the only thing to do now is waiting for the resource deployment to finish. But don’t forget to check whether the resources you need were deployed or not! For this, you merely need to look up the resource group that you have created and see for yourself if the amount of successful installations has increased. Amongst them, there should be the ones with the prefix for the resource group for the S2D cluster.
The next move will be checking one of the created VMs in All servers and the S2D cluster to make sure that the cluster itself, storage, and another VM are alive and well.
Check the cluster manager to look up a few things. It would help you if you saw whether the witness is the Azure cloud, that SOFS role is active and working, and that, eventually, the disk pool is available.
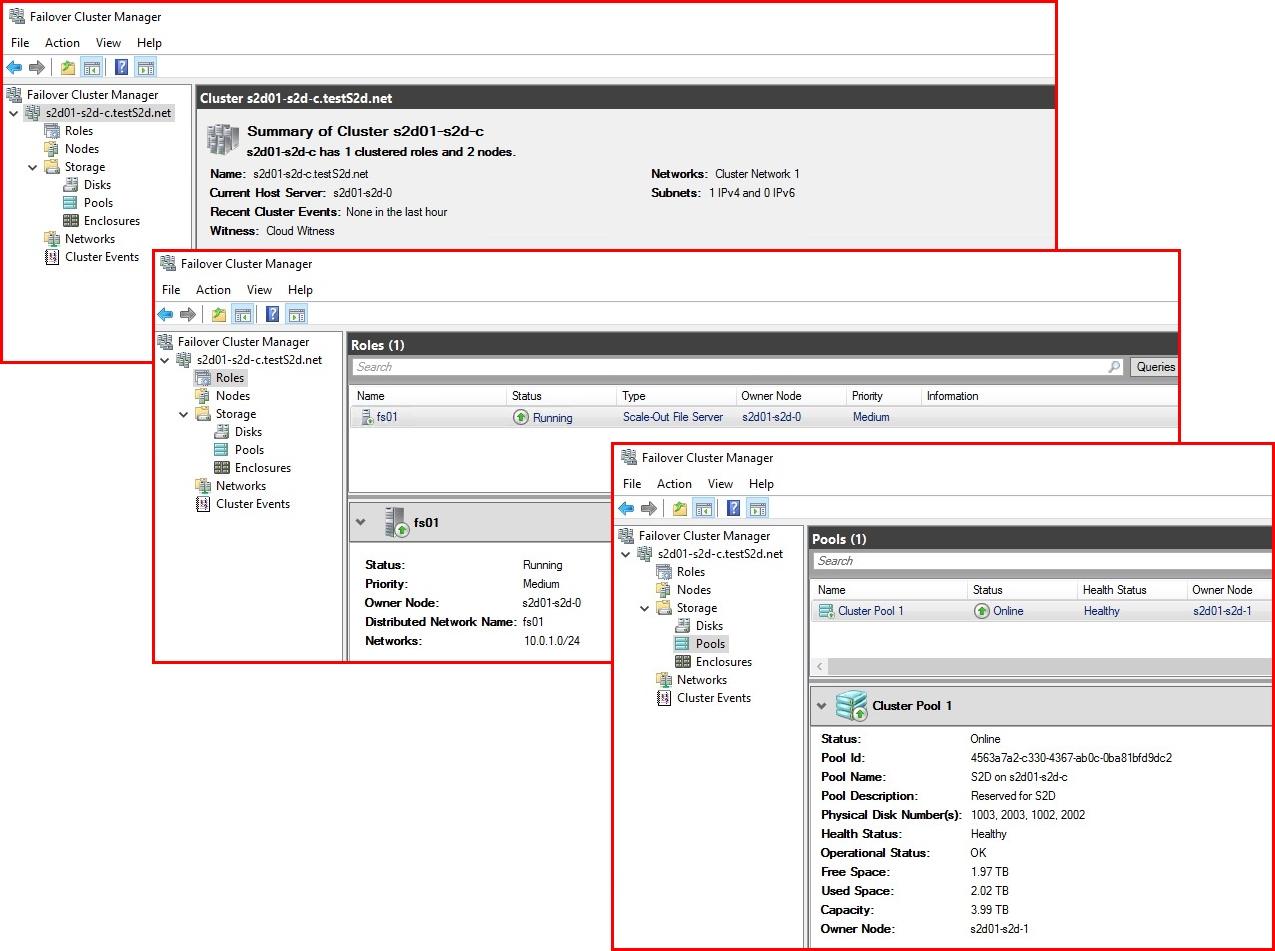
Finally, check if the storage is deployed and available!
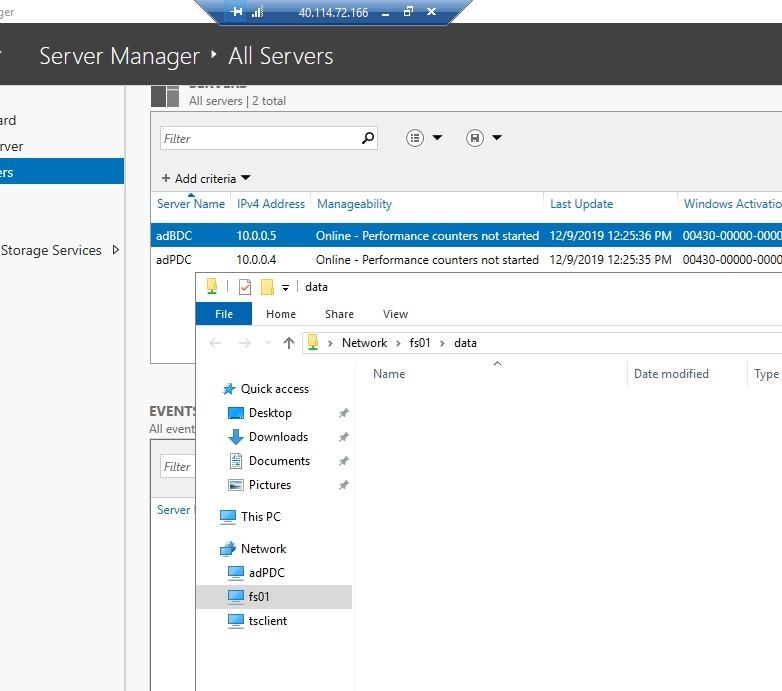
Results must look like this:
That’s all for now!
I also want to express my gratitude to Simon Davies and Keith Mayer for the work they have put into creating these very templates.
RESULTS
In this article, I provided you with a manual on deploying the S2D cluster in Microsoft Azure using Azure Resource Manager Templates. However, I insist that you pay the utmost attention to the following:
- The given article under no circumstances should be perceived as direct instruction for deployment. Materials below are for educational and informational purposes only and may not correspond to your specific situation;
- If you decide to proceed with deployment using Azure Resource Manager Template, please, don’t forget to check the listing of this template on GitHub in general, and on Azure in particular by clicking on Edit template. There’s always a chance of complications for your infrastructure specifically;
- In case of deploying more than one template in one resource group, be sure to use the name and parameters of the first one for the next ones;
- Don’t jump into the bulk deployment of the VMs! Try 2-3 at one time to define the most appropriate size based on the workload requirements. That way, you’ll be able to set a necessary size on your own;
- After you are done with the VM from the template, you can add disks in it and fix their sizes as well;
- Using templates saves you tons of time.
I hope this short instruction will come in handy!


