The past month has been categorized as something of a performance and upgrades challenge as one of the constant calls I hear is “application X is going to slow”, of course, a month ago it was fine but today it isn’t and normally this is just down to increasing load.
One of the common fixes for increasing load is to add more vCPU and RAM but often that can cause its own set of problems especially when NUMA boundaries are crossed and when vCPU contention pushes things a little too far.
The second part of the challenge is the upgrade challenge where various applications need upgrading but there are dependency chains to take into account, this is the sort of thing where application X needs a very specific version of application y. In those cases, an upgrade is much easier to do by reinstalling the OS and starting again then transferring the data across!
As a potential solution to these issues that I’ve been exploring is Docker on VMWare’s Photon OS.
So, what is Photon OS? In short, it’s a Linux distro that has been created and released by VMware specifically to run on ESXi.
VMWare has made various tweaks to the OS to make it more performant on ESXi than more traditional Linux distro’s. It’s very quick to install, very lightweight and comes with the Docker engine included by default even in the minimal installation as its main purpose is to run Docker containers.
Photon OS is very lightweight and also very quick to install which makes it a very nice OS for rapid deployment tasks as you can be guaranteed that the core of the OS will be available very quickly. As you can see from the screenshot above, my lab installation which is not on the fastest hardware completed in just 95 seconds.
Photon may be at version 1.0 but it’s important to know that VMWare is committed to this OS. The vCentre 6.5 Appliance is all built on Photon OS.
Installing Photon is very easy, it’s just a matter of connecting up the ISO file, booting from it, hitting install and then selecting the type of install. I’ve not yet looked at scripting and PXE type deployments this but I don’t expect that it will be too difficult to do.
Once Photon is installed then it looks just like any other minimal Linux install. It’s based on the RedHat 7.x standards so Systemctl controls the services. A nice security feature is that root is disabled from the very start. I’ve not yet tried out SSH keys as a login method for this OS but as it’s RedHat based I also expect that to work pretty much the first time.
Photon also features TDNF which is a YUM Compatible installer, DNF being the future replacement for YUM (DNF standing for ‘Dandified yum’ and TDNF for ‘Tiny Dandified yum’!).
Of course, whilst it’s perfectly possible to use TDNF to install common applications such as apache or nginx, the real power in Photon is with Docker due to dockers inherent application portability.
If you’ve not used Docker then it’s important to know that Docker has three components:
The Repository – This is there the Docker Images are stored, think of it as a nothing more than a remote file share.
The Image – This is the application image that you pull to run the application, think of it as a template customized software installer.
The container – This is where the application actually runs. When you’ve pulled the image from the repository, you “spin up” the container from that image.
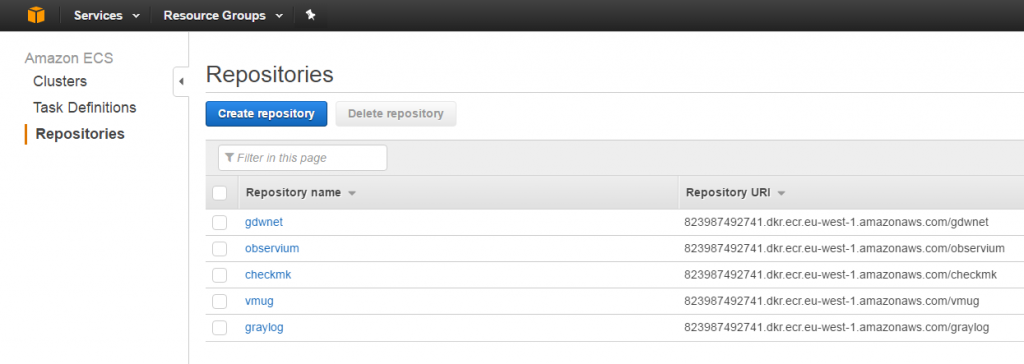
I’ve been using the AWS Docker repository feature to host my own Docker images, the reason for this is simply that with Github I’m only allowed a single private repository and, at the moment, my Docker images are still very basic and are large development and test images that I really don’t want anyone to pull down and wonder just what the hell I was doing!
AWS gives me the ability to push my images to a private location which I can then open up if I wish to. The costs of doing this are just in the disk space that’s used up so with the tiny sizes of images that I’m playing with its really just pennies and it provides for a nice location to experiment. The AWS CLI is required to get the password for the AWS Docker repository.
 One image I’ve got stored at AWS is a very basic apache container, this was created on a CentOS install using the Docker-CE engine, this is the recently released community edition of Docker.
Accessing the AWS repository was just a matter of using the ‘docker login’ command.
Once I was logged into the repository, all I had to do was a ‘Docker pull’ of the image and a ‘Docker start’ had the CentOS based web server up and running.
I’ve heard a lot of people say that “Docker is just another type of Hypervisor” and I used to think this as well until I really started exploring what Docker was and how it worked. While it’s true that yes, the Docker engine acts in a very similar way to how a hypervisor works, the actual concepts are fundamentally different as conterisation puts all of its focus on the application.
If you’ve never used Docker, I’ll run through a small example of how it works
With a traditional VM, you’d deploy the VM perhaps from an image, allocate an IP address or reserve one in DHCP, install patches, install the required software, add the server to backups and finally, you’re able to use the server.
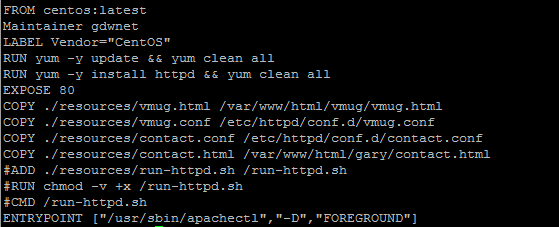
With Docker, there is a time required in making the container by using a Dockerfiler which is basically a simple scripting language. This language uses directives to tell the image what it needs to look like. Once this image has been built it can be deployed on any server that hosts a Docker engine with a simple “docker pull/docker start” combination and this is where the power of Docker really comes into its own and it’s where scale up and scale down become truly possible.
This is the Dockerfile for my test apache image which just has a few HTML pages.
Docker is designed to be stateless, f you stop a container then restart it any changes that have occurred in that container will be lost. This is very important to understand and I know that when I first started using Docker I wondered what the point of this would be, after all, if the data is lost on shutdown, what about things like databases? This is where part of the Docker build scripting language comes in to play. 99% of an application is something that can be thrown away. It’s just things like apache config files or MySQL databases that can’t because those are things that contain the data you care about and even with apache config files, those rarely change but what about MySQL which potentially could see a high rate of data change. In this case, the dockerfile again comes to the rescue as it has the ability to mount a folder from the hosts file system and so with applications like MySQL, it’s simply a matter of telling Docker to put the databases in the folder that is actually mounted to the container hosts file system. This allows the container to host the MySQL application but also makes sure then when the container
Photon, Docker and the recently released vSphere Integrated containers are all tools that I will be exploring in more depth over future articles and as I convert my various hosted instances to Docker containers. As you may be able to tell, I’m something of a fan of the containerised approach to software deployment.
I do believe that over time we’ll see more applications offered as containers that can just be pulled into a distro as it is a much easier software deployment approach than traditional installers.


