


Introduction
There are two ways to backup your Azure Virtual Machines: First method is using the Azure Backup service in order to backup Virtual Machine periodically based on a backup policy. The Azure Backup service backs up data from on-premises machines, and Azure VMs. Data can be backed up and recovered at a granular level. Second method is creating VM disk snapshots in order to backup a disk manually. It is great when you try to backup a VM for which Azure Backup can not be used.
In this article, I will explain the second option in order to automate the process of creating disk snapshots using PowerShell.
Creating Azure Runbook
In this article, I will create daily snapshots of the disks which have associated tagname ‘Snapshot’ with tagvalue ‘True’. First, we have to create the tag on the Virtual Machines that must be snapshotted. Open the Azure Portal, navigate to the Virtual Machine blade and ‘Tags’:

Now, we can create the Runbook from the Azure Automation blade. If you don’t already have an existing automation account, then create a new one.
Click ‘+ Create a runbook’

And enter the following information:
- Name: It is a friendly name for the Runbook
- Runbook Type: Select PowerShell in this case, but you can select another type if needed
- Description: it is optional, but you can describe the goal of this runbook

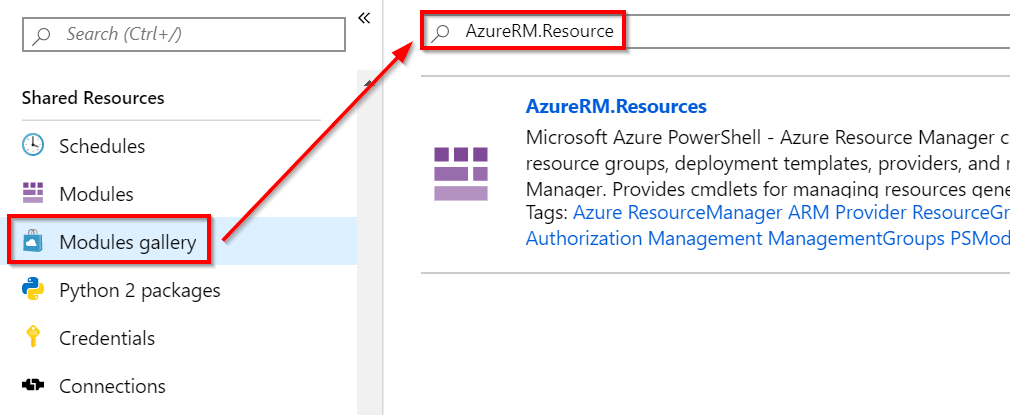
The runbook is created, but before going deeper, we must update the modules. Go to ‘Modules gallery’ and search for ‘AzureRM.Resource’ which is a module we need in the runbook.
In order to import the module, click ‘Import’

Before validating the wizard, select the checkbox in order to update all the modules.

Go back to the ‘Modules’ blade and confirm that the module is available

Now, edit the runbook and copy/paste the following PowerShell code.
$connectionName = "AzureRunAsConnection"

try{

#Getting the service principal connection "AzureRunAsConnection"

$servicePrincipalConnection = Get-AutomationConnection -name $connectionName

"Logging into Azure..."

Add-AzureRmAccount -ServicePrincipal -TenantID $servicePrincipalConnection.TenantID -ApplicationID $servicePrincipalConnection.ApplicationID -CertificateThumbprint $servicePrincipalConnection.CertificateThumbprint

}

catch{

if(!$servicePrincipalConnection){

$ErrorMessage = "Connection $connectionName not found."

throw $ErrorMessage

}else {

Write-Error -Message $_.Exception

throw $_.Exception

}

}

if($err) {

throw $err

}

# Get VMs with snapshot tag

$tagResList = Get-AzureRmResource -TagName "Snapshot" -TagValue "True" | foreach {

Get-AzureRmResource -ResourceId $_.resourceid

}

foreach($tagRes in $tagResList) {

if($tagRes.ResourceId -match "Microsoft.Compute")

{

$vmInfo = Get-AzureRmVM -ResourceGroupName $tagRes.ResourceId.Split("//")[4] -Name $tagRes.ResourceId.Split("//")[8]

#Set local variables

$location = $vmInfo.Location

$resourceGroupName = $vmInfo.ResourceGroupName

$timestamp = Get-Date -f MM-dd-yyyy_HH_mm_ss

#Snapshot name of OS data disk

$snapshotName = $vmInfo.Name + $timestamp

#Create snapshot configuration

$snapshot = New-AzureRmSnapshotConfig -SourceUri $vmInfo.StorageProfile.OsDisk.ManagedDisk.Id -Location $location -CreateOption copy


#Take snapshot

New-AzureRmSnapshot -Snapshot $snapshot -SnapshotName $snapshotName -ResourceGroupName $resourceGroupName


if($vmInfo.StorageProfile.DataDisks.Count -ge 1){

#Condition with more than one data disks

for($i=0; $i -le $vmInfo.StorageProfile.DataDisks.Count - 1; $i++){


#Snapshot name of OS data disk

$snapshotName = $vmInfo.StorageProfile.DataDisks[$i].Name + $timestamp


#Create snapshot configuration

$snapshot = New-AzureRmSnapshotConfig -SourceUri $vmInfo.StorageProfile.DataDisks[$i].ManagedDisk.Id -Location $location -CreateOption copy


#Take snapshot

New-AzureRmSnapshot -Snapshot $snapshot -SnapshotName $snapshotName -ResourceGroupName $resourceGroupName


}

}

else{

Write-Host $vmInfo.Name + " doesn't have any additional data disk."

}

}

else{

$tagRes.ResourceId + " is not a compute instance"

}

}
Publish the Runbook when everything is ok, and then go back to the Azure Automation Account and select Schedules. Click on ‘Link to schedule’.


You can confirm the schedule is created

You just need to wait until the runbook start, then a snapshot will be created

Conclusion
Thanks to Azure Automation, you can very easily and quickly deploy a Runbook to backup a Virtual Machine. You can also automate tasks that you performed manually.
Thanks for reading!
