One problem that I had recently was a full disk that was being used in a MySQL pod. We will see how to upgrade a disk in such a situation in this article.
As prerequisites, you need:
- An AKS cluster
- An Azure-managed disk, in my case, 4Gb
– In the RG where AKS resources are located
– In another RG, with Contributor permissions at the RG level, to the AKS SPN
We will start by creating a persistent volume, linked to our disk:
apiVersion: v1

kind: PersistentVolume

metadata:

name: pv-starwind

spec:

capacity:

storage: 4Gi

accessModes:

- ReadWriteOnce

persistentVolumeReclaimPolicy: Retain

storageClassName: managed-csi-premium

azureDisk:

kind: Managed

diskName: aksDisk

diskURI: /subscriptions/subscriptionId/resourceGroups/Starwind/providers/Microsoft.Compute/disks/starwind-data01
We will now create a persistent volume claim for our application, to use this disk:
apiVersion: v1

kind: PersistentVolumeClaim

metadata:

name: pvc-starwind

spec:

accessModes:

- ReadWriteOnce

resources:

requests:

storage: 4Gi

volumeName: pv-starwind

storageClassName: managed-csi-premium
These 2 resources are created:
For PV and PVC, it is very important to use a storageClassName that allows you to dynamically extend the volume size: https://docs.microsoft.com/en-us/azure/aks/concepts-storage#persistent-volumes
Otherwise, you will need to delete the PVC/PV and recreate them.
You can use pre-created classes or create your own. The important parameter here is allowVolumeExpansion which must be set to true.
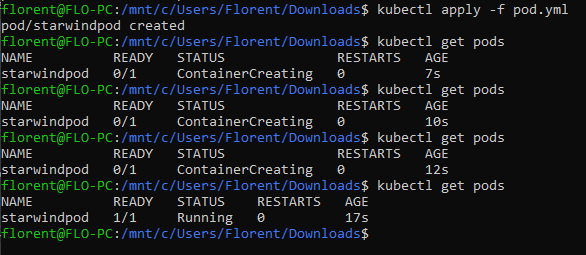
We will now deploy a pod, with the PVC attached:
apiVersion: v1

kind: Pod

metadata:

name: starwindpod

spec:

containers:

- image: nginx:latest

name: starwindpod

volumeMounts:

- name: azure

mountPath: /mnt/azure

volumes:

- name: azure

persistentVolumeClaim:

claimName: pvc-starwind
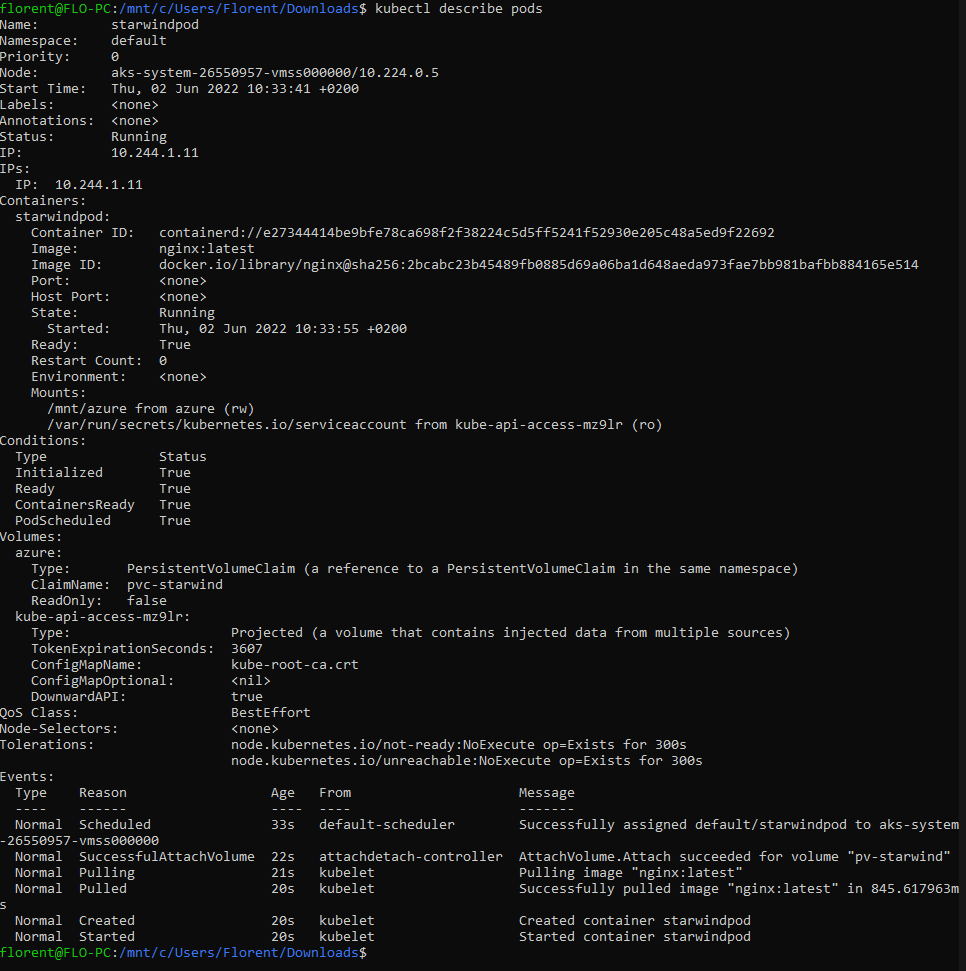
We can see that the volume has been attached, in Mounts part:
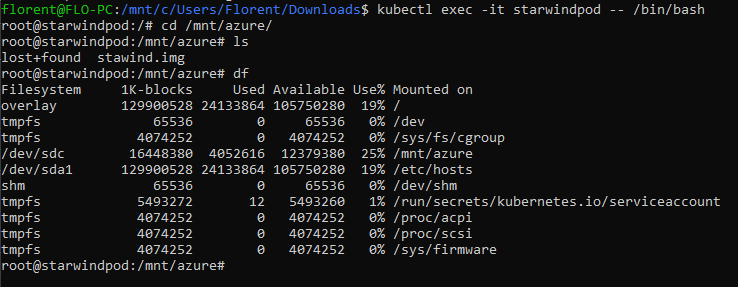
The first thing, we will connect to the pod to see if the folder has been mounted correctly:
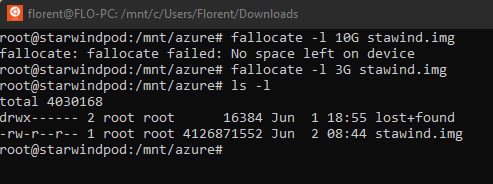
And next, we will create a file inside for the demo:
We can see with the df command the size of the volume and the space used. As you can see, there is no more space left:
We will now increase the size of our disk. To do this, you need to delete the pod, detach the volume and then increase it:
You can resize it through the portal or through CLI/PowerShell:
Update your PV/PVC with new values:
apiVersion: v1

kind: PersistentVolume

metadata:

name: pv-starwind

spec:

capacity:

storage: 16Gi

accessModes:

- ReadWriteOnce

persistentVolumeReclaimPolicy: Retain

storageClassName: managed-csi-premium

azureDisk:

kind: Managed

diskName: aksDisk

diskURI: /subscriptions/ce6d976b-5197-4ae5-8467-173ddf912b64/resourceGroups/Starwind/providers/Microsoft.Compute/disks/starwind-data01

---

apiVersion: v1

kind: PersistentVolumeClaim

metadata:

name: pvc-starwind

spec:

accessModes:

- ReadWriteOnce

resources:

requests:

storage: 16Gi

volumeName: pv-starwind

storageClassName: managed-csi-premium
You can now recreate the pod and see that the volume has now more disk space available:
By using an Azure-managed disk, you will have downtime when you extend the disk. If your application must enjoy High Availability (HA), you should use Azure File Share, like this, so that the auto-extend is easier.


