Hi, guys, I finally managed to finish an article on deploying VMware vSAN on the nested ESXi hosts. Some had difficulties with setting up the networking for this scenario, so here’s a guide on this matter from me!
Toolkit
Today, I used the host from my previous article. It’s my old PC that has the following specs:
- Intel® Core™ i7-2600 CPU @ 3.40GHz (CPU);
- Gigabyte Z68X-UD7-B3 (Motherboard);
- 24 GB (RAM);
- 2 x 1TB (HDD);
- 1 x 1 Gb/s RTL8111E (LAN);
- 1 x 1 Gb/s Intel® PRO/1000 PT Dual Port Server Adapter (LAN).
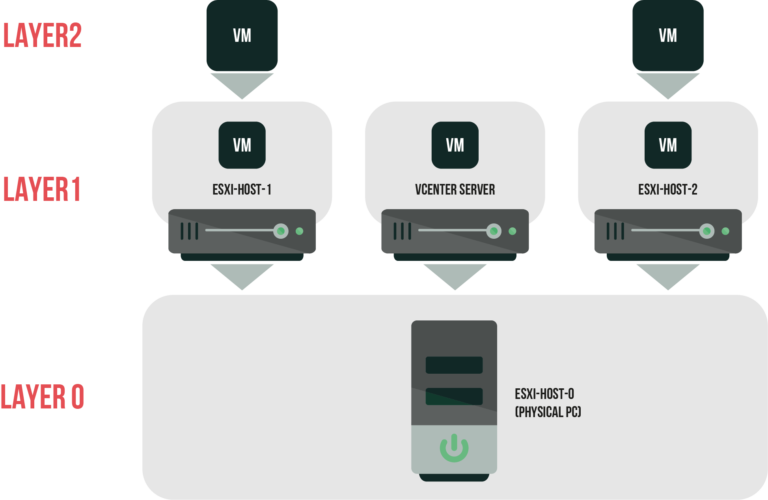
Well, that’s a good PC, but it seems a way too slow to be called a good server. Nevertheless, until it can be an ESXi host (I named it ESXi-HOST-0), I am OK with that gear. The physical host shares resources among 2 virtual ones that are deployed as VMs. I decided to change their configurations a little for this article:
- 8 x Intel® Core™ i7-2600 CPU @ 3.40GHz (CPU);
- 1 x 8 Gb (RAM);
- 1 x 20 GB (HDD);
- 1 x 40 GB (HDD);
- 1 x 255 GB (HDD);
- 1 x VMware Paravirtual (SCSI controller);
- 3 x 10 Gb/s (VMXNET 3 LAN).
Now, let’s discuss ESXi 6.7 virtual hosts’ configurations briefly. Each VM has 3 disks: 20GB (ESXi resides there), 40GB (VMware vSAN cache tier), and 255 GB (the capacity tier). I reserved 255GB for that virtual disk based on vSAN storage requirements to avoid the cluster-check warning.
Apart from 2 virtual hosts used to run VMs, there is the 3rd one where vCenter Server is installed. I won’t stop on installing vCenter Server here. You can find all the necessary information in my previous post. Here are the properties of that host:
- 2 x Intel® Core™ i7-2600 CPU @ 3.40GHz (CPU);
- 1 x 4 GB (RAM);
- 13 x HDDs. The overall capacity: 280 GB;
- 1 x VMware Paravirtual (SCSI controller);
- 1 x 10 Gb/s (VMXNET 3 LAN).
I often do not recommend using thin provisioned disks; today, though, I use them to save some storage.
Note that there are some configuration restrictions for vSAN in the 2-node scenario. This means that you may need to create more virtual hosts or deploy a vSAN witness node to try out some things in your lab. Regarding these limitations, I discuss here only some key moments of cluster configuration with a specific focus on setting up networks.
Setting up the bare-metal host
To start with, let’s configure everything for the Layer 0 host. First, I created 2 Datacenters:
- Datacenter – I use it only for the bare-metal host (ESXi-Host-0).
- Dc-Test – I use it for virtual hosts (ESXi-Host-1 and ESXi-Host-2) and vCenter Server VM. I’m going to create this Datacenter a bit later.
Long story short, at this step, I’m going to discuss how to assign NICs to both virtual hosts via virtual layer (i.e., virtual switches, port groups, and VMkernel adapters).
Setting up the standard switch
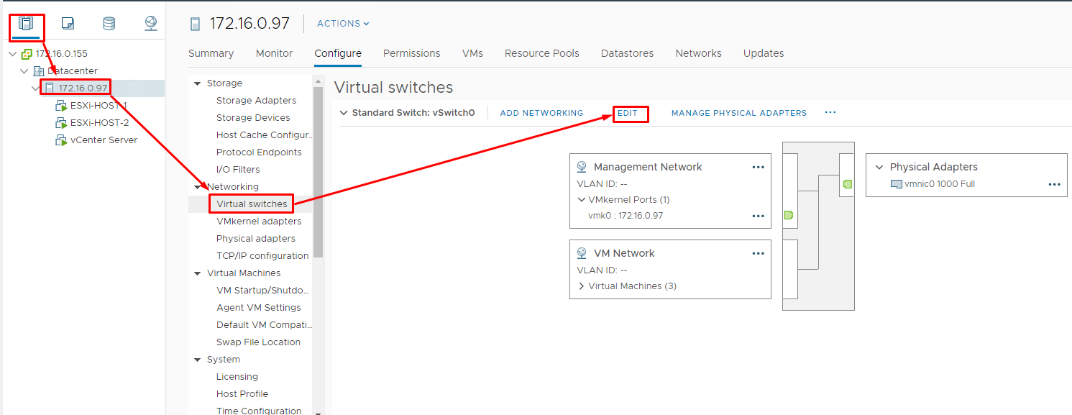
To begin with, set up the standard switch (vSwitch0) that is created by default during ESXi installation. This virtual switch will be the starting point for building the virtual network (management and networks for VMs in Layer 2).
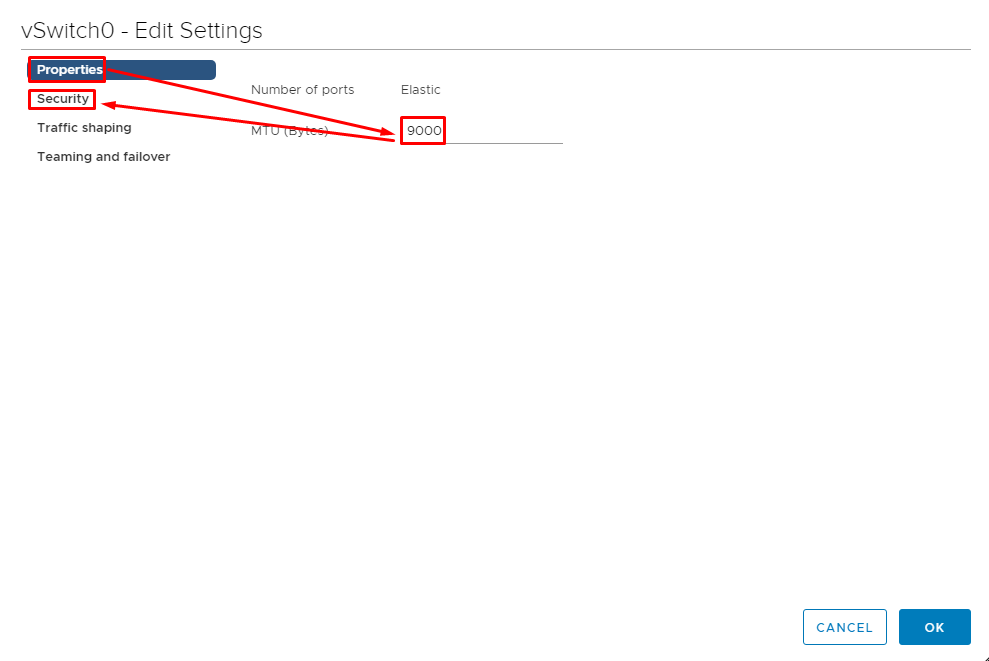
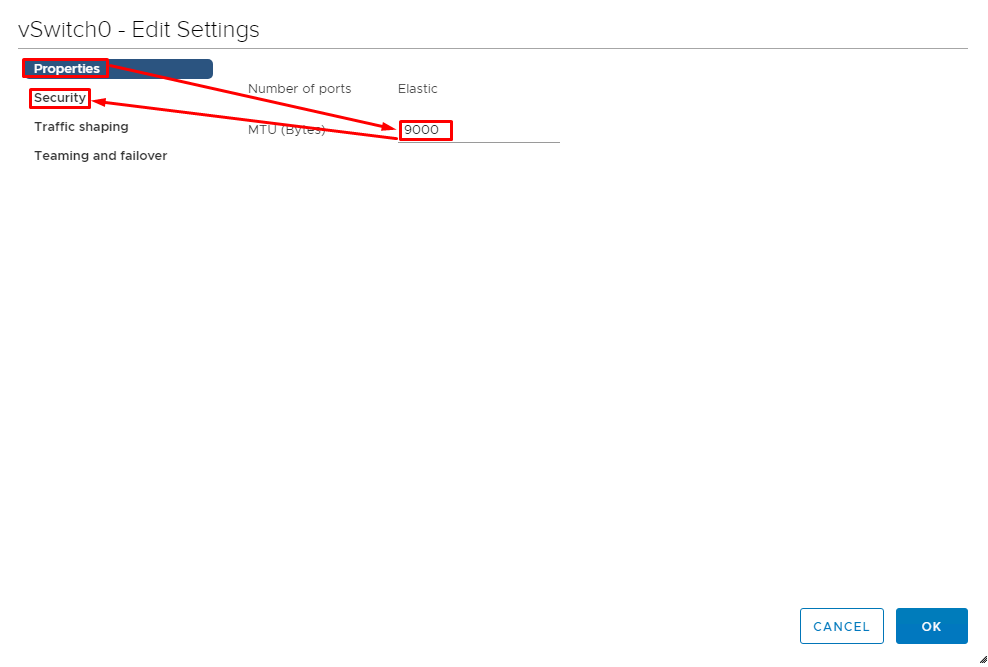
In order to improve the network efficiency, it is necessary to increase the amount of payload data transmitted with a single packet: VMs in Layer 2 talk in large blocks. So, go to vSwitch0 settings to set MTU value to 9000 (i.e., enable jumbo frames).
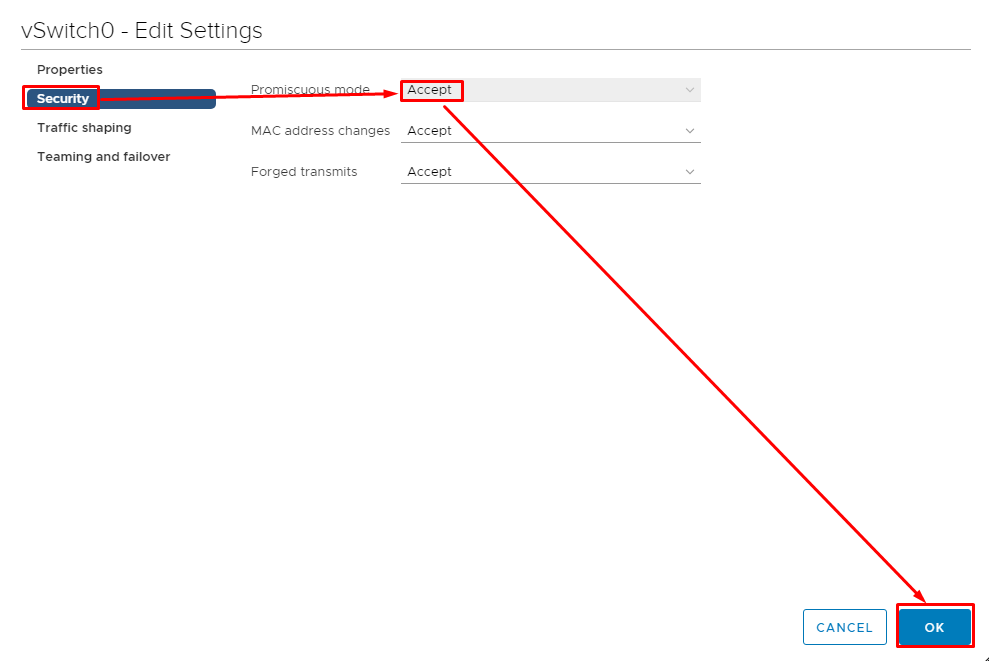
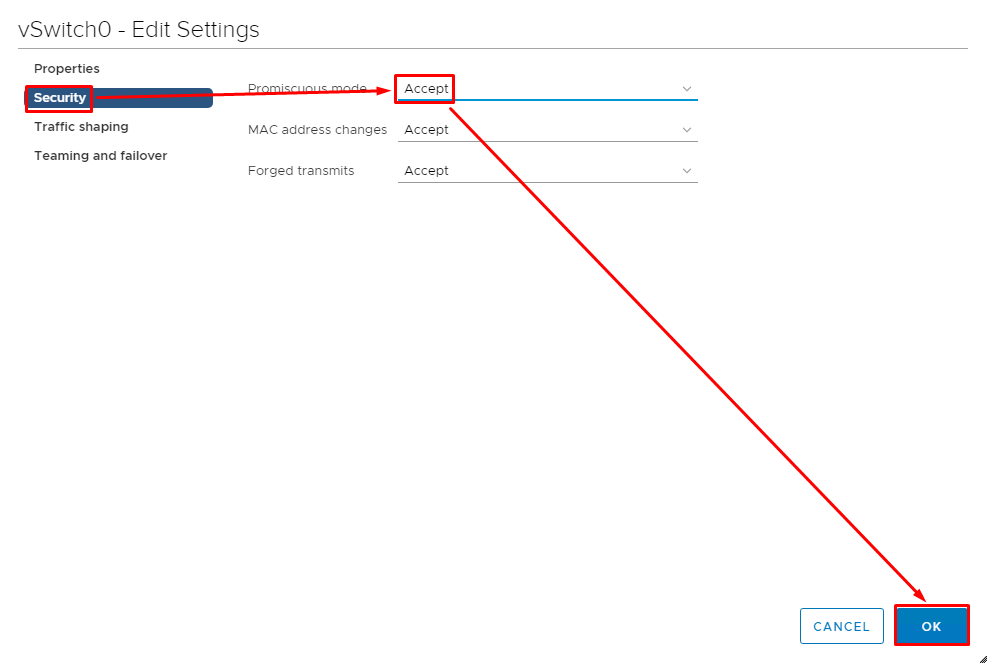
Also, don’t forget to enable promiscuous mode in vSwitch0 security settings. Otherwise, the switch won’t allow for any traffic between VMs.
Afterward, create 2 more vSwitches to distinguish somehow vMotion and vSAN traffic from everything else. Add 1 more port group to each switch.
Creating the port group for vSwitch0
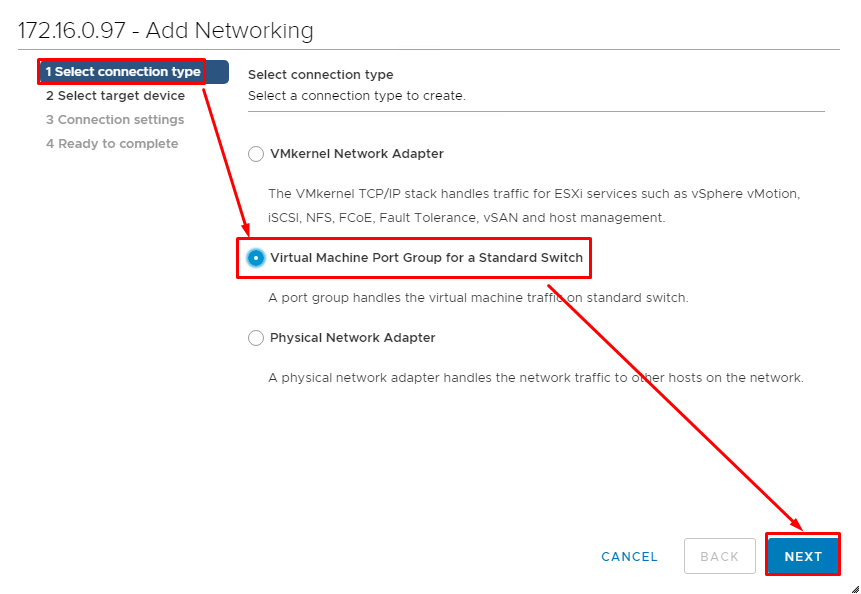
Create a new VM port group.
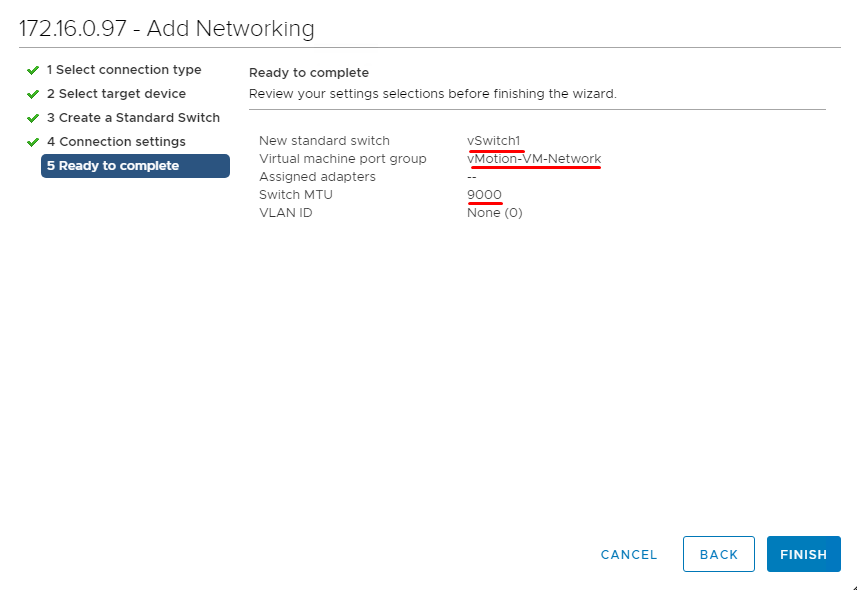
Add that port group to the standard switch and set MTU value to 9000.
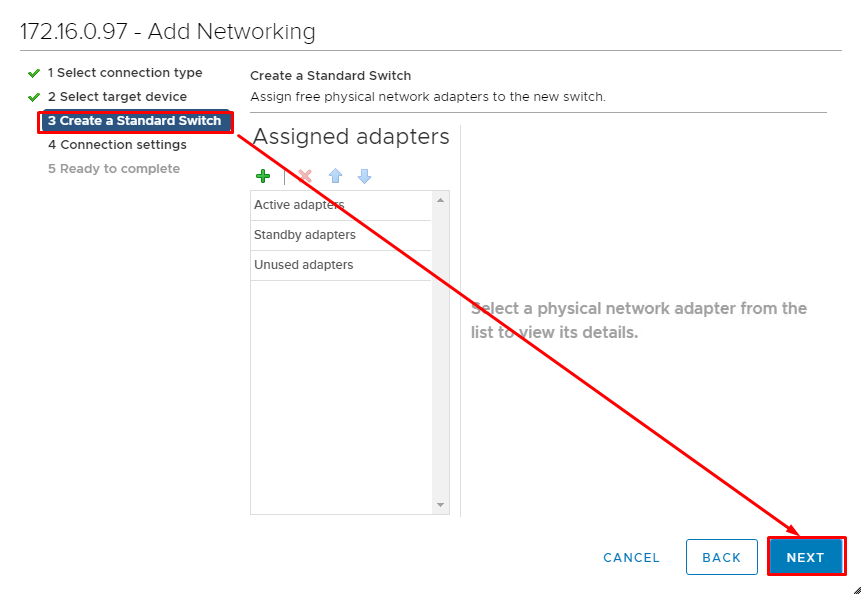
At the next step, I just pressed Next. There’s no point to add and configure the physical network adapter because there will be no outbound traffic from the bare-metal host.
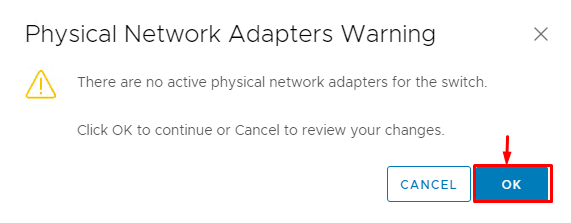
… but the Add Networking wizard doesn’t get it. Just click OK.
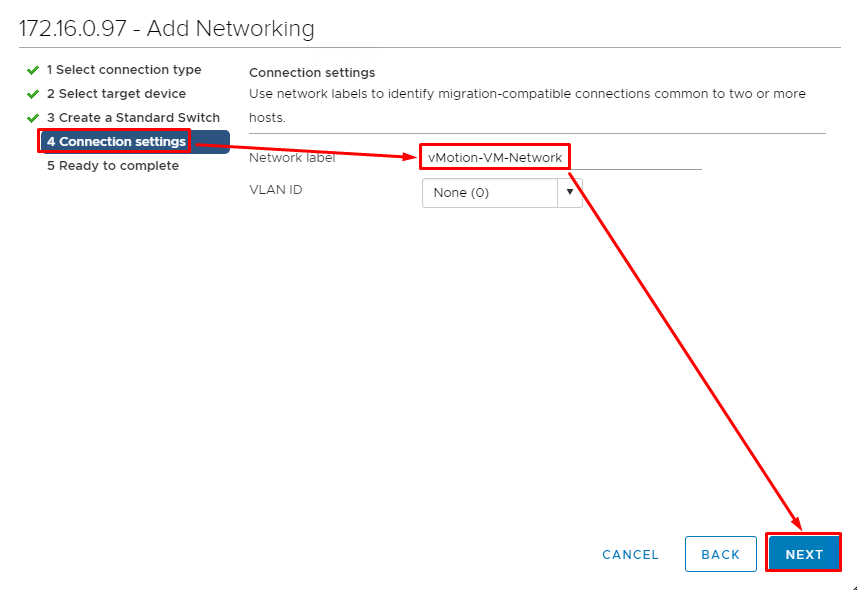
Specify the port group name.
Review the settings and finish the wizard.
Configuring virtual switches for VM network
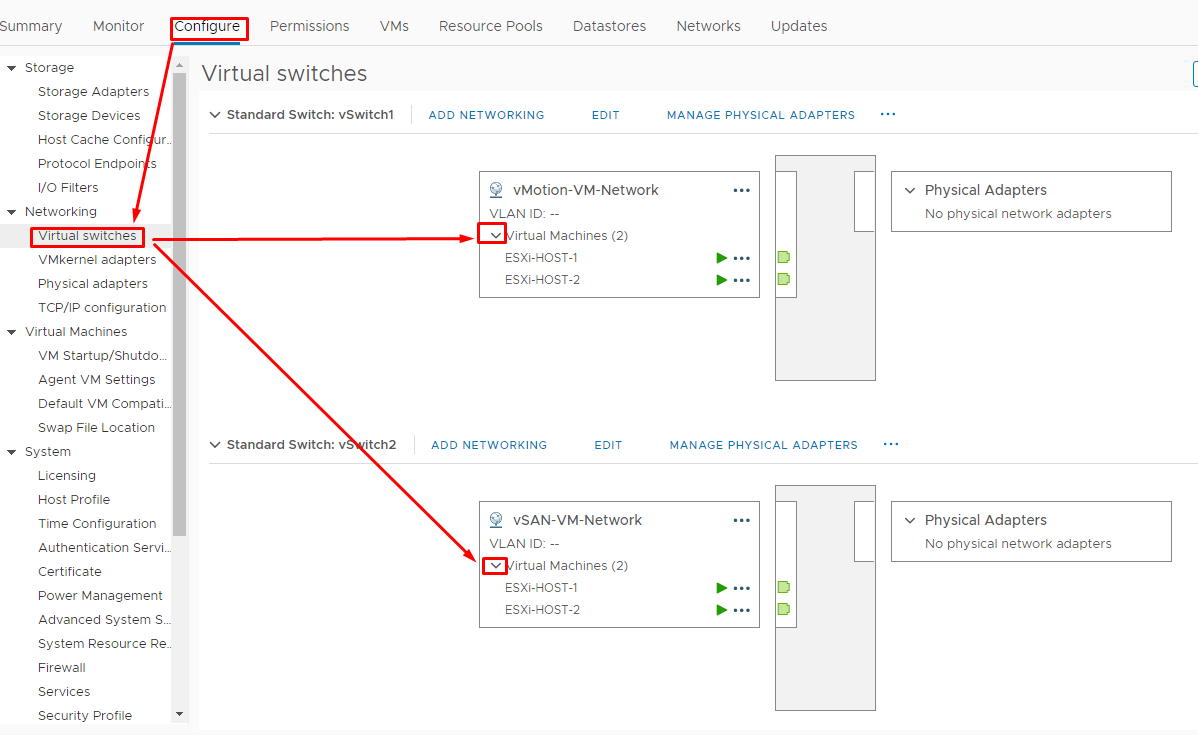
Configure one more virtual switch and add a port group to it. For convenient management, it is necessary to separate vMotion and vSAN traffic (that’s why you need 2 switches!). Here’s how I called those vSwithces:
- vMotion-VM-Network – vMotion-only traffic (vSwitch1);
- vSAN-VM-Network – vSAN-only traffic (vSwitch2).
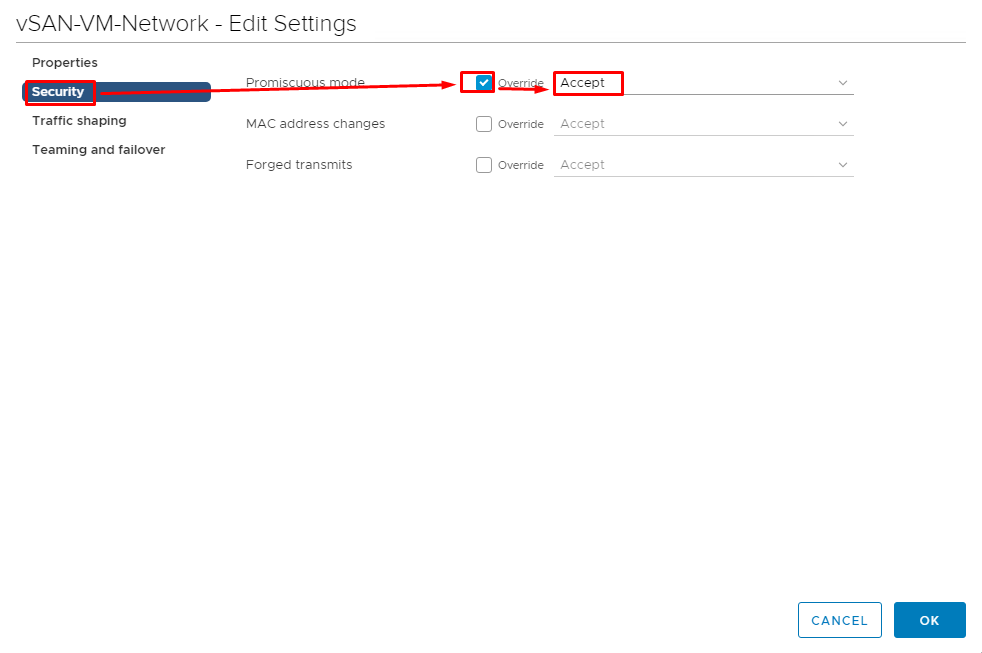
Enable promiscuous mode for both virtual switches.
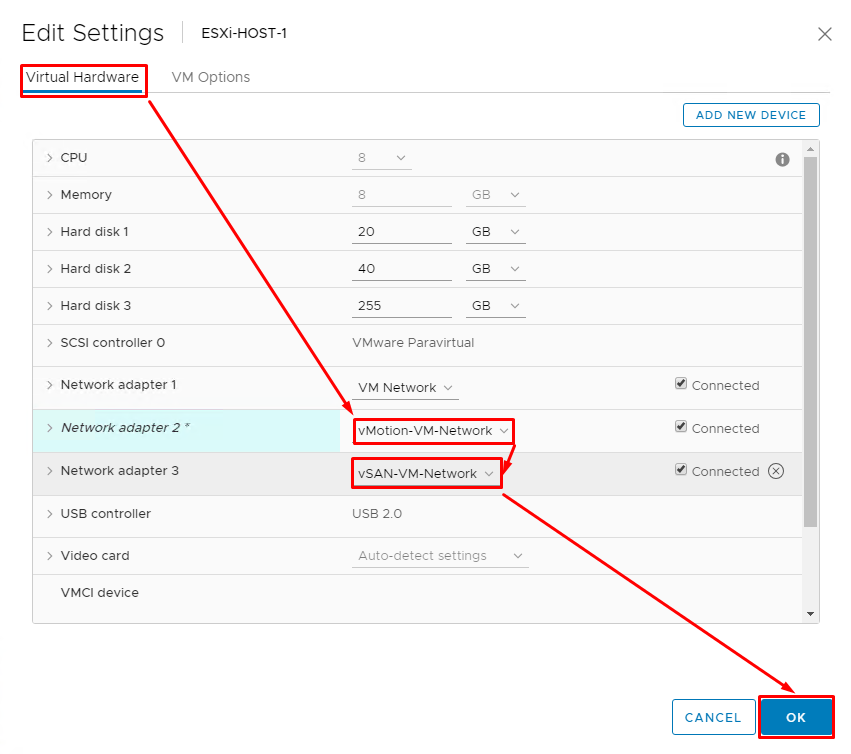
Add virtual network adapters to both virtual hosts and assign them to the recently created networks (port groups).
Now, virtual hosts are connected with 10 Gb/s network.
One more time, don’t forget to double-check whether MTU is set to 9000 and the promiscuous mode is enabled for all port groups.
Configuring networks between virtual hosts
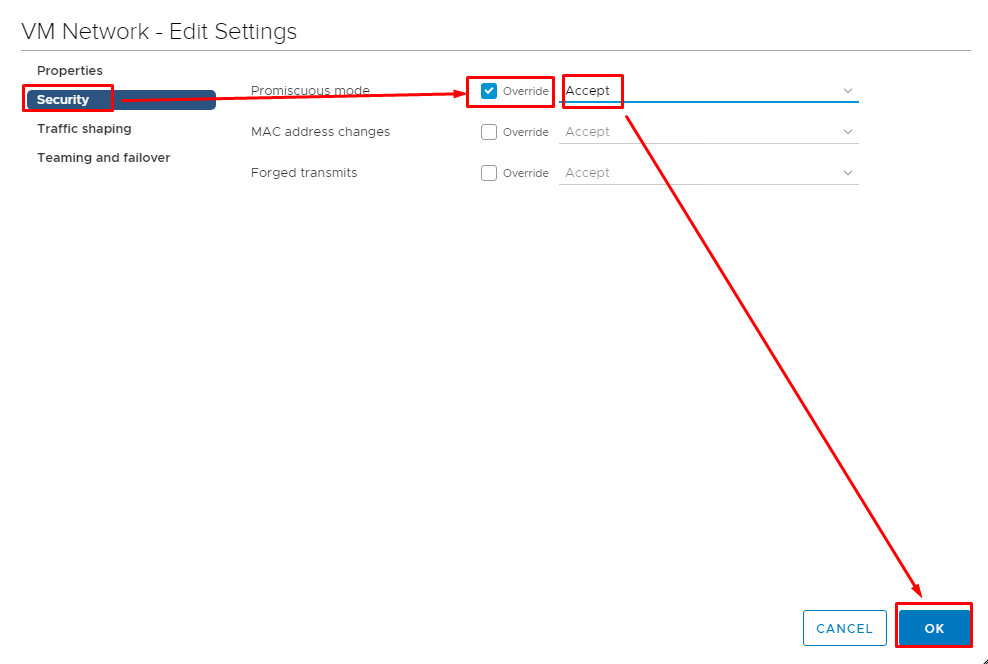
Now, let’s configure networking between the virtual hosts: ESXi-HOST-1 (172.16.1.4) and ESXi-HOST-2 (172.16.1.5). First, add both hosts to the Dc-Test Datacenter (in my case, addresses were obtained from DHCP). Afterward, edit VM Network settings.
Enable promiscuous mode.
On each virtual node, edit vSwitch0 settings.
Set MTU to 9000.
Enable promiscuous mode for vSwitch0.
Configuring VMkernel adapter
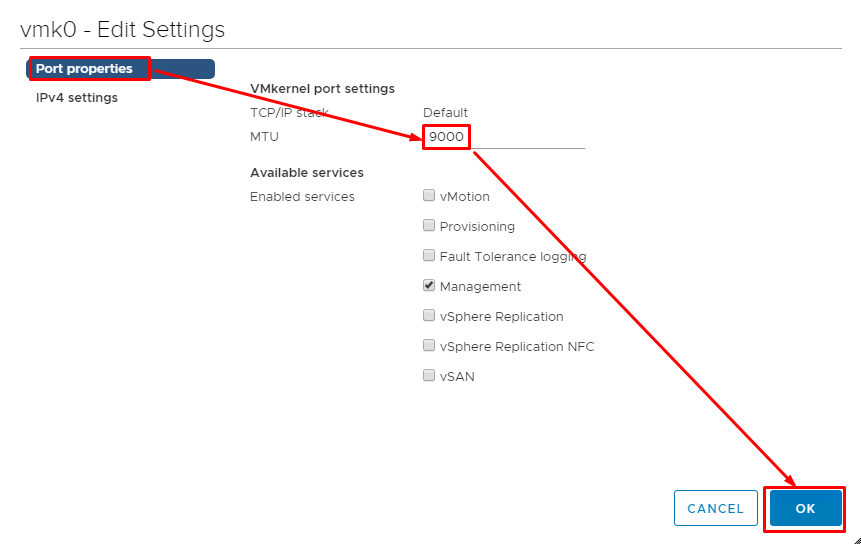
Set up VMkernel adapter next. This adapter allows connecting virtual hosts in Layer 1 with VMs running in Layer 2.
Set MTU to 9000.
Repeat the whole process for another host (172.16.1.5).
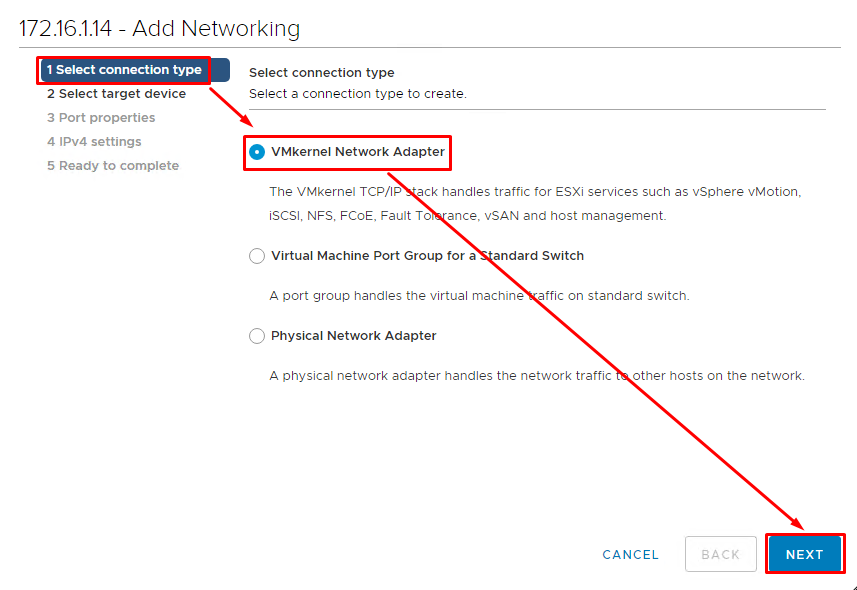
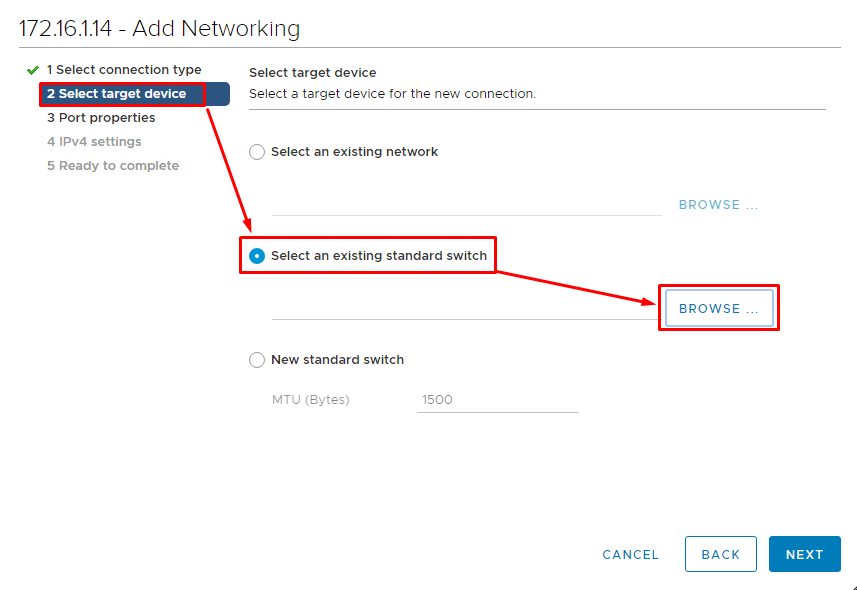
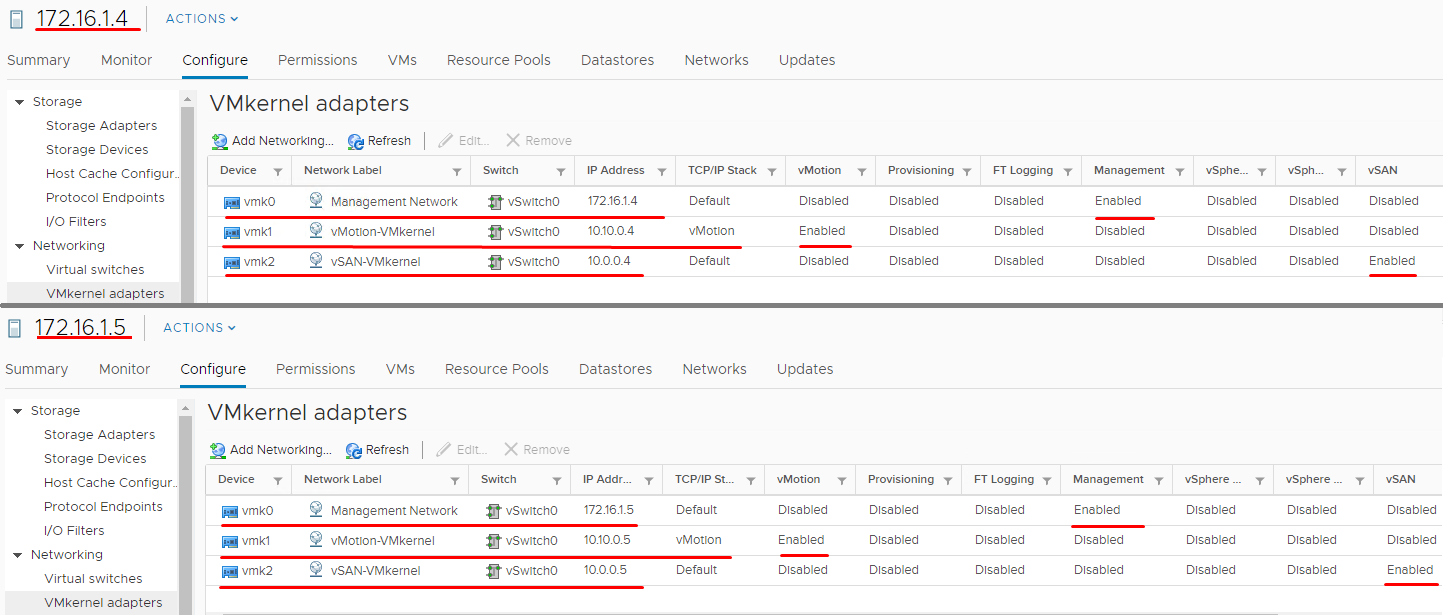
Now, create 2 VMkernel adapters on each virtual host. Add them to standard virtual switches on each host (vSwitch0). Make sure that you specified the same adapter names for each host to avoid any connectivity problems.
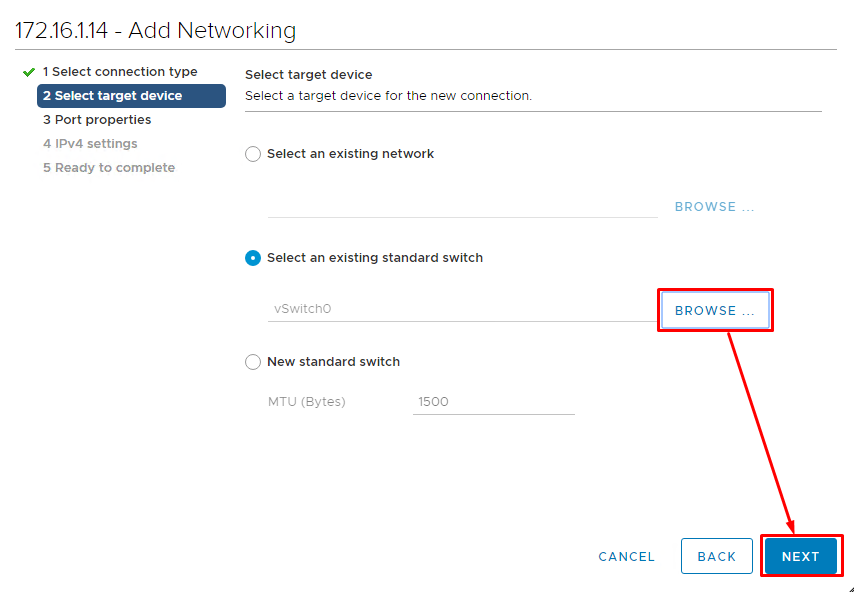
Create one more adapter for vMotion (vMotion-VMkernel) per host.
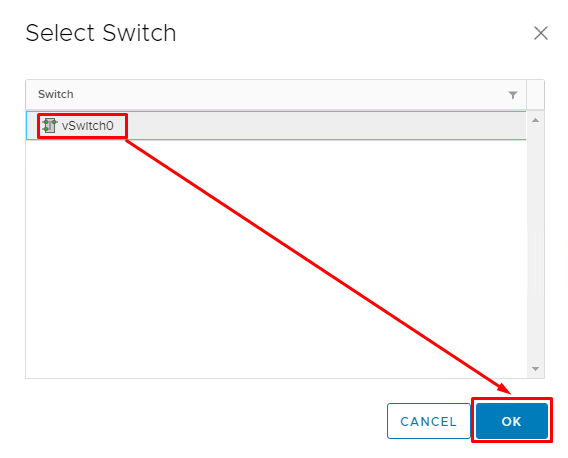
Connect those adapters to the standard switches (vSwitch0 on each host).
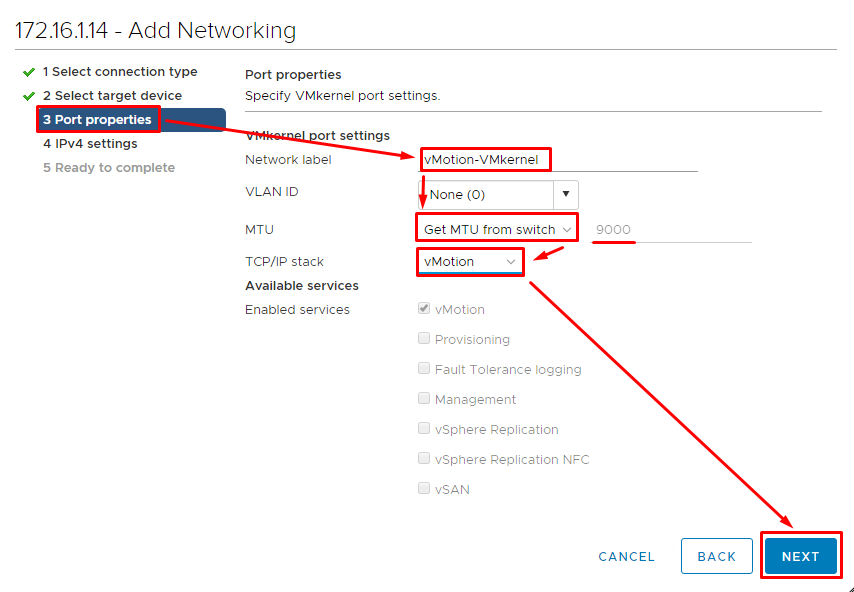
Enter the network label and set MTU to 9000 and select vMotion as the TCP/IP stack option.
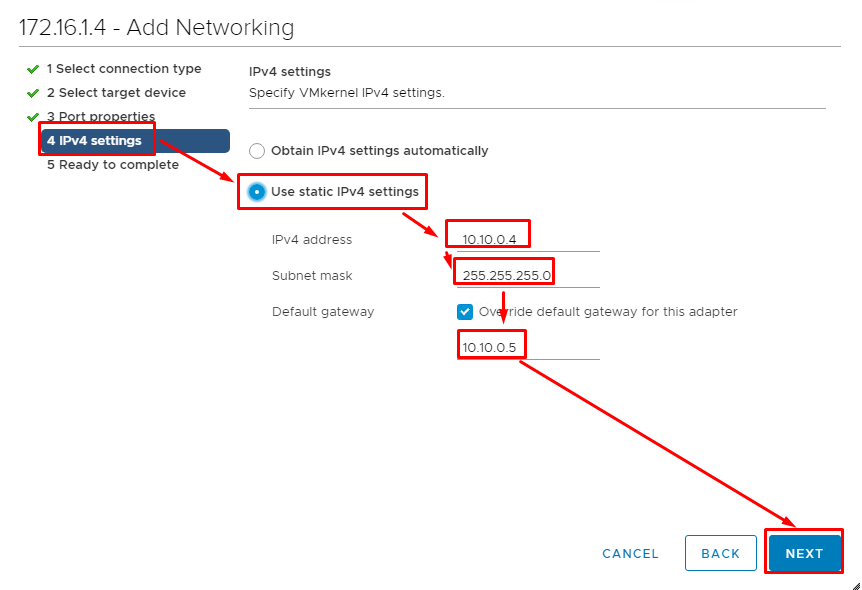
In IPv4 settings, enter 10.10.0.4/24 for IP. Use another host as a gateway (10.10.0.5). While setting everything up for 172.16.1.5, consider ESXi-HOST-1 settings.
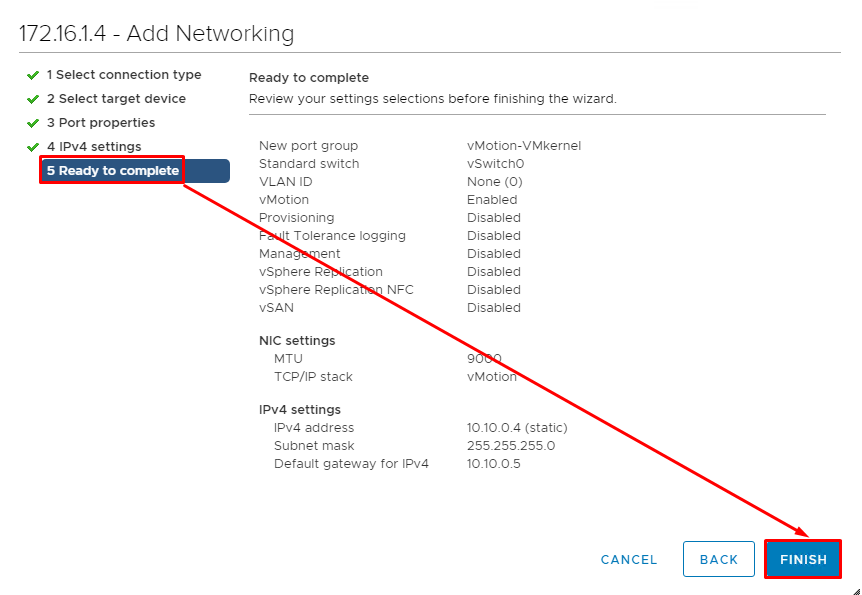
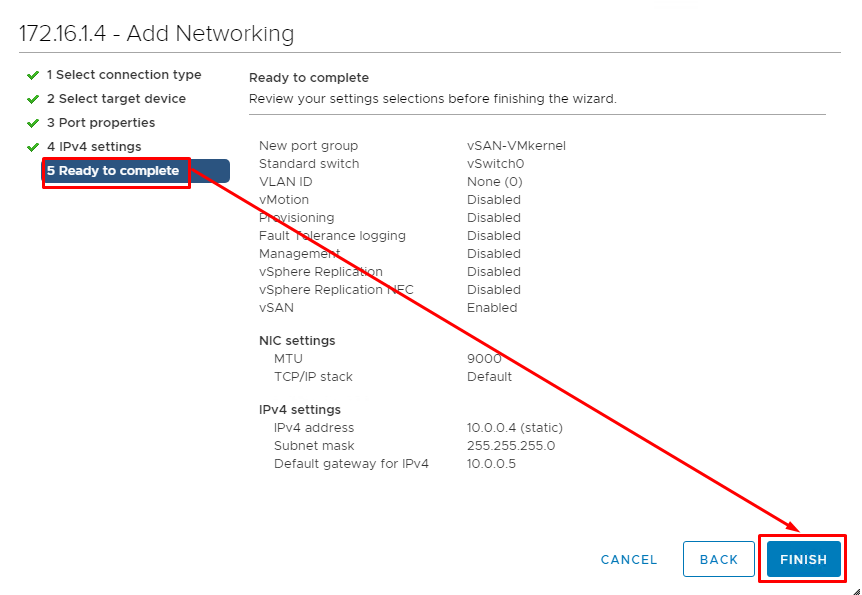
Review the settings and click Finish to create the network.
Next, create 2 vSAN-VMkernel adapters on each host.
And, here’s the configuration you’ll get on each virtual host.
Creating a vSAN cluster and adding hosts to it
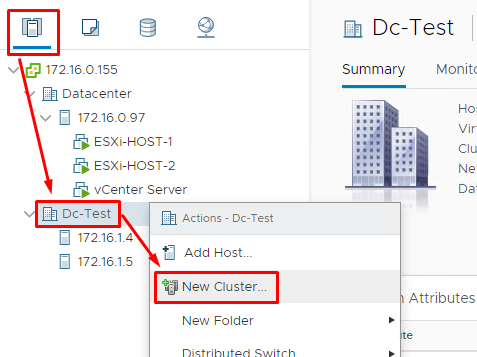
Create the cluster in the Dc-Test datastore.
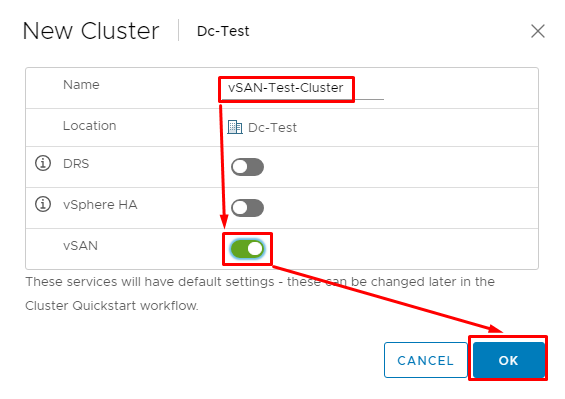
Specify the name for vSAN cluster and enable the vSAN cluster feature itself.
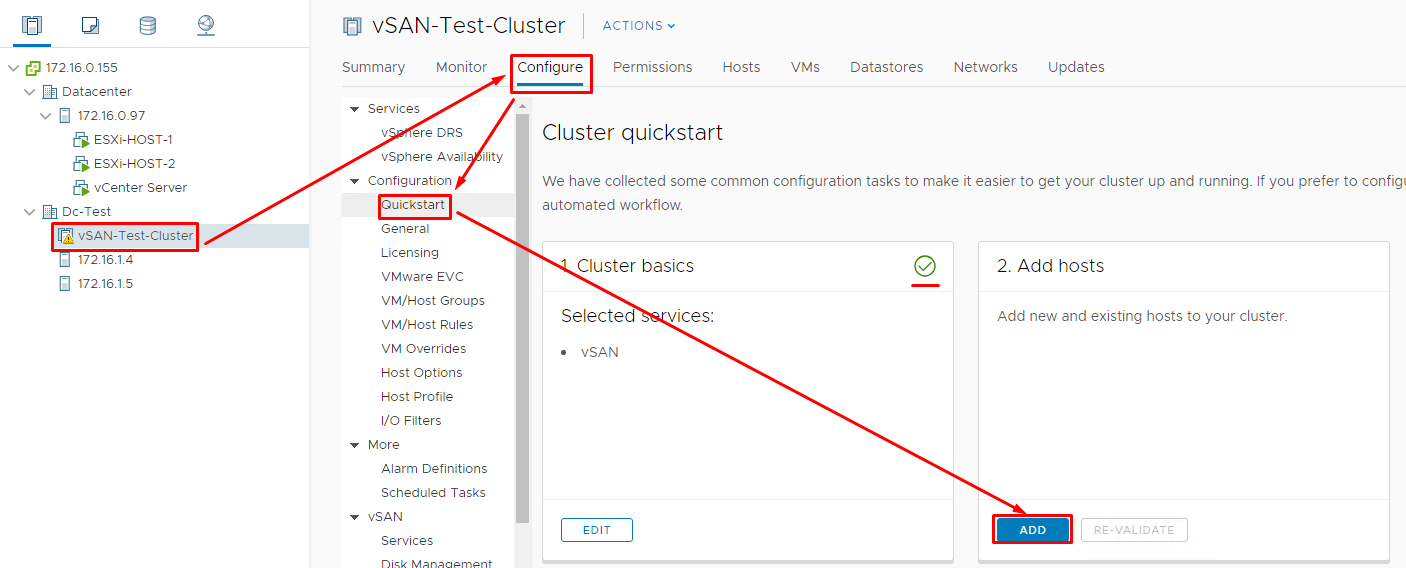
Add hosts to the cluster.
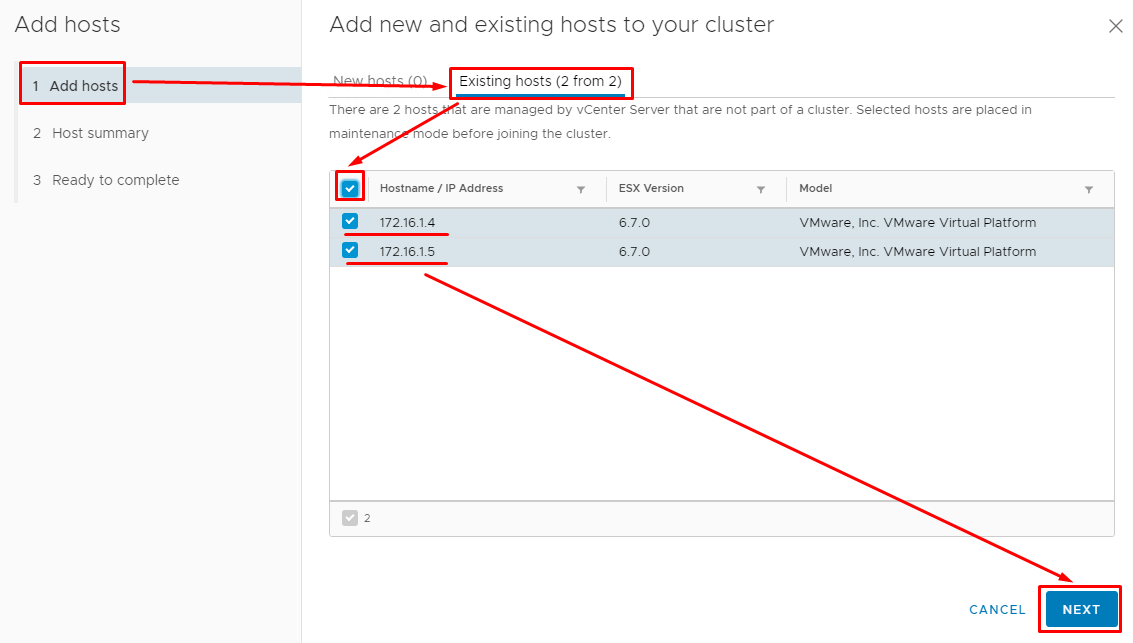
Select both virtual hosts from the list.
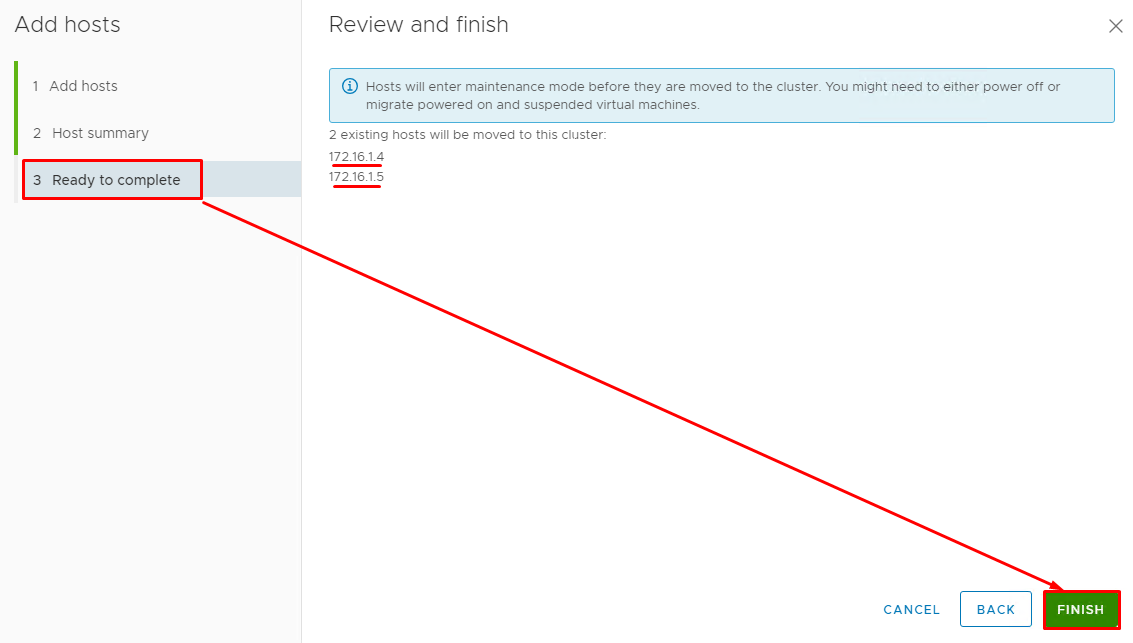
Review the settings and click Finish.
Setting up distributed switches and connecting them to the hosts
What’s the diff between a virtual switch and distributed one? The latter allows for managing networking on a datacenter level, providing a way more management flexibility than if you were using just vSwitches. Without a dvSwitch, you won’t be able to create a vSAN cluster.
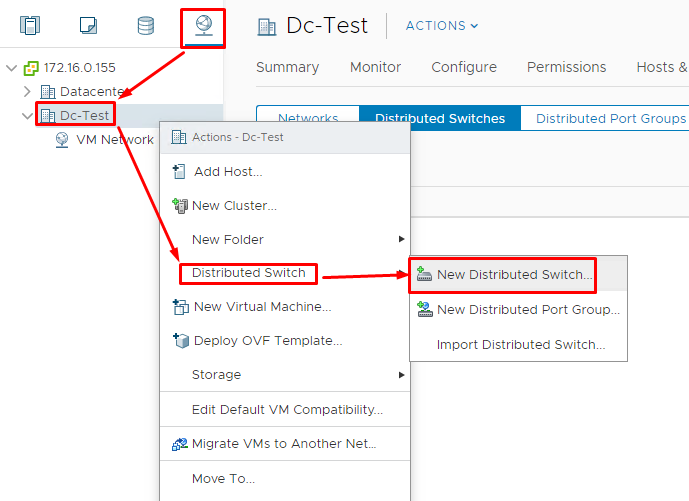
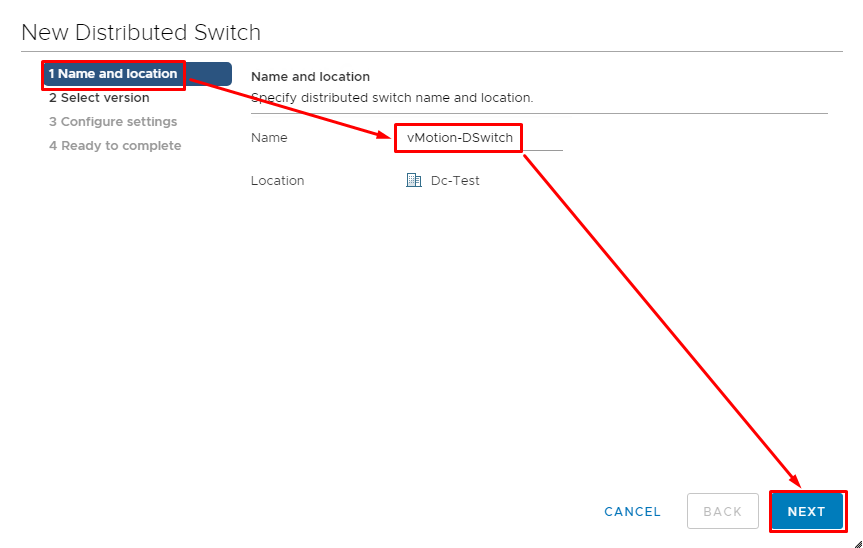
Create a dvSwitch first.
Here, I use the switch for vMotion (that’s why it is called vMotion-DSwitch).
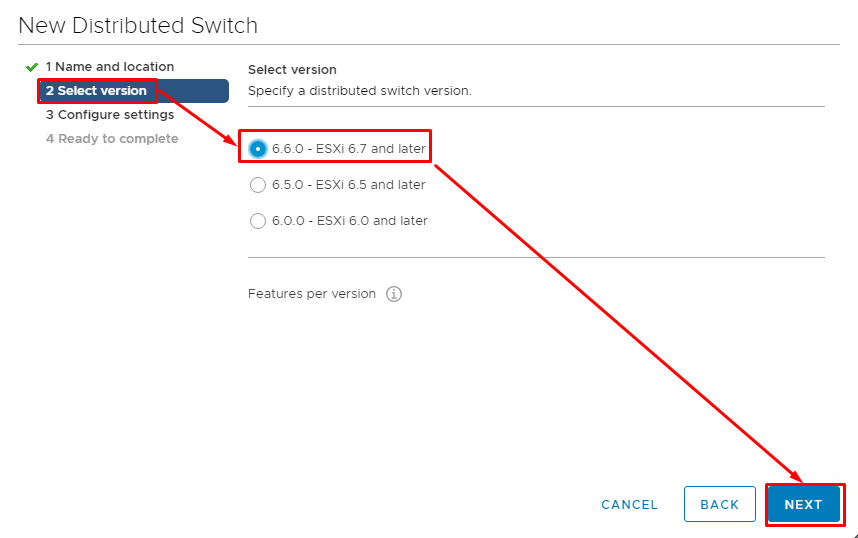
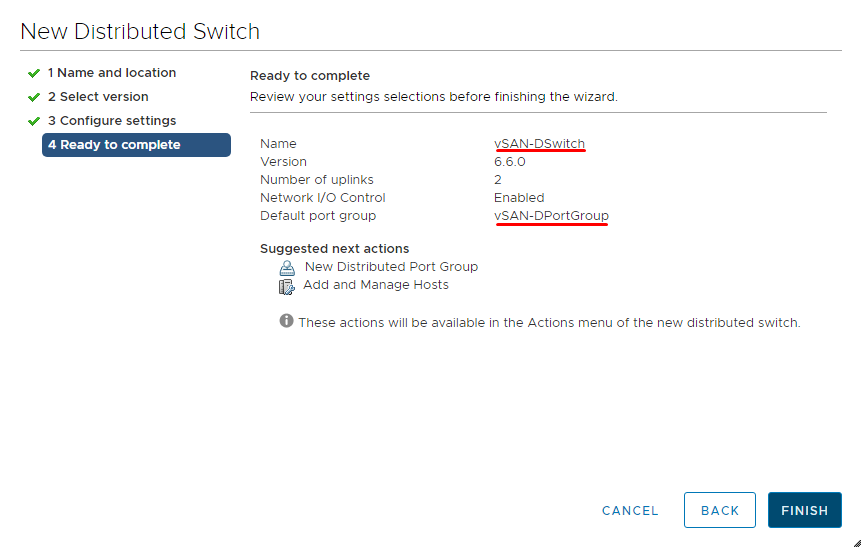
Next, decide on the distributed switch version. Today, I do not care that much about compatibility since I have ESXi 6.7 installed on both virtual hosts. That’s actually why I just selected 6.6.0 dvSwitch version.
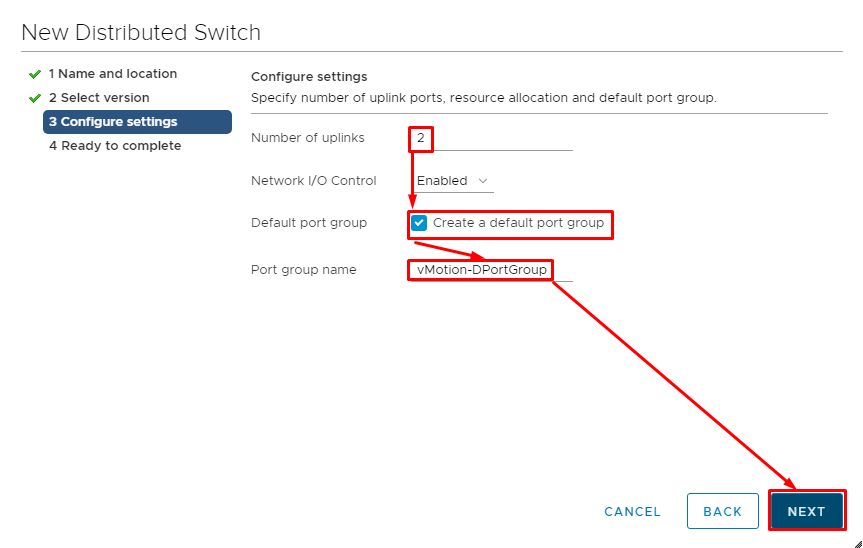
Specify 2 uplinks and assign the port group to the distributed switch.
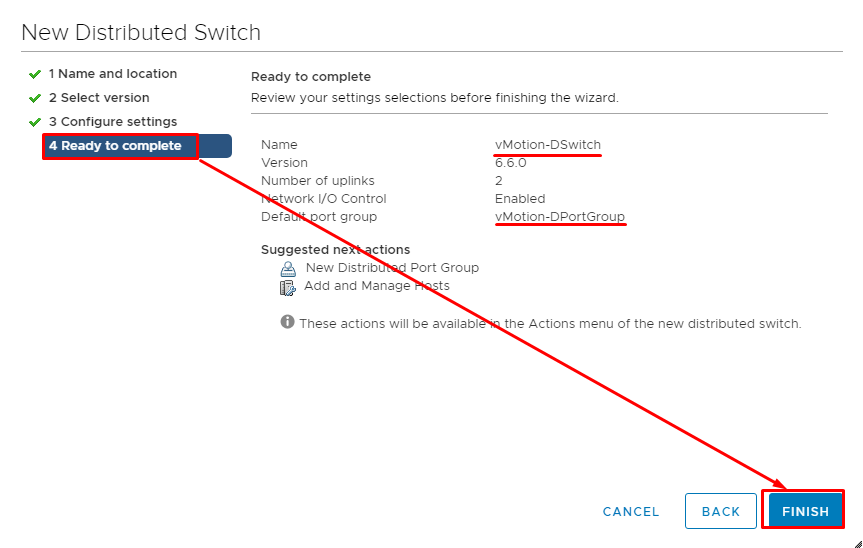
Review all the settings and press Finish to create the switch.
I won’t use the recently created switch today since I do not care about vMotion in this setup. You may need it though to set up the cluster according to vMotion best practices (this switch helps to ensure the decent bandwidth for VM migration).
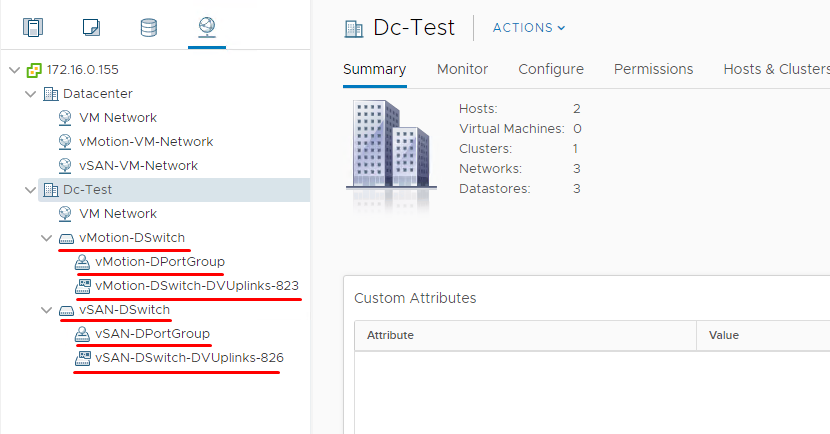
Set up the vSAN port group in just the same way.
Here’s how the networking looked like once everything was set up.
Setting up cluster networking and creating vSAN disk
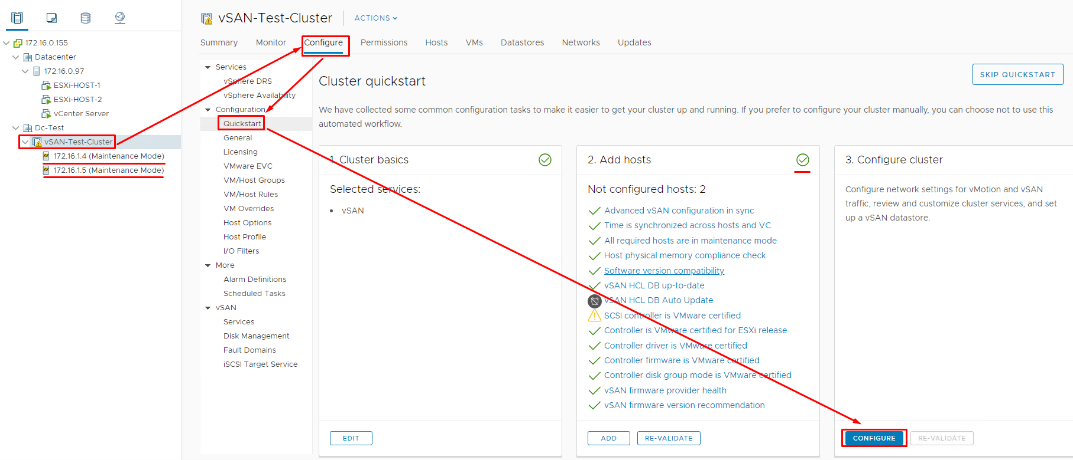
Just a few settings are still to be done. You need to set up cluster virtual network and create a vSAN disk.
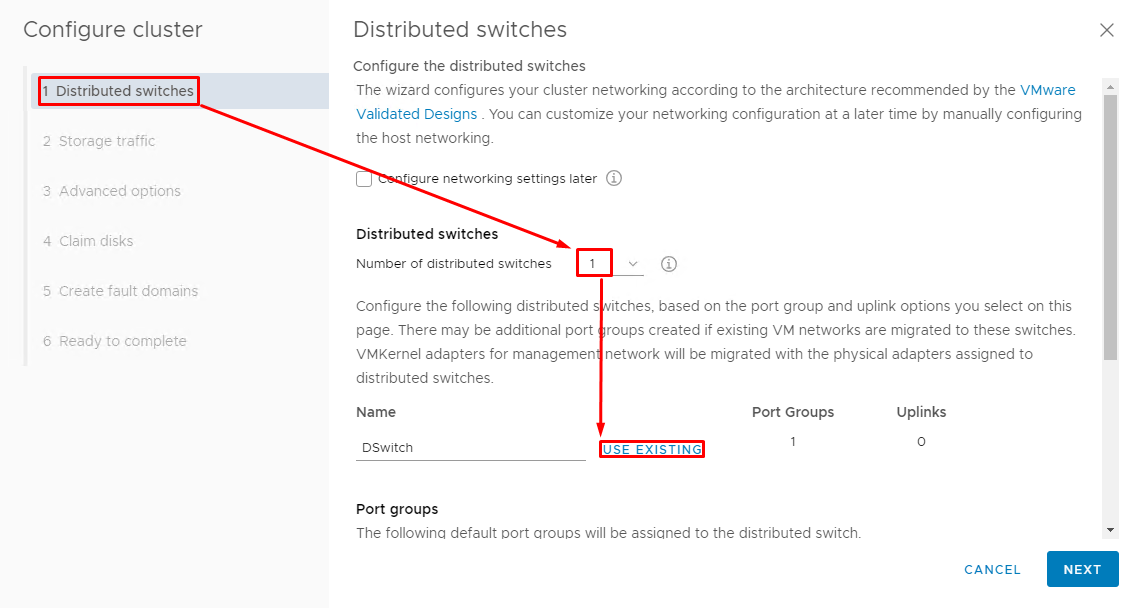
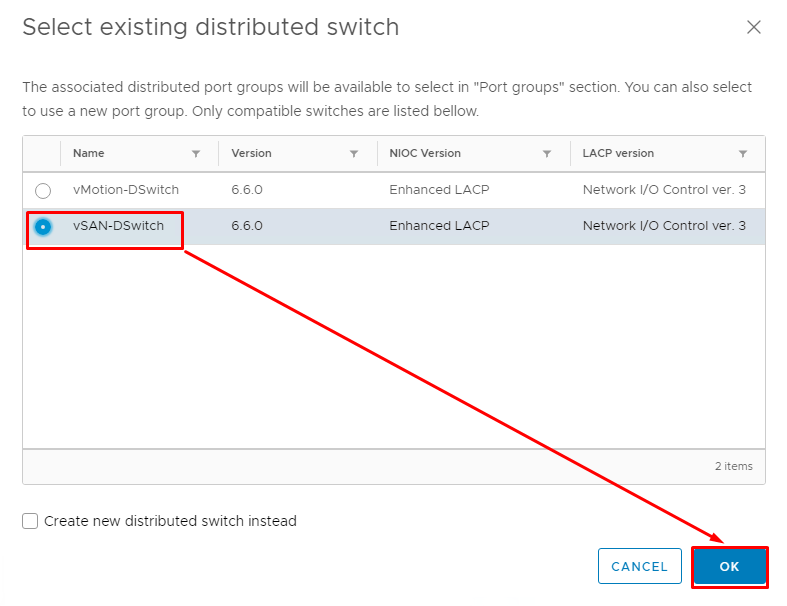
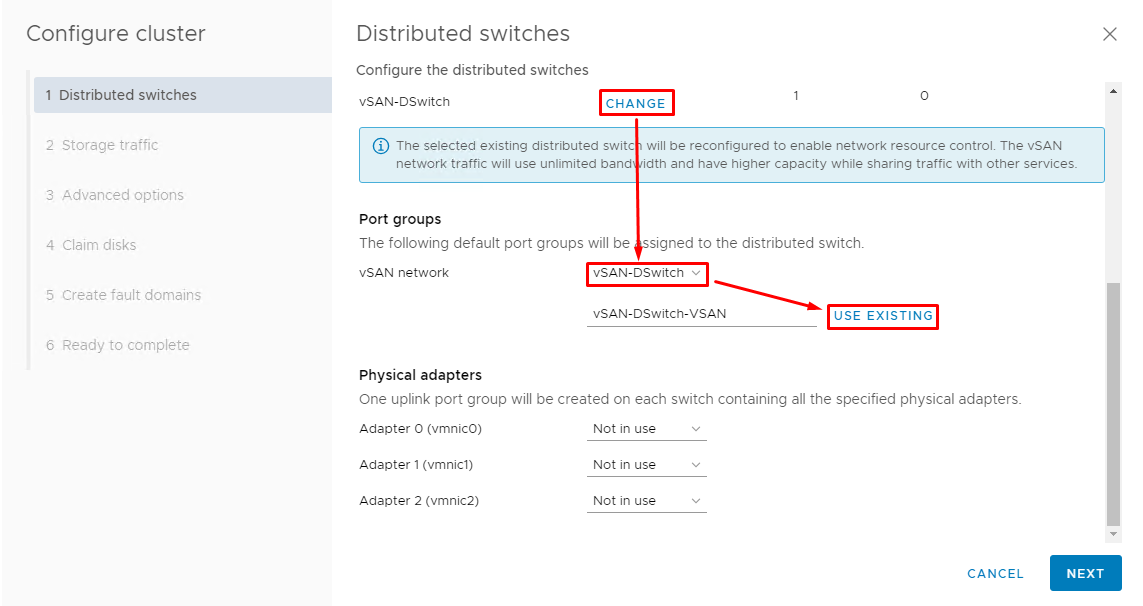
Now, select the dvSwitch for vSAN (v-SAN-DSwitch).
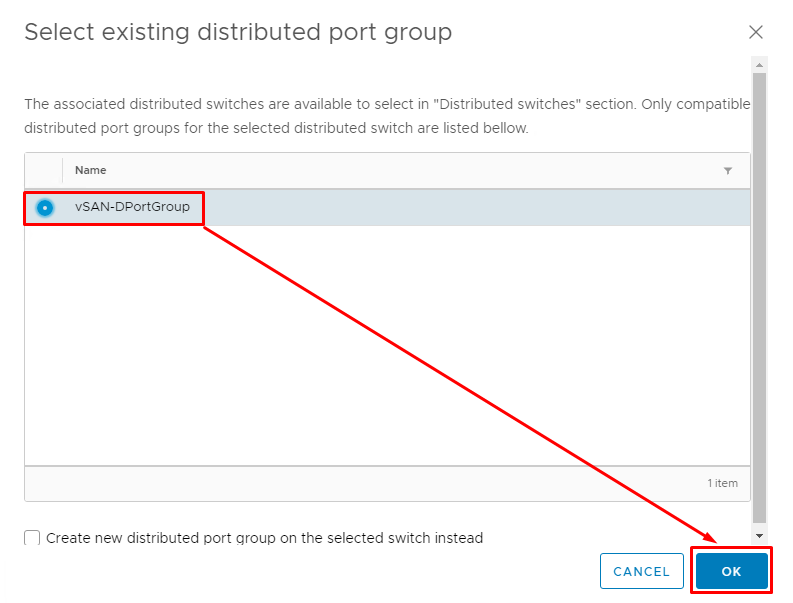
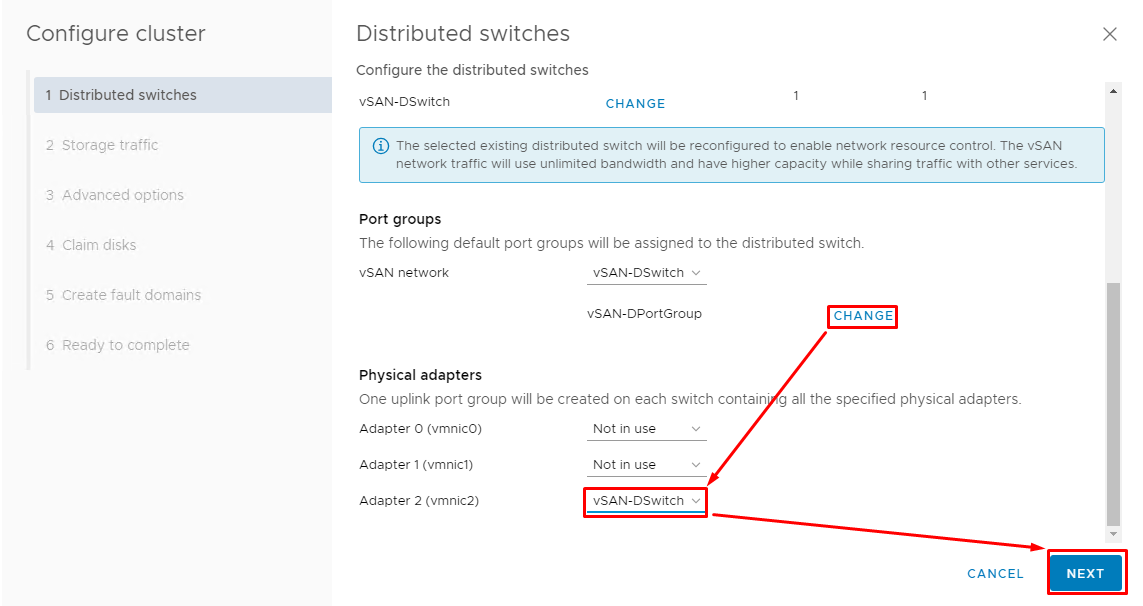
Assign the port group to dvSwitch. You should use an existing one.
There’s only one port group connected to the vSwitch. One more time: I do not use vMotion switch today (it will be available in the wizard only during advanced configuration).
Specify a network adapter for uplink (today, I use vmnic2).
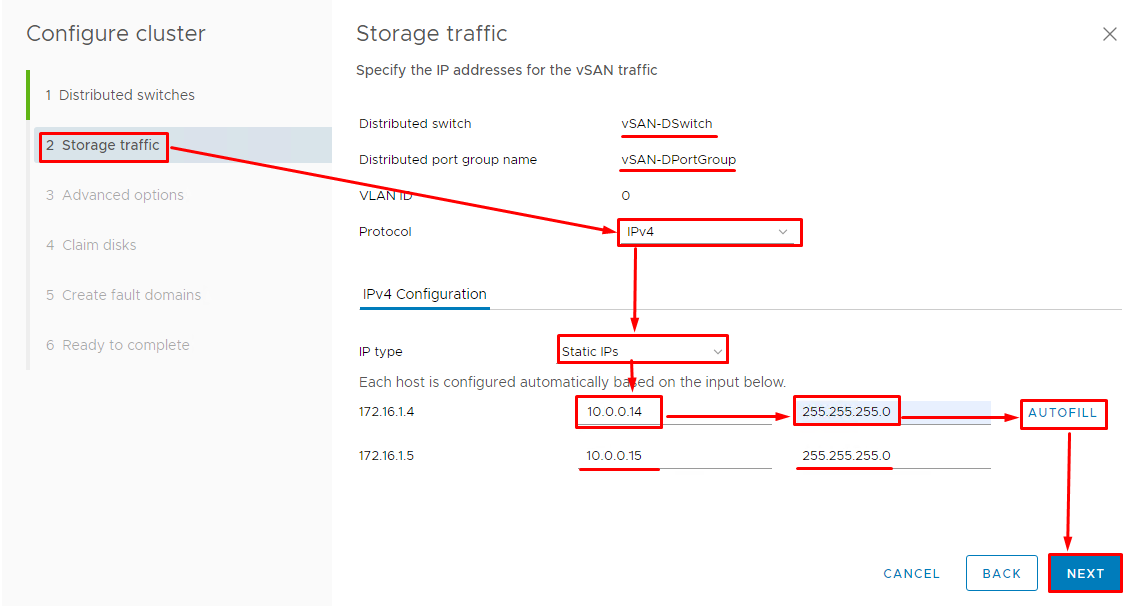
Specify IP addresses for vSAN traffic next. Use the vmk2 IP range (10.0.0.0/24).
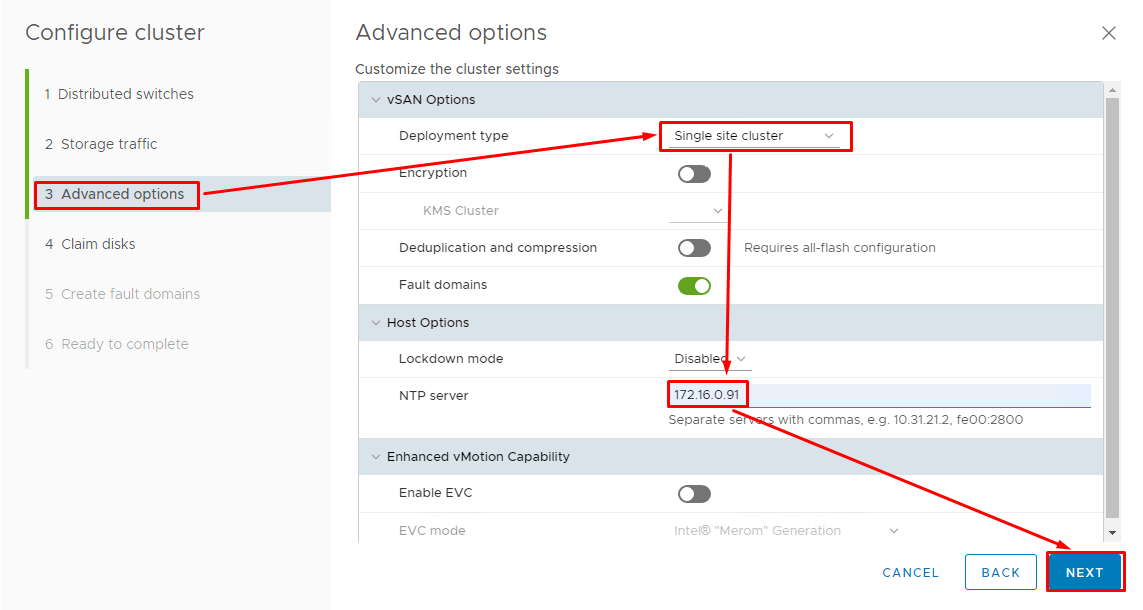
In the Advanced options tab, select Single site cluster for the deployment type. Leave the Fault domains parameter enabled (you need that parameter to test failover scenarios). Enter NTP server IP to avoid any problems with the further configuration process.
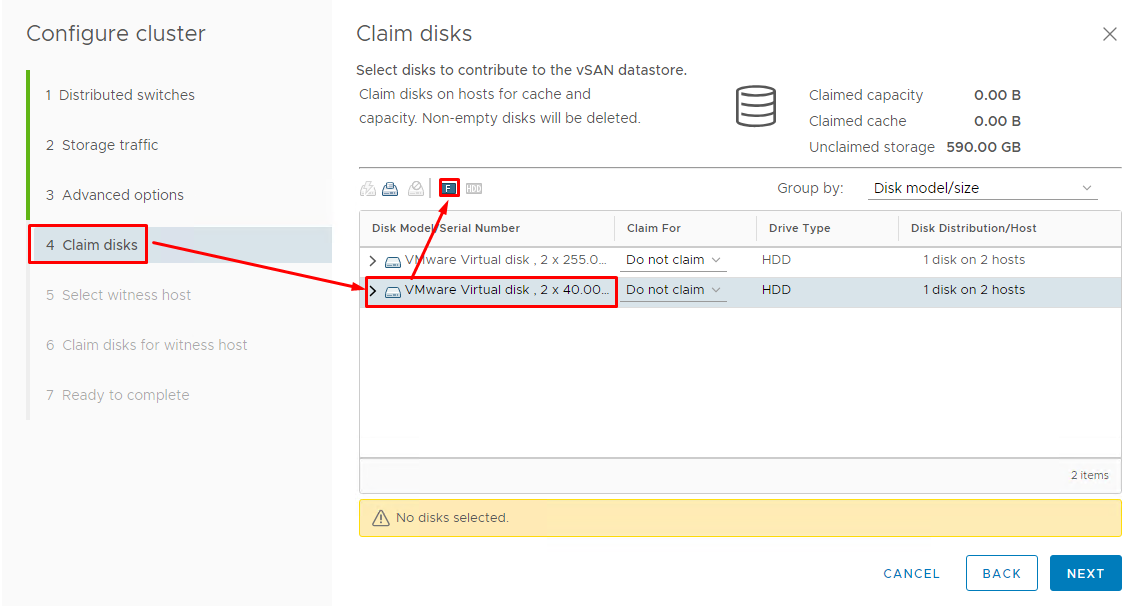
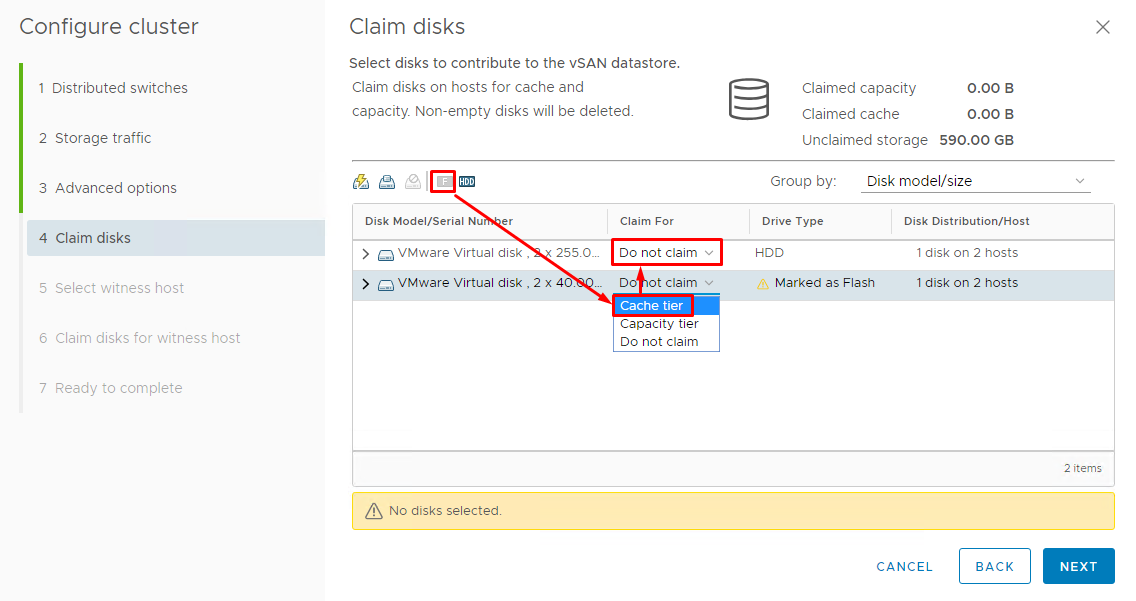
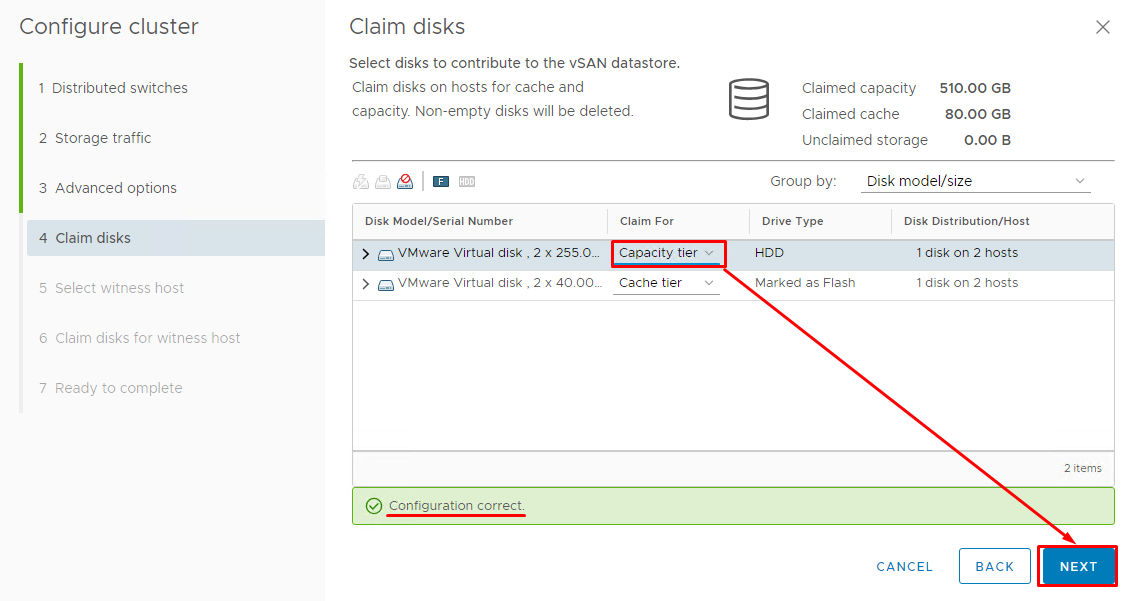
Now, let’s set up vSAN datastore. Claim disks for capacity and cache pools. For the former, you can go with HDDs, for the later, SSDs are needed. Wait, I do not have a physical SSD in my setup… let’s just emulate them! Just select the necessary pool and label it as one comprised of flash (SSD) disks. Of course, there will be no performance gain, and I do not expect any decent performance on a setup like that.
Here’s how you can claim some pool for cache tier.
Claim another pool for the capacity tier just in the same way.
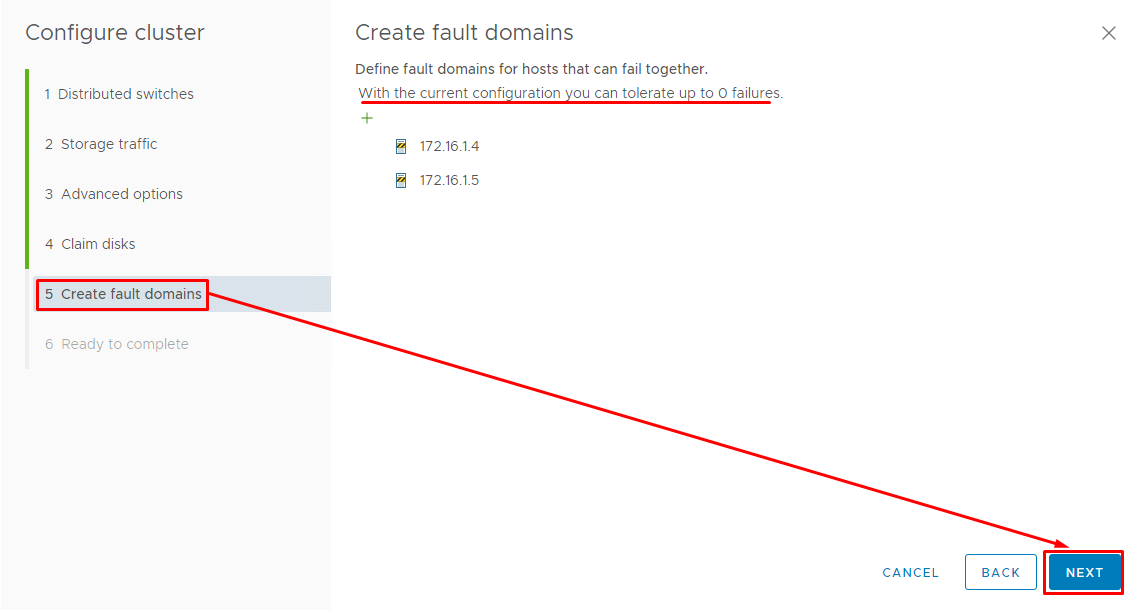
Now, you need to decide on fault domains for hosts that can fail together. My cluster can tolerate 0 failures… but I do not care that much about that, to be honest. Of course, to run any experiments in your home lab, you need more hosts. Therefore, you need a better gear than I use today.
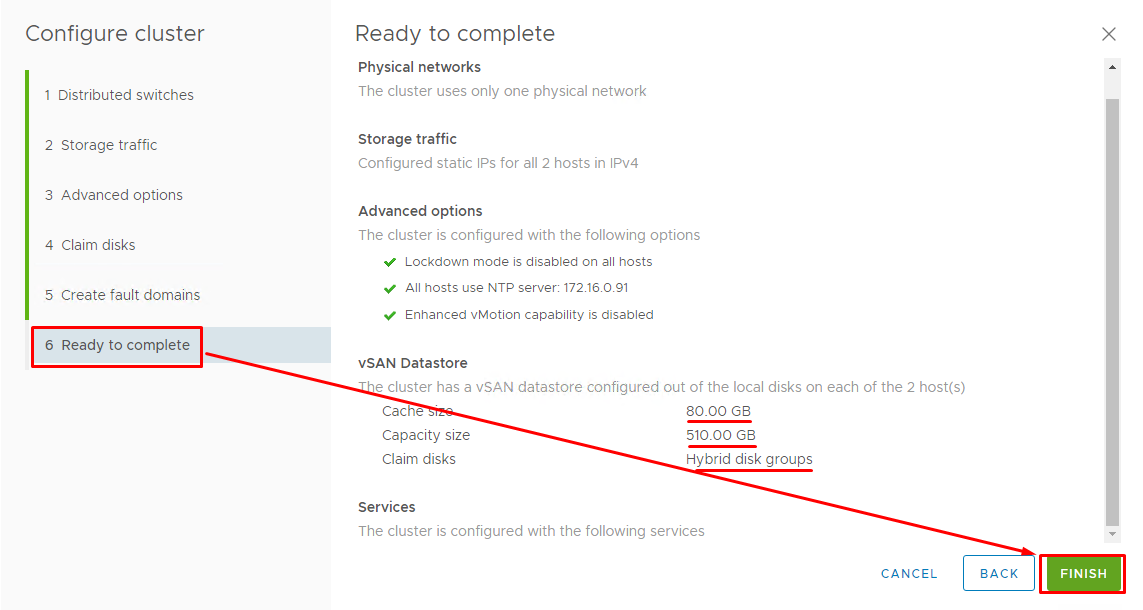
Check the settings and click Finish to start vSAN datastore creation.
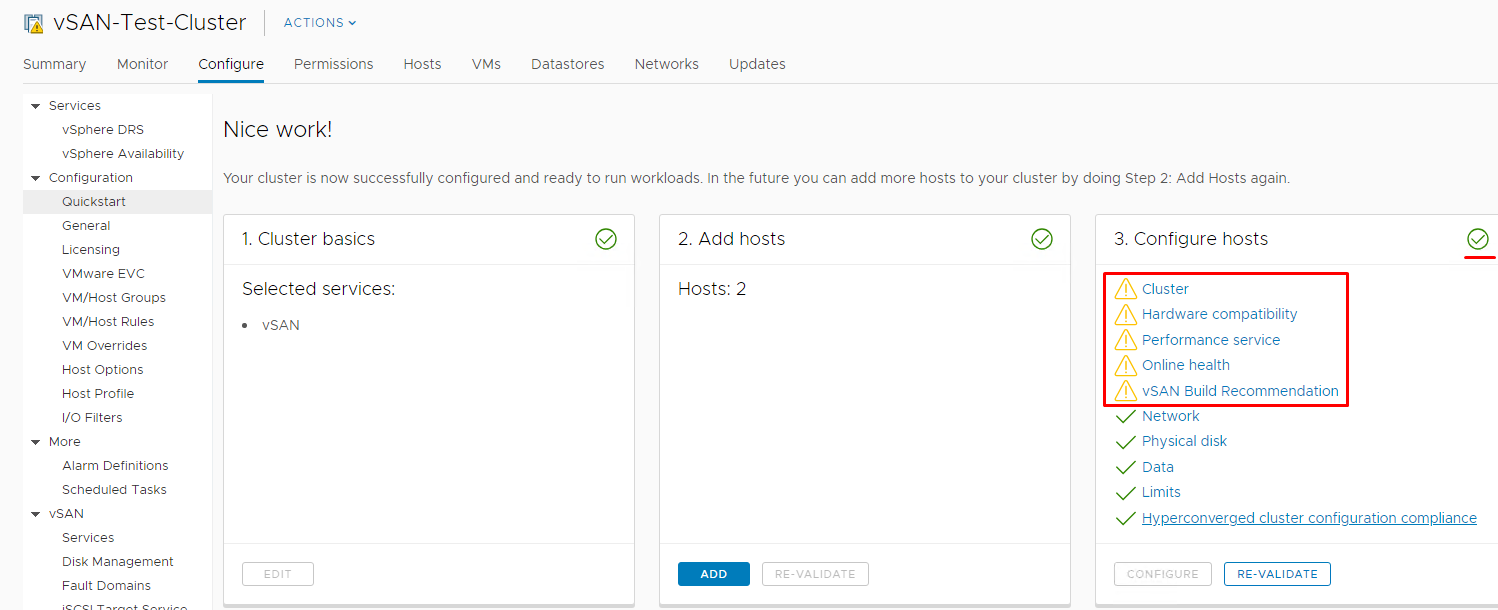
Once the cluster is created, you may get a bunch of warnings. If you one of the perfectionist crowd, you can do something with those warnings. Anyway, it is absolutely OK to ignore them: none of them is critical.
Testing vSAN cluster
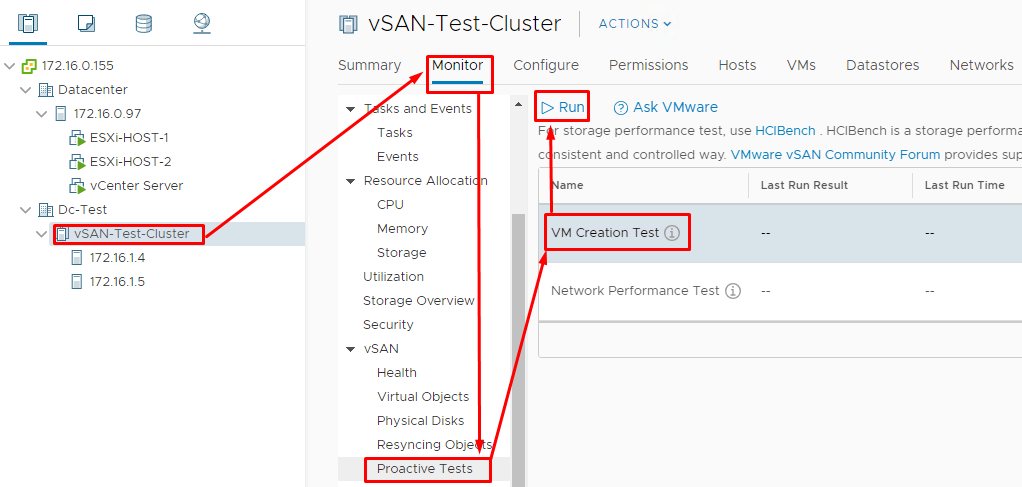
Next, you need to run 2 simple tests to see whether cluster works as it should.
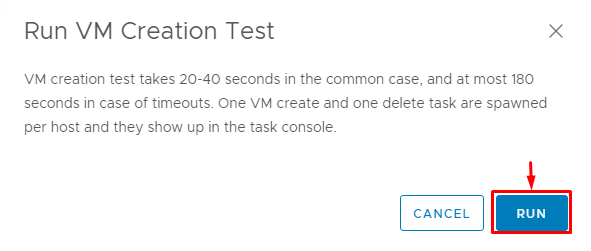
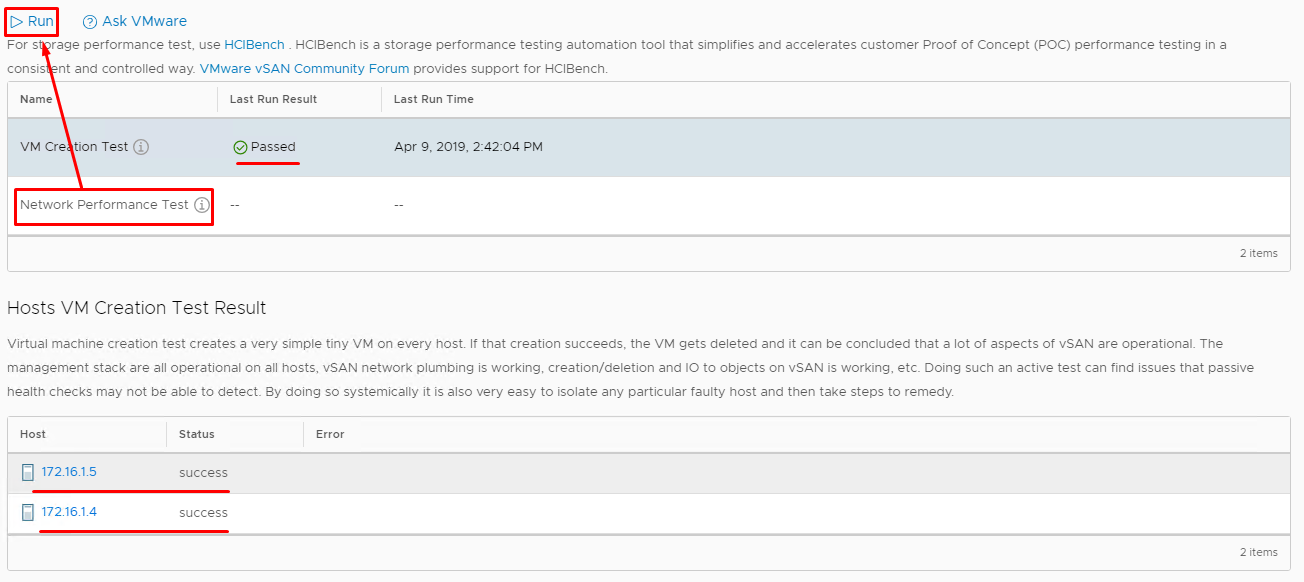
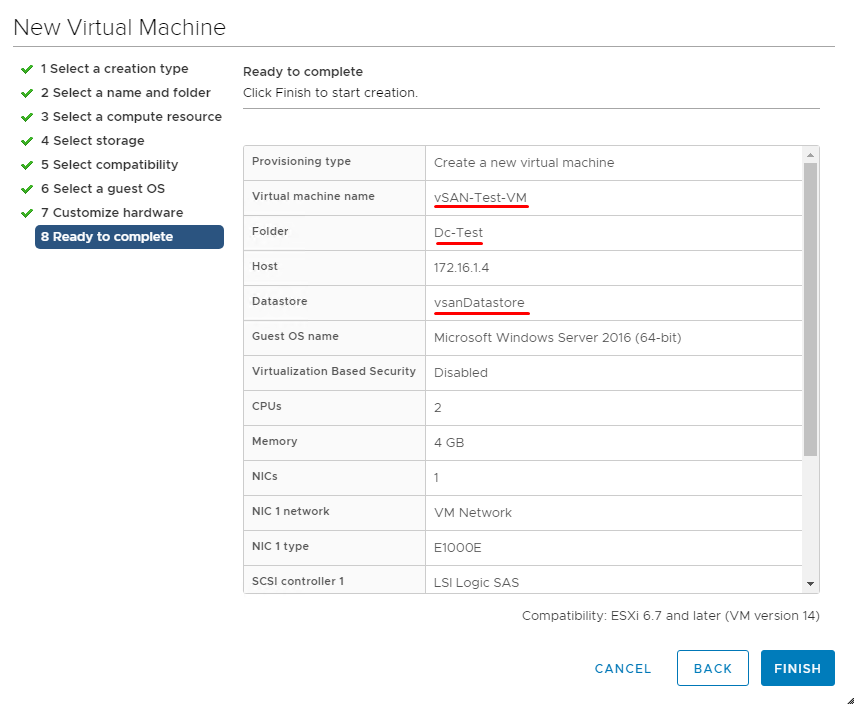
First, run the VM creation test since it is fast and provides a comprehensive report on what’s wrong with your cluster. My cluster is very likely to “fail” it. Why? There’s no way to create VM in a vSAN cluster without defining the storage policies. If you encounter the same error, find more details about it here: https://docs.vmware.com/en/VMware-vSphere/6.7/com.vmware.vsphere.virtualsan.doc/GUID-C8E919D0-9D80-4AE1-826B-D180632775F3.html.
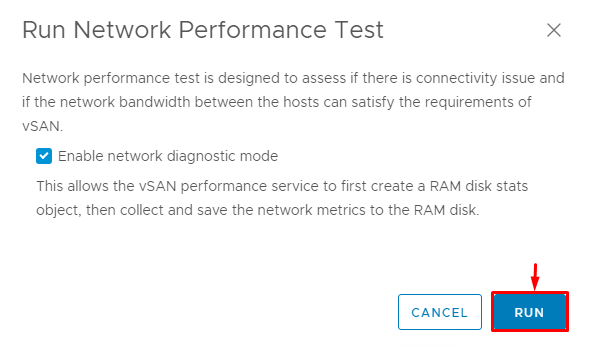
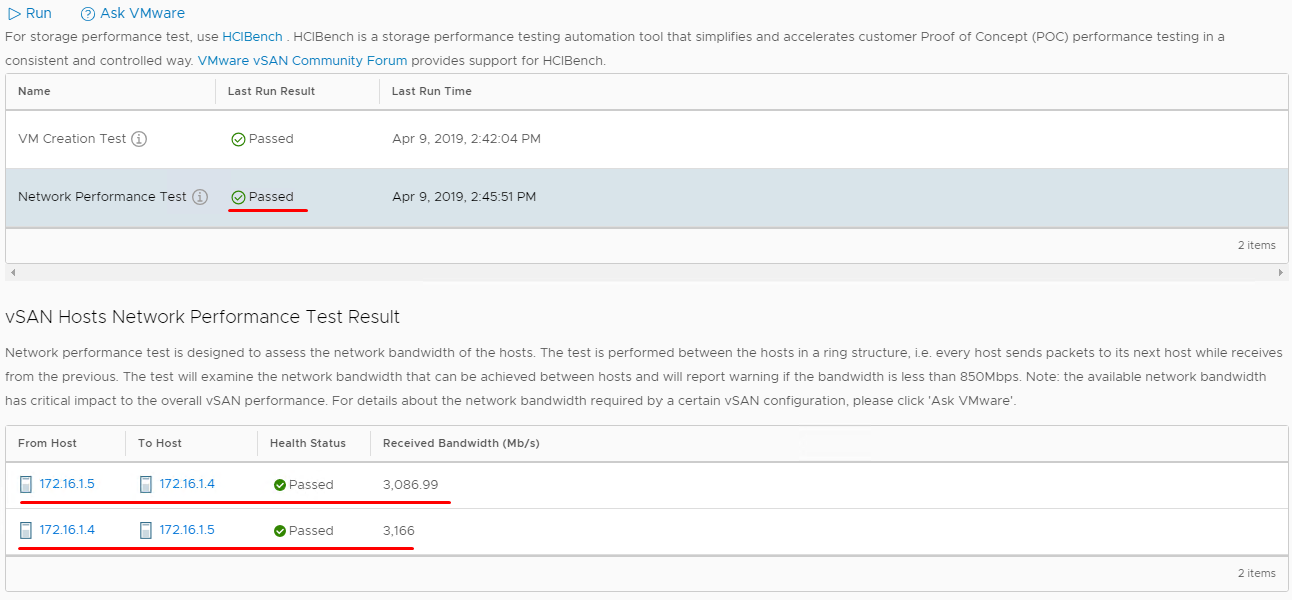
The second test allows benchmarking vSAN network bandwidth.
Enable network diagnostic mode to run tests faster. If you enable this option, the network metrics are written to the RAM disk, allowing to save some time.
Network bandwidth could not go beyond 3 Gb/s. And, I have no clue what could go wrong. Any ideas? I’ll readily discuss them in comments. Anyway, I can have the cluster running even with such a poor networking bandwidth.
Now, you can create Layer 2 VMs to make sure that the datastore is 100% OK.
Conclusion
I hope this post contains sufficient answers on most questions one may encounter while creating a home lab. One more time: you need a better setup for a home lab than I have. My gear used today is good only for demonstrating how to create a virtual vSAN cluster and configure its networks. Basically, this guide helps you to build a ready to go cluster for your home lab using just some PC. Enjoy!


