Azure AD Domain Services (AADDS) is a great service that allow you to deploy a managed domain in your Azure subscription. One of the great things is that you don’t need to deploy Virtual Machines in order to install the ADDS role. It means that you also don’t need to manage the AADDS servers, and you don’t need to patch the domain controllers.
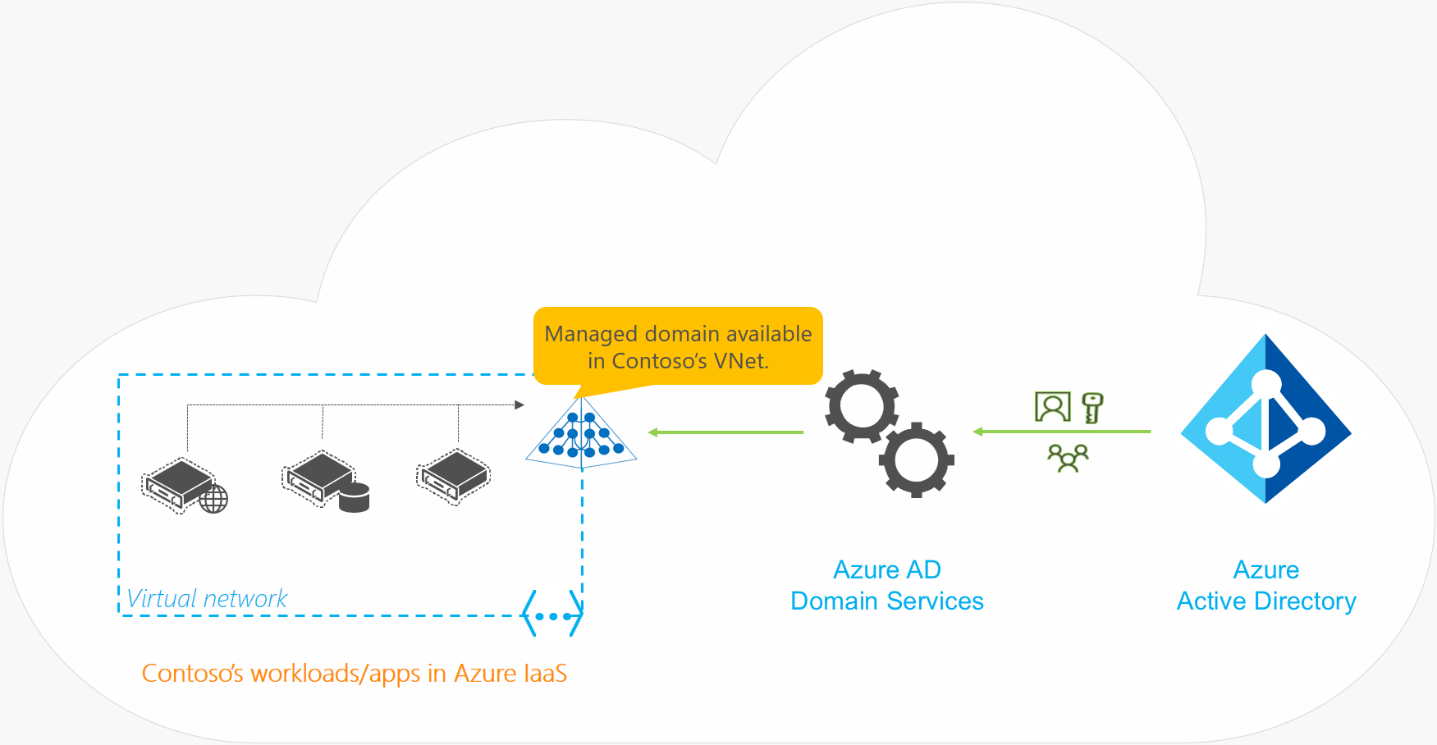
The following diagram published on the Microsoft website, describes the AADDS architecture:
In this example, the AADDS service is deployed for cloud-only organizations. You must deploy a Virtual Network and a dedicated subnet within it. Microsoft recommends to not deploy any other virtual machines in this subnet and this subnet must have at least 5 available IP addresses in its address space. When, you deploy the AADDS service, it will create two Domain Controllers in this subnet.
Enable Azure AD Domain Services
Go to the Azure portal, in the left pane, click Create a resource. Then, type Domain Services into the search bar. On the Azure AD Domain Services page, click the Create button.
Configure the AADDS basic settings
In the new blade, you must enter the following information:
- DNS Domain name: By default, the wizard specifies the default domain name of the directory but you can enter a custom domain name. In my case, I use my default domain name.
- Subscription: Azure Subscription in which you would like to create the managed domain.
- Resource Group: The Resource Group where the managed domain will be created.
- Location: The Azure location where the managed domain will be located.
Configure the AADDS network settings
On the Network page, you should see all existing virtual networks. In my case, I choose a dedicated VNet:
This dedicated VNet was created using the following settings:
Configure the AADDS Group Sync
In the new blade that appears, you will notice that a new group named “AAD DC Administrators” has been created. This group allows you to manage your domain. So, you must add a user to this group in order to manage your domain.
Next, you must choose if you want a full synchronization of all users and groups available in Azure AD, or you can select scoped synchronization to synchronize only specific groups. Be careful, because, if you choose the full synchronization, you will not be able to switch to scoped synchronization at a later time.
On the Summary page of the wizard, review the configuration before creating the AADDS domain.
The process of provisioning your managed domain can take up to an hour.
Once the provisioning is done, you can see that the AADDS service is Running.
On the Properties tab, you should see two IP addresses at which domain controllers are available for the virtual network.
Configure the AADDS DNS Settings
To finish the deployment process, you must enable computers within the virtual network to connect to this AADDS instance. Click Configure to update the DNS server settings for the VNet. Be careful, Virtual Machines in the VNet only get the new DNS settings after a restart.
A warning message will appear in order to indicate that DNS servers have been configured.
Now, we need to deploy a Virtual Machine in order to join the AADDS domain.
You will be prompted to enter the name and password of the account who is member of the “AAD DC Administrators”.
In order to manage the AADDS domain, you must install the ADDS MMC. The domain can only be managed using the classic MMC from a domain join machine. You cannot manage the domain from the Azure portal. You can notice that two Domain Controllers are created in the domain.
You can see domain joined computers.
To finish, you can also manage users and groups from the MMC.


