In light of my previous discussion on different virtual disks, I would like to continue this topic by highlighting a quite interesting option that enables you to expand the possibilities of the VM configuration. As you probably have noticed more than once, upon creating a new virtual disk or additional virtual disk configuration, there is always a “Disk Mode” option. However, based on my experience, I can tell that only a handful of users actually know how it works and what to do with it. So, let’s dig into this!
Disk Mode Configuration
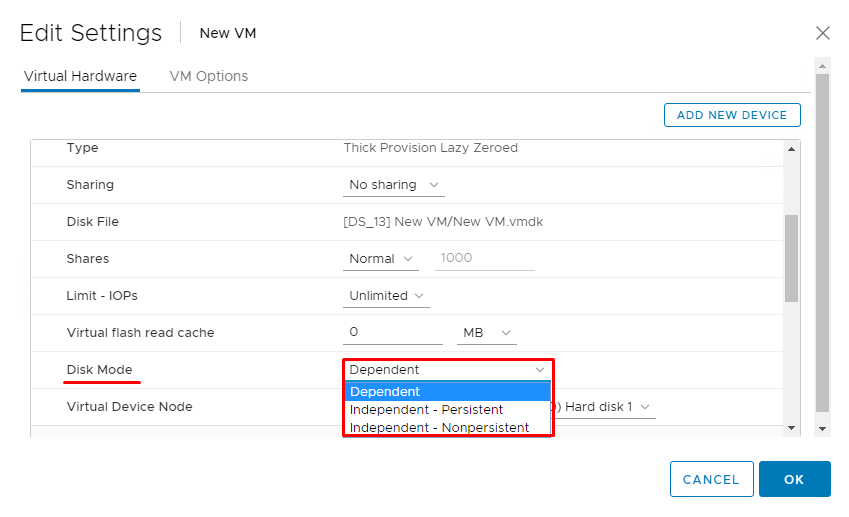
You can choose a specific disk mode in by editing settings in the vSphere Client.
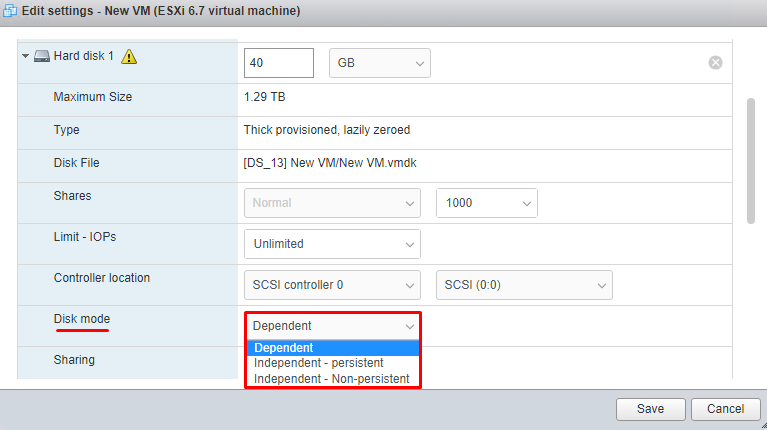
It’s also available in the web-client of the ESXi host itself.
Or with the PowerCli command-line interface.
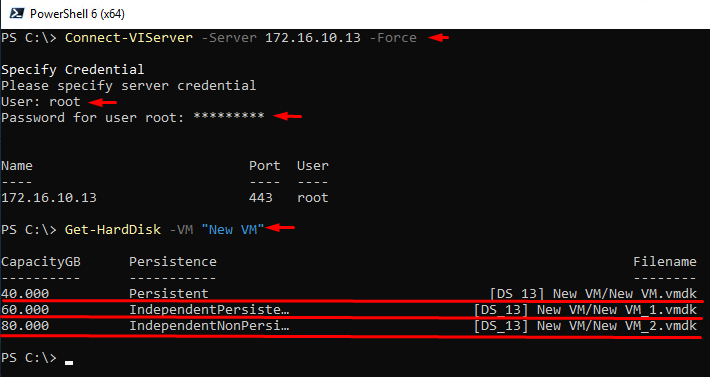
In that case, you’ll need connecting to the ESXi host from the VM or from another server by entering the host address and host admin credentials. The next step will be using a command to get the parameters of the current disks on the required VM.
PS C:\> Connect-VIServer -Server <”Server name or IP”> -ForceGet the whole lists of the disks on the required VM.
PS C:\> Get-HardDisk -VM <"VM Name">Further, let’s pick up the disk we need from the ones connected to the VM ([<”Disk number”>]). Usually, it takes just checking up with numbers:
- [0] – New VM.vmdk;
- [1] – New VM_1.vmdk;
- [2] – New VM_2.vmdk.
In my case, New VM_2.vmdk is number 2. For his particular VM, the disks correspond to their numbers as per creation, but it’s not always the case, so don’t skip checking as unnecessary and be careful. You have probably already noticed that configuration here, just like in the web consoles, has three modes, albeit their names do differ:
- Dependent is shown as Persistent;
- Independent – persistent is shown as IndependentPersistent;
- Independent – Non – persistent is shown as IndependentNonPersistent.
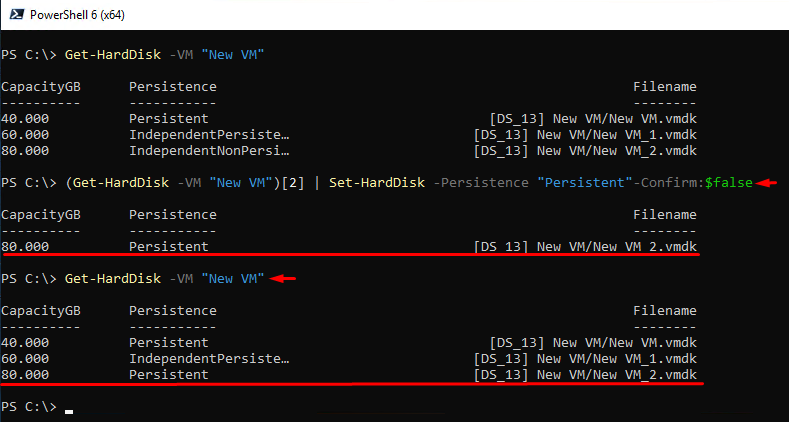
Enter a command to change disk mode.
PS C:\> (Get-HardDisk -VM <"VM Name">)[<”Disk number”>] | Set-HardDisk -Persistence "Persistent"-Confirm:$falseDouble check the results.
PS C:\> Get-HardDisk -VM <"VM Name">Don’t forget to disconnect the ESXI host session after you’re done, because otherwise it won’t stop consuming your host’s resources and will present a potential vulnerability until a next reboot.
PS C:\> Disconnect-VIServer -Server <”Server name or IP”> -ForceDisk Modes Description
Now, time to learn what the vmdk disk modes actually are.
- Dependent – well, pretty much everything is simple here, because it’s a default disk mode, and it has neither peculiarities nor special requirements, just your ordinary vmdk disk. No more, no less;
- Independent – persistent – this disk mode resembles the dependent disk in all but snapshots. You can’t take a snapshot of this disk and revert it since the creating of the machine snapshots will pass it by. Basically, data is written permanently, so any further changes are going to stay, and you won’t be able to go back no matter what you do.
- Independent – Non – persistent – now, that is a Redo-disk, which means that if you start your VM with Independent – Non – persistent mode on, all changes will be written into disk delta. The previously existing data is available as read-only. Therefore, if you stop the VM or start it (not reboot, that doesn’t affect anything), or if you delete snapshot, all changes will be discarded.
Using Disk Modes
Dependent
There’s no real point to describe this in any precise way since it’s an ordinary disk. Upon creating a snapshot, data will be saved with disk delta to be either added to existing data or deleted, depending on necessity.
Independent – persistent
Now, this one will come in handy if you’re actively using VM snapshot technology. When you revert back a snapshot, it doesn’t affect the disk in this mode at all. Such a disk becomes useful in the case with data that shouldn’t be reverted back to the initial state, like a system log, or a site log with its content that requires preservation in the current state. Shift to this disk mode when you are deleting your snapshot, and your data will remain intact if you start VM or stop it.
Independent – Non – persistent
Speaking from experience, I may guess that a lot of VMware vSphere admins often use snapshots to keep their environment in the required condition after experimenting with it. It doesn’t matter what scenario is working in each specific case, whether it would be checking updates at work or various VM tests. Either way, it can seriously affect the performance of your VM or even damage your infrastructure at large. I hope you are one of those admins that aware of the danger lying behind the use of the snapshots, and you’re not abusing it unless in extreme cases. When you are using the snapshots too often, they reveal such a tendency as exponential growth, which inevitably leads to a substantial utilization of the disk subsystem. This way, it may come a day when there will be not enough space on the disk even to delete them all. That’s when this particular disk mode becomes extremely useful because you won’t be risking your environment by using snapshots. Considering the fact that the changes on the disk in Independent – Non – persistent mode do survive the reboot, you can test software or OS updates freely. Basically, in this disk mode, you can do whatever you want, performing any kind of tests inside your VM, without risking its safety if anything goes wrong. To discard all the changes, just stop your VM and start over. In general, this regime is promises to become more than a decent alternative solution to snapshots.
All in all, you can turn on a and off each one of those modes, but keep in mind that you can do so only if the VM is stopped.
Afterword
As usual, I hope that I managed to explain it shortly and effectively and that this information will help you one day.


