In part one of this multi part blog series, we explained the benefits of Azure Resource Manager and resource groups in Azure V2 versus the Service Management API in Azure V1, then we looked in depth at JavaScript Object Notation (JSON) Quick Start templates. In the second part, Part II: we will create and configure a GitHub account, if you don’t already have one, to host a GitHub repository for a Quick Start template, and lastly we will examine Visual Studio Code integration with Git and push commits to a remote repository. In the final post, we will modify and deploy sample/custom template and parameter JSON files.
If you missed Part I, please make sure to check it here before you continue with this post.
Introduction
In part one of this multi part blog series, we explained the benefits of Azure Resource Manager and resource groups in Azure V2 versus the Service Management API in Azure V1, then we looked in depth at JavaScript Object Notation (JSON) Quick Start templates. In the second part, Part II: we will create and configure a GitHub account, if you don’t already have one, to host a GitHub repository for a Quick Start template, and lastly we will examine Visual Studio Code integration with Git and push commits to a remote repository. In the final post, we will modify and deploy sample/custom template and parameter JSON files.
If you missed Part I, please make sure to check it here before you continue with this post.
Objectives
During this post, we will cover the following topic:
• Create a GitHub account and public repository.
• Configure GitHub desktop and clone the repository.
• Examine Visual Studio Code integration with Git and push commits to a remote repository
Create a GitHub account and public repository
GitHub is used to store Azure Resource Manager templates and other code-related objects. GitHub is a web-based Git repository to ensure availability and provide a version control system for files.
Version control systems record changes to files or a set of files so that they can be retrieved at a later time. There are different kinds of version control systems, the simplest being the manual use of multiple folders to store different versions of your files. More sophisticated and fault-tolerant version control systems use central or distributed databases to store the files and their changes.
Git is a distributed version control system in which clients clone entire repositories to ensure that there is no single point of failure. If a particular repository fails, the contents can be restored from a cloned copy that exists elsewhere.
This step is optional if you already have a GitHub account.
Note: If you do have a GitHub account and you have enabled multi-factor authentication for it, you may have difficulties authenticating to your account when using Visual Studio Code. If you have multi-factor authentication enabled on your Git repository and you want to follow along, please consider to create a new GitHub account.
In this section, you will learn more about GitHub and Git repositories. You will also learn how to configure Visual Studio Code to use Git.
1- Open your browser, and navigate to https://github.com.
2- On the home page, click Sign up.
3- On the Join GitHub page, enter a username, email address, and password.
4- Click Create an account.
5- On the Welcome to GitHub page, click Finish sign up.
6- On the Choose your personal plan page, the Free plan is chosen as default, click continue.
7- Click Skip this step, and on the next page click Start a project.
8- Open your email client, and then open the verification email sent to you by the GitHub website.
9- Click Verify email address.
10- Switch to the GitHub page.
11- In Repository name, type ARM-Templates, select Initialize this repository with a README, and then click Create repository. In the next step, we will clone the repository.
12- In Repository name, type Templates, select Initialize this repository with a README, and then click Create repository as shown in the following screenshot.
Configure GitHub desktop and clone the repository
In this section, we will download and launch the GitHub desktop application, configure settings, and then clone the Templates repository that we created in the previous step.
1- Open your browser, and navigate to https://desktop.github.com/
2- Click on Download GitHub Desktop.
3- Run the GitHubSetup.exe and follow the wizard.
4- On the desktop, open GitHub.
5- On the Welcome page, enter your GitHub username and password, and then click Log in.
6- Click Continue.
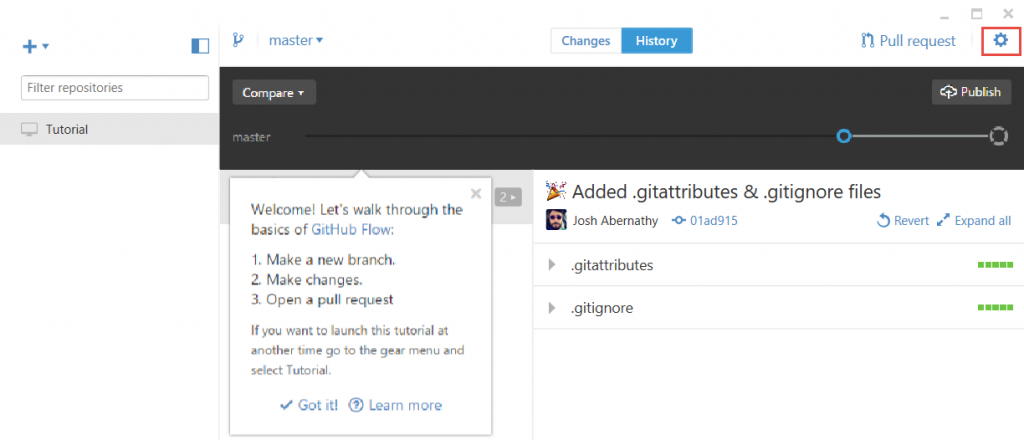
7- Under No local repositories found, click dashboard. The GitHub desktop application opens showing a pre-configured Git repository named Tutorial that contains a .gitattributes and a .gitignore file. Before proceeding with the next steps, please feel free to launch the tutorial by clicking Got it!
8- In the upper right corner, click Settings (the gear icon) as shown in the following screenshot.
9- Click Options.
10- On the Options page, in Clone path, enter C:\GitHub as shown in the following screenshot, and then click Save.
11- On the GitHub home page, in the upper left corner, click Add (plus sign).
12- Click Clone.
13- Click ARM-Templates, and then double click ARM-Templates.
14- In the Browse for Folder dialog box, ensure that C:\GitHub is selected, and then click OK.
15- On the desktop, double-click Git-Shell. A PowerShell window opens. The option to integrate the Git commands with PowerShell is configured in the GitHub client.
The Git-Shell was installed during the GitHub setup.
16- At the PowerShell prompt, type the following command, and then press ENTER.
Git config –global credential.helper wincred
This command is necessary to ensure that Visual Studio Code can authenticate against the GitHub website. The command is case sensitive.
17- At the PowerShell prompt, type the following command, and then press ENTER.
Git config –list
This command shows the settings that are configured for Git. Note that the bottom of the output displays your GitHub user name and email address. These settings were configured when you signed in to the GitHub Desktop Windows client.
18- Download the Azure Quick-Start templates from the following link:
https://github.com/Azure/azure-quickstart-templates/archive/master.zip
19- Extract the archive file, open the folder, right-click 101-vm-simple-windows, and then click Copy.
20- In File Explorer, navigate to C:\GitHub\ARM-Templates.
21- Press CTRL-V to paste the folder to C:\GitHub\ARM-Templates.
22- In File Explorer, on the ribbon, click View, and then select Hidden items.
23- As shown in the following screenshot the hidden .git folder appears. This folder is created upon initialization of the Git repository. The .git folder includes the Git database and other files necessary for staging and committing changes to files for source version control.
Examine Visual Studio Code integration with Git and push commits to a remote repository
At the time of writing, Microsoft just released version 1.0 of Visual Studio Code. Since the initial launch one year ago, 2 million developers have installed VS Code. As of today, more than 500,000 developers actively use VS Code each month. Visual Studio Code has integrated support for the most common Git commands, for example, to stage and commit changes.
In this section, we will integrate Visual Studio Code with Git and push commits (changes you wish to be permanent) to the remote repository on GitHub.
1- Open your browser, and navigate to http://code.visualstudio.com/
2- Click on Download for Windows.
3- Run the VSCodeSetup-stable and follow the wizard.
4- On the desktop, open Visual Studio Code.
5- In Visual Studio Code, on the File menu, click Open Folder.
6- In the Select Folder dialog box, navigate to C:\GitHub, click ARM-Templates, and then click Select Folder. The folder opens and Visual Studio Code provides a visual indication that Git detects uncommitted files in the folder as shown in the following screenshot. These are the files we copied to the folder in the previous step.
7- Click the Git icon on the left.
8- Press CTRL, and then select all files.
9- Click the ellipsis… as shown in the following screenshot, and then click Commit All.
Git files have three states:
a. Modified means that the files are in a workspace and have been changed but have not yet been committed to the database in the repository.
b. Staged means the files have been moved to a staging area prior to being committed, for example, as a holding area pending review.
c. Committed means that a snapshot of the file is committed to the database.
10- In Message, type Initial Version, and then press CTRL+ENTER.
These files will represent a starting point for changes that we will make in the next post.
The changes are committed to the local C:\GitHub repository. The files disappear from view in the Git node. In the next step, we will push the committed files to the remote (ARM-Templates) repository on GitHub.
11- Click the ellipses as shown in the following screenshot, and then click Push.
12- When prompted by Visual Studio Code, enter your Git username and password, and then click OK.
13- Switch to your browser and open the GitHub page.
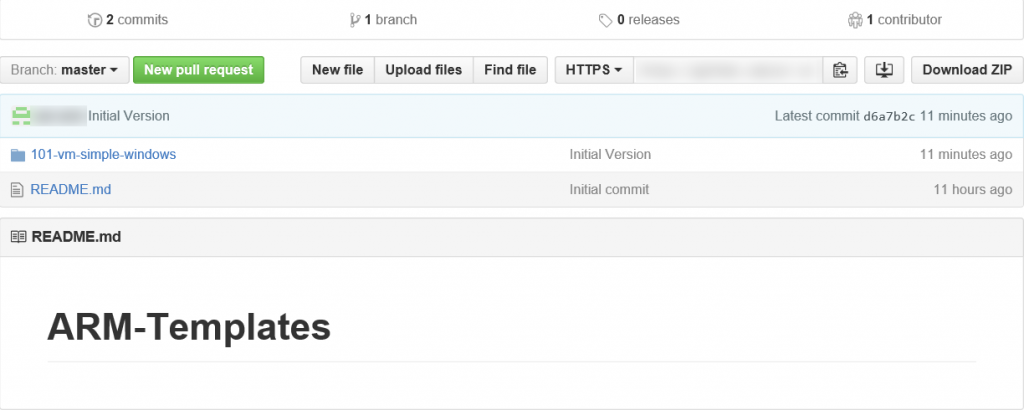
14- Ensure that you are viewing the Templates page for your repository in my case it’s (ARM-Templates), and then press F5 to refresh the page. You should see the 101-vm-simple-windows folder from your local repository as shown in the following screenshot.
15- Click 101-vm-simple-windows. You should see the JSON files in the folder as shown in the following screenshot.
Summary
In this post, we have created a GitHub account and a repository named “ARM-Templates”.
Then, we have downloaded and configured settings for GitHub and cloned the “ARM-Templates” to a local repository.
And lastly, we have integrated Visual Studio Code with Git and pushed changes to the remote repository on GitHub.
Until then… see you in the last Part.
Thanks for reading.


