Introduction
Greetings, fellow sysadmins and everyone who is still wondering how to make their SQL server highly available! You’re just in time since I’ve prepared for you detailed guidelines with pictures and explanations on how to achieve this goal by using the SQL Server AlwaysOn approach! The great thing is that we are also going to configure and review the full-fledged system with the disaster recovery scenarios implemented. I’ve decided to break this topic into 3 parts. First, we will go through the process of configuring AlwaysOn Failover Cluster Instance (FCI), the next part of this series will cover the deployment of a DR site for our cluster using AlwaysOn Availability Groups, and finally, we will learn more about how to achieve the same using 3rd party software.
The first thing you should keep in mind is that SQL AlwaysOn FCI needs shared storage, whether traditional iSCSI or Fiber Channel SAN. There is also an option to use third-party tools allowing you to replicate the local storage of the servers, thus you get some sort of a shared storage pool that is accessed by all of the nodes in the cluster. For the record, I’ve chosen the second option, since I found it more performant and safe (yes, yes, yes, I belong to that caste where SAN remains a single-point-of-failure, despite what they say). But let’s go back to the architecture of SQL FCI.
AlwaysOn FCI was designed to provide the protection from the unplanned node failure or any other possible breakdowns. In case you run out of luck and one of the nodes goes down, the SQL service simply gets started on one of the remaining nodes. It is important to understand that there still can be a little downtime since it obviously takes some time to start the service and reapply all the transactions. The feature itself requires Windows Server Failover Clustering (WSFC) and some form of shared storage, as I’ve mentioned above. From the licensing standpoint, AlwaysOn FCI is fully available in SQL Server Enterprise Edition and has a limitation of 2 nodes in the Standard Edition.
We’re moving on, so stick around.
Cluster configuration details
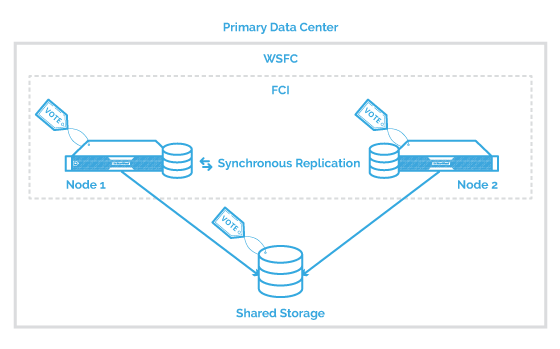
Below there is a diagram of what we are trying to build.
Basically, we are going to configure a 2-node Windows Server 2012 Failover Cluster that will host SQL Server Failover Clustered Instance. Let’s say that you guys have the cluster already configured with all the necessary features installed, like the Microsoft .NET Framework 3.5.1 and 4.0 that are both required for proper functioning of SQL Server. As for the shared storage, I’ve decided to utilize VSAN from StarWind for this purpose, since it does its job without extra efforts by simply mirroring the local storage of the nodes. Eventually, I’ve created one CSV that will be utilized for storing altogether: SQL related files and databases. Well, just before we look into the SQL FCI installation process, let’s define a quorum mode that will be used in an AlwaysOn FCI configuration. There are three possible options:
– Node Majority
– Node and Fileshare Majority
– Node and (symmetrical) Disk Majority
I’ve decided to choose the latter. It means that a cluster disk storage becomes available to all the failover nodes in the WSFC cluster.
Configuring SQL Server FCI
Now, let’s take a look at the procedure itself, which is pretty straightforward and easy to follow.
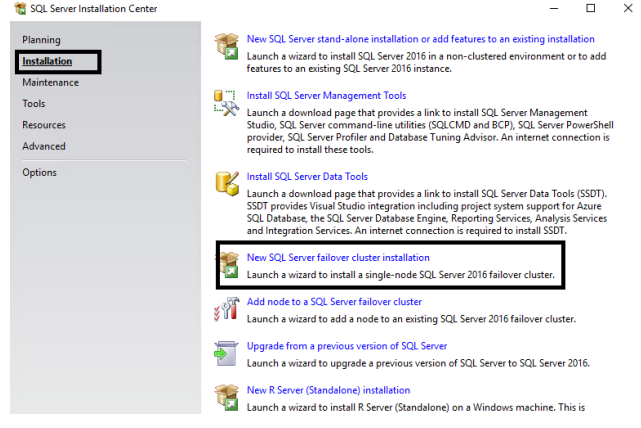
- Run the SQL Server executable on the first node (as administrator, of course) and you will see the page as shown below. Select New SQL Server Failover Cluster Installation.
- Afterwards, you have to enter the product key, accept the Licensing Terms, and choose if you want Windows to install updates automatically (all that boring stuff, as we call it).
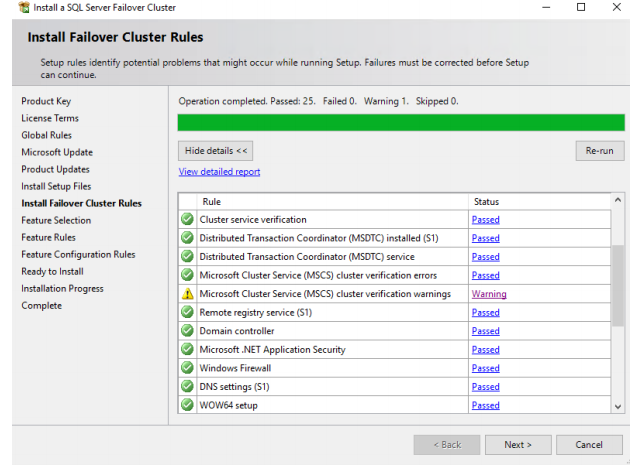
- Next, we come to the page where the installer validates the cluster configuration to make sure the setup process will go smoothly. Basically, we react only to the failures while ignoring the warning messages. However, I’d still recommend checking all of them before proceeding.
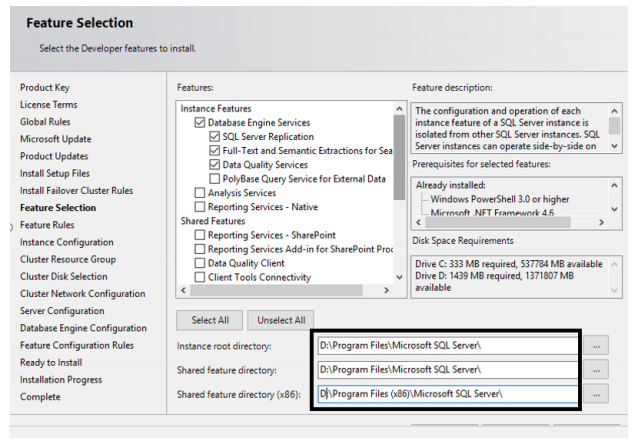
- At this step, you tick all the features you want to install. Also, the good practice is to keep SQL system files and databases on a dedicated local drive (it is D in my case).
- To go further, you name a server and, if you wish, an instance along with the SQL Server resource group.
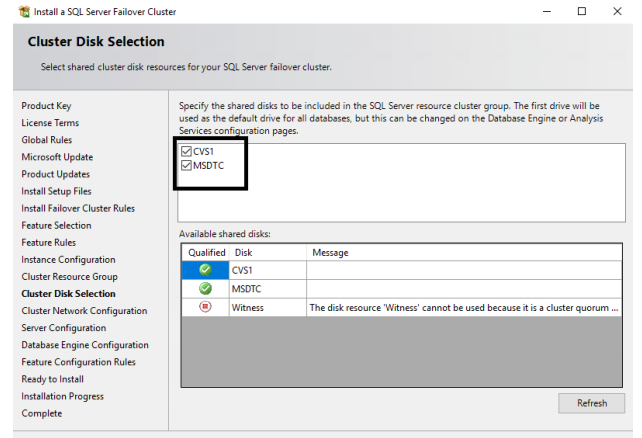
- The cluster disk selection page asks you to select the disks you want to add into the cluster. I have two shared volumes that are used for all databases and MSDTC accordingly. (Note: Starting with SQL Server 2008, creating a clustered MSDTC is no longer a requirement for building a SQL Server FCI)
- The next step is going to be a Cluster Network Configuration where you specify a static IP address for your SQL Server (DHCP is not recommended, btw).
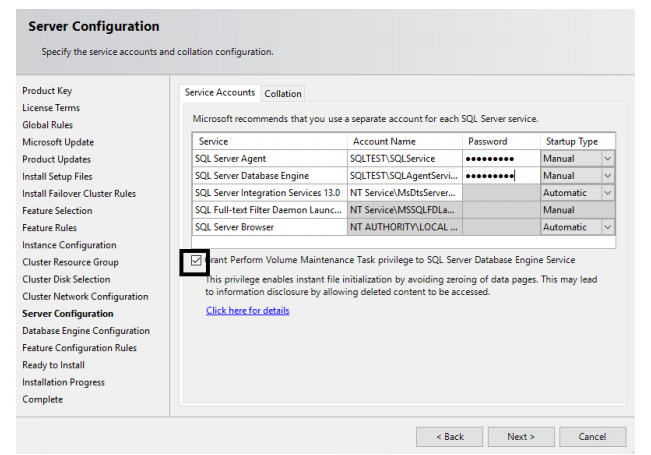
- On the Server Configuration tab, you should select the Service Account you will use for SQL Server and Agent. Do not forget to check the box “Grant Perform Volume Maintenance Task to SQL Server”, which will allow the SQL Server to perform restoring and autogrowth faster.
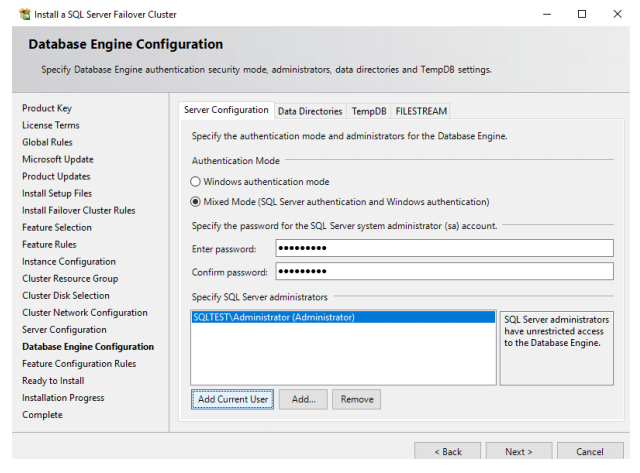
- Database Engine Configuration assumes selecting the Authentication Security Method (our choice is a Mixed one). You should specify the password for the SA account and optionally add the current Windows account as administrator.
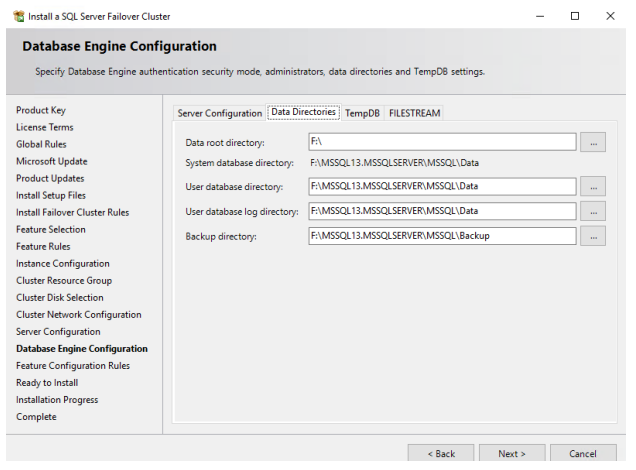
On the same page, we go to the Data Directories tab, where you can select the drives that will keep data, log, and Tempdb files. Note that they should be on different drives according to Microsoft best practices.
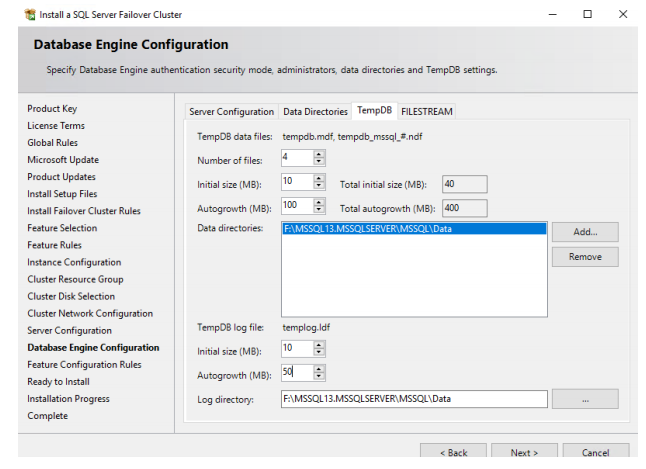
- Next, click Tempdb tab and configure Tempdb as shown in the picture below. I would actually recommend referring to the appropriate source at Microsoft knowledge base (https://support.microsoft.com/en-in/help/2154845/recommendations-to-reduce-allocation-contention-in-sql-server-tempdb-d) to configure it correctly since its configuration depends on the number of logical cores in the system.
- The last steps will be checking the parameters you’ve selected and the installation process itself.
- When the installation is completed, you can move to adding node 2 to the SQL Server FCI.
The process is almost similar to the configuration of the node 1: you run the installation, enter the product key, name the node, add the password for SQL Server and Agent service account, and finally, end it by checking the features of the added node.
Having followed these steps, you can consider your SQL Server FCI as completely configured.
If you require more detailed instructions on how to create SQL Server FCI, please refer to this guide: VSAN from StarWind® SQL Server HADR using Availability Groups and Failover Cluster Instance
Conclusion
Well, I hope you are now convinced that FCI technology can become a powerful tool for creating SQL Server HA environments, and what’s most important, that it is easy to configure. As for me, FCI is the best HA solution for those who have at their disposal just 2 nodes and aren’t going to spend lots of money on the project (we remember that having even standard edition, you can feel free to configure a 2-node cluster with the shared storage powered by free StarWind VSAN, for instance). In the next articles, we will continue working on this system and deploy a DR site using two different methods. Stay tuned!


