There’s, probably, no IT administrator who hasn’t heard of SMB3 (Server Message Block). is an application-layer network protocol, developed by Microsoft mostly to provide shared access to the files, and allowing communication between nodes. SMB has been designed as a tool for the creation of a DOS-based network file system, but Microsoft took the initiative and renamed SMB into CIFS later on (Common Internet File System) and continued further developing it. The second version – SMB 2.0, has been introduced in Windows Vista with a wide range of new features, thus it became clear that Microsoft was working hard to improve this protocol.
Now, to SMB3. It’s an improved version of the previous Server Message Block protocol that Microsoft introduced as one of the key features in Windows Server 2012 operating system. SMB3 comes with a significant number of new capabilities like SMB Transparent Failover, SMB Encryption, VSS for SMB file shares, SMB Direct (SMB over RDMA) and SMB Multichannel. SMB Multichannel allows file servers to use multiple network connections simultaneously, therefore increasing performance and adding one more level of Fault Tolerance within the networking layer.
By including all these options, Microsoft was aiming to improve the functionality and performance, especially for virtualized data centers. And they succeeded, thereby, SMB along with NFS is now one of the most widespread network protocols.
Mainly, the SMB3 protocol is often used for the configuration of the client file access to the storage. The best example of its implementation would be the creation of an HA Network Share within the Windows Server Failover Cluster. For demonstrating the basic application of SMB3, why don’t we briefly go over the process?
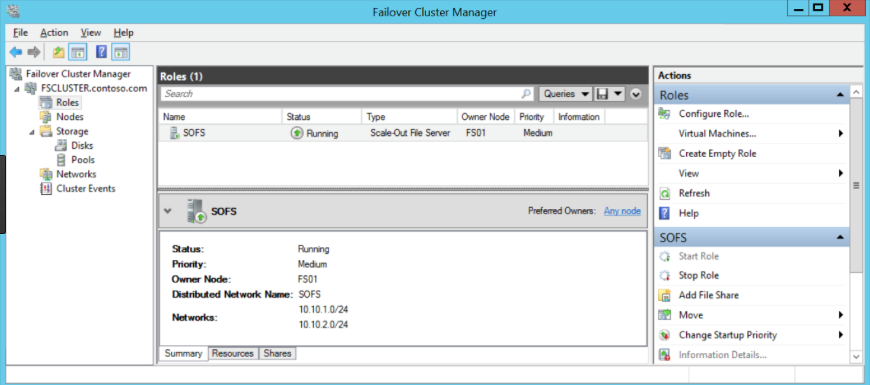
Since there are a lot of great guides that describe the implementation process from scratch, I’ll skip the cluster creation part. So, after we added drives to the cluster as cluster shared volumes, we move on to adding a Scale-Out File Server Role. Once complete, the Failover Cluster Manager window should look as shown below:
It would also be possible to add a Scale-Out File Server role by using Windows PowerShell command:
“Add-ClusterScaleOutFileServerRole -Name SOFS -Cluster FSCLUSTER”The important thing is that the Scale-Out File Server requires a cluster shared volume to be set. In my case, I considered VSAN from StarWind as a shared storage provider for this purpose. It mirrors the local disks of the nodes, so as a result, we get a network share sitting on an HA storage.
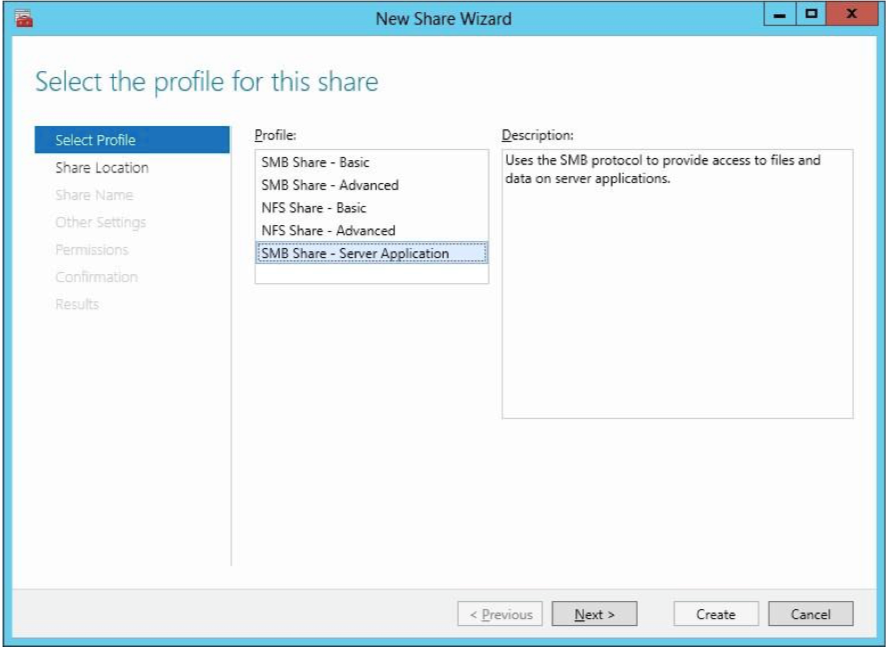
So, the first step of configuring a continuously available SMB file share requires a selection of a profile. We have several options here, each with their differences:
The next step is to select corresponding CSV which will host the share. After this is done, we specify the share name and its location. Also, make sure that the “Enable Continuous Availability” checkbox is activated.
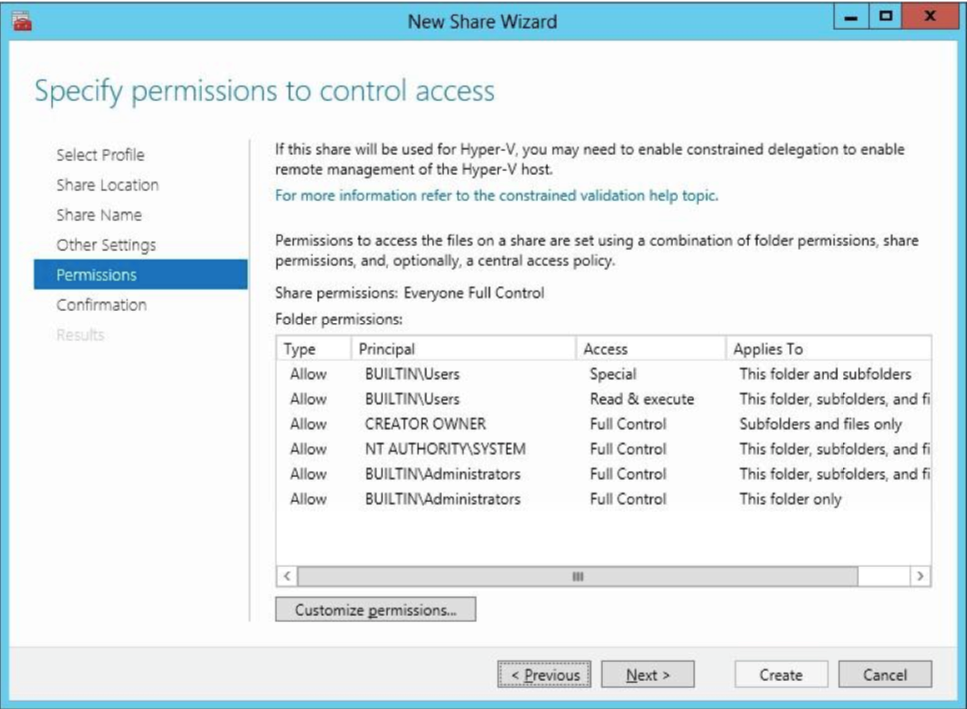
Another important note: on the “Specify permissions to control access” page, click “Customize permissions” and grant the following permissions according to the expected workload:
- If you are using this Scale-Out File Server file share for Hyper-V, all Hyper-V computer accounts, the SYSTEM account, and all Hyper-V administrators must be granted full control over the share and the file system.
- If you are using Scale-Out File Server with Microsoft SQL Server, the SQL Server service account must be granted full control on the share and the file system. The outcome should look like on the screenshot below:
Basically, that is all you should consider when configuring a continuously available SMB file share.
Conclusion
So, let’s draw a line and summarize the things that I’ve touched in this article. When it comes mostly to providing a transparent remote access to the files, it becomes clear that SMB 3.0 is a great way to create a high-performing and highly available Scale-Out File Server, thanks to the useful set of features. It also allows you managing user permissions that is one of the pleasant options here. Moreover, the SMB3 implementation won’t take much of your time since the configuration process is pretty much straightforward.


