Introduction
In Part I of this series, we created the tenant virtual network and connecting two VMs to it using System Center Virtual Machine Manager, and then we validated that both VMs can route between each other.
In Part II, we created a public Virtual IP Address (VIP) on the Software Load Balancer (SLB) using VMM console and PowerShell through which we were able to access a website on the virtual network. We also created Site-to-site (S2S) VPN to a Remote site.
In the final Part III, we will be restricting access to the Web server VMs (VM1 and VM2) that we have already deployed in Part I, as well as limiting what the Web server is able to access to only what it needs. This reduces the attack surface of the Web server as well as limits its ability to attack other services if it were to be compromised.
For more information about Extended Port ACLs in VMM, please check the following article:
Please make sure to check Part I so you can have an overview of the infrastructure and the VMM Logical Network that we are using throughout this series.
Add Dynamic Security with Port ACLs
In the following steps, we will be restricting access to the Web server VMs as well as limiting what the Web server is able to access to only what it needs:
As of this writing, Port ACLs in Virtual Machine Manager is managed by Windows PowerShell only.
- Open SCVMM Console and click on the “Home” ribbon tab. Click on the PowerShell button in the ribbon.
- To create a new Access Control List (ACL), in the “Windows Powershell console – Virtual Machine Manager” window, type the following command and Press Enter:
$acl = new-scportacl -Name FrontEnd -ManagedByNC - To create an inbound rule for HTTP, type the following command and Press Enter:
New-scportaclrule -Name AllowHTTPIn -Description "Allow inbound HTTP to VM" -Type Inbound -Protocol TCP -Action Allow -PortAcl $acl -DestinationPortRange 80 -priority 110 - To create an inbound rule to block all traffic by default, type the following command and Press Enter:
New-scportaclrule -Name BlockAllIn -Description "Block All Default" -Type Inbound -Protocol Any -Action Deny -PortAcl $acl -priority 120 - To create an outbound rule to allow DNS, type the following command and Press Enter:
New-scportaclrule -Name AllowDNSOut -Description "Allow DNS Out" -Type Outbound -Protocol TCP -Action Allow -DestinationPortRange 53 -PortAcl $acl -priority 120 - Create an outbound rule to allow HTTP across S2S, type the following command and Press Please update the destination IP address according to your environment.
New-scportaclrule -name AllowIntranet -Description "Allow Port 80 out" -Type Outbound -Protocol TCP -Action Allow -DestinationPortRange 80 -DestinationAddressPrefix "60.60.60.1/32" -portacl $acl -priority 115 - To create an outbound rule to block all traffic by default, type the following command and Press Enter:
New-scportaclrule -Name BlockAllOut -Description "Block All Default" -Type Outbound -Protocol Any -Action Deny -PortAcl $acl -priority 130 - Last but not least, to apply the rule to the Web server subnet, type the following command and Press Enter: After a few seconds your ACLs will be applied to both Web servers (VM1 and VM2).
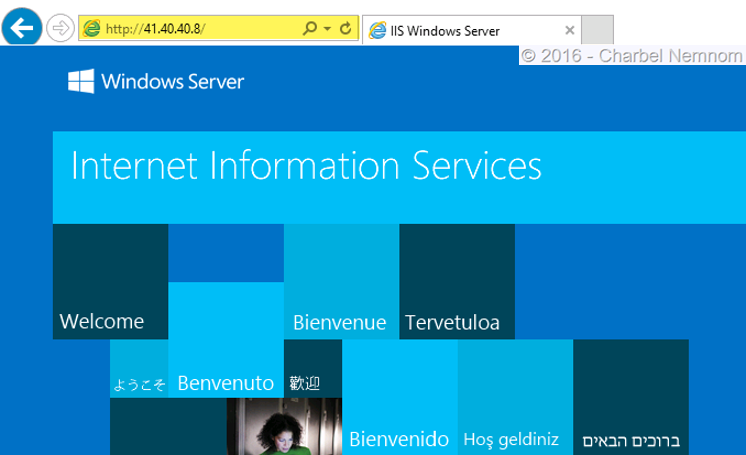
Get-scvmsubnet -Name "subnet1" | set-SCVMSubnet -PortACL $acl Get-scvmsubnet -Name "subnet2" | set-SCVMSubnet -PortACL $acl - To verify the Virtual IP access, open up Internet Explorer, and navigate to http://41.40.40.8 (your IP might be different). And confirm that the web page is the “IIS start default page.” As shown in the following screenshot:

- To verify Site-to-site connectivity to the remote site, you can connect to the Web Server VM1 and VM2, open up Internet Explorer. Navigate to: (your IP might be different) and confirm that the web page opens.
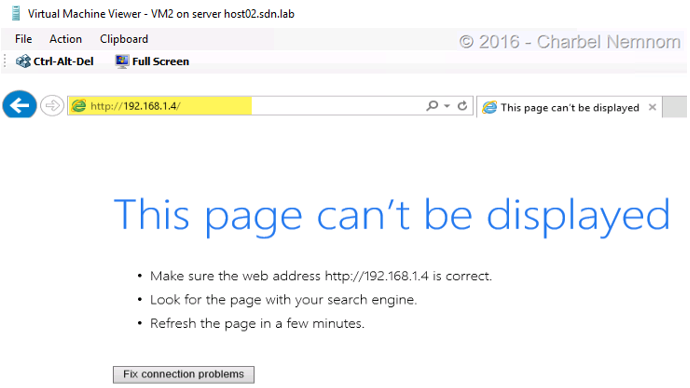
- In the final step, we will verify the ACL restrictions by connecting to “VM2” via the console. Open up Internet Explorer and navigate to http://192.168.1.4 (IP of VM1 web server). The browser should report “This page can’t be displayed”.
Summary
In the final part, we restricted access to the Web server VMs as well as limiting what the Web server is able to access to only what it needs. This reduces the attack surface of the Web server as well as limits its ability to attack other services if it were to be compromised.
I hope these series have been informative to you and I would like to thank you for reading!


