Introduction
Microsoft announced the release of VMM SDN Express for System Center Virtual Machines Manager 2016 to simplify their Software-Defined Networking (SDNv2) deployment infrastructure.
You can read about this announcement here:
https://blogs.technet.microsoft.com/scvmm/2016/11/28/announcing-vmm-sdn-express-for-vmm-2016/
In short, VMM SDN Express is basically a VMM PowerShell script and parameter file that help you to deploy a production-ready Software-Defined Networking on top of Windows Server 2016 Datacenter Edition and SCVMM 2016, and without you having to move through multiple wizards or having to wait for a long time.
The VMM SDN Express script can be downloaded from Github, including the required VMM templates, documentation and example of two parameter files. There you will find the following:
In the rest of this blog post, I will walk you through the Fabric configuration deployment and share with you the lessons learned, so you can deploy VMM SDN Express successfully in your environment.
Infrastructure Overview
We have the following servers already deployed in the environment:
- Domain controller, DNS server, and DHCP Server.
- System Center Virtual Machine Manager 2016 with Update Rollup 2.
- 4 Hyper-V nested hosts running Windows Server 2016 Datacenter Edition.
- Routing and Remote Access Service (RRAS).
- Remote Site (workgroup machine).
We have also prepared Windows Server 2016 Datacenter image (Server Core or Full Server) as Generation 2 VM that VMM SDN Express will use as a prerequisite to deploying the SDN stack, more on that later.
Planned Logical Networks for Management and SDN Topology
Additional logical networks need to be created and provisioned during the SDN deployment for the gateway, and SLB usage. You need to work closely with your network administrator to obtain the correct IP prefixes, VLAN IDs, and gateway IP addresses for these networks.
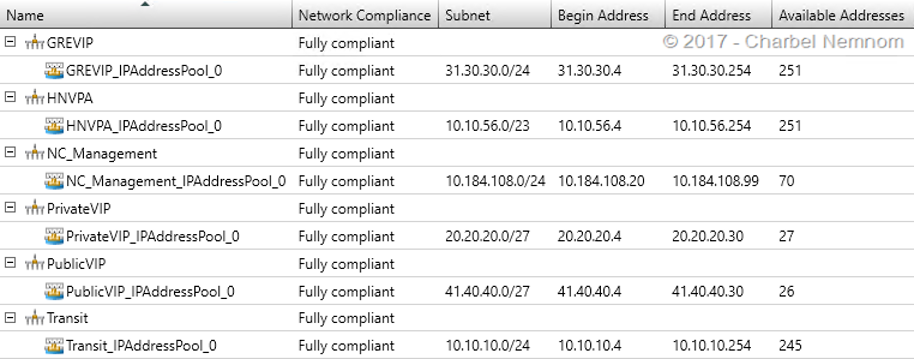
In this example, we will use the following logical networks:
To plan your Software Defined Network Infrastructure correctly, please review the following guide by Microsoft.
VMM SDN Prepare Deployment
As mentioned earlier, we have 4 Hyper-V hosts deployed and are managed by SCVMM 2016 as shown in the following screenshot.
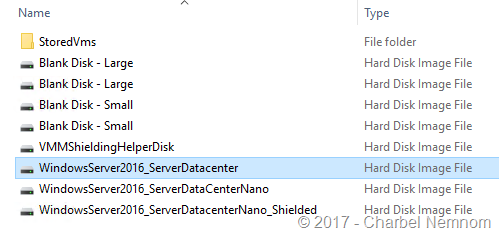
Please also make sure to copy Windows Server 2016 Datacenter image (VHDX) to the VMM Library\VHDs folder.
In the following steps and before we run the VMM SDN Express deployment, we will update the Fabricconfig.psd1 file to match our environment.
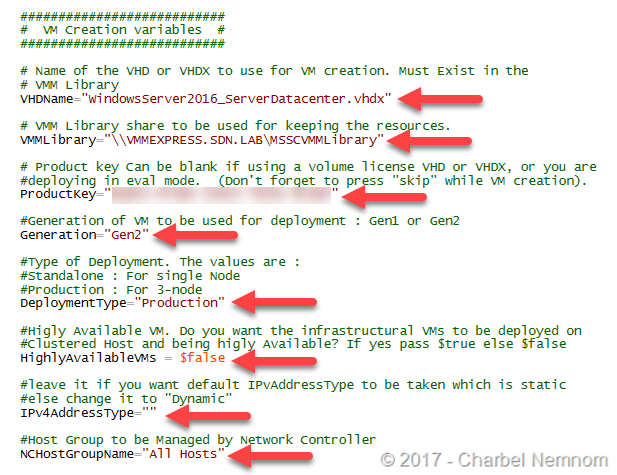
Open Fabricconfig.psd1 with Windows PowerShell ISE and update the “VM Creation variables” section as the following:
- Specify the VHDX file name that you imported to VMM library.
- Specify the UNC path of the VMM library share and that your admin account has write access to it. In this example “\\VMMEXPRESS.SDN.LAB\MSSCVMMLibrary”
- Specify Windows Server 2016 Datacenter product key
- Specify the Generation of the VM image to be used (Gen2).
- Specify the deployment type. In this example, we will use “Production” deployment.
- Specify if you want the SDN infrastructure VMs to be deployed as highly available (clustered VMs).
- Specify if you want static or dynamic IP address.
- Specify the host group name in VMM where the Network Controller will manage all the Hyper-V hosts. In this example, we used the default host group in VMM named “All Hosts”.
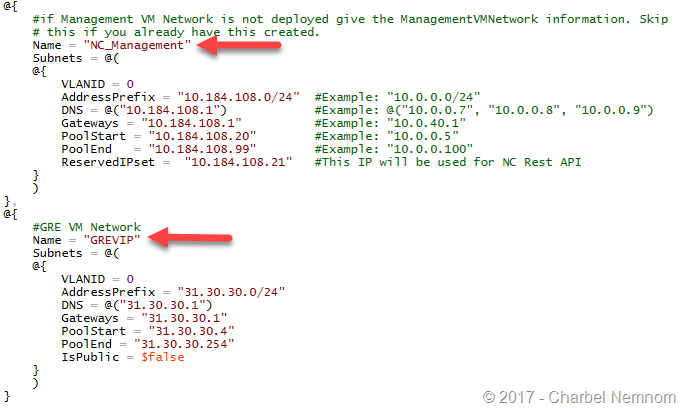
- If you want VMM express to deploy the Logical switch and Management Network for you, then make sure to set the IsLogicalSwitchDeployed = $false and IsManagementVMNetworkExisting = $false
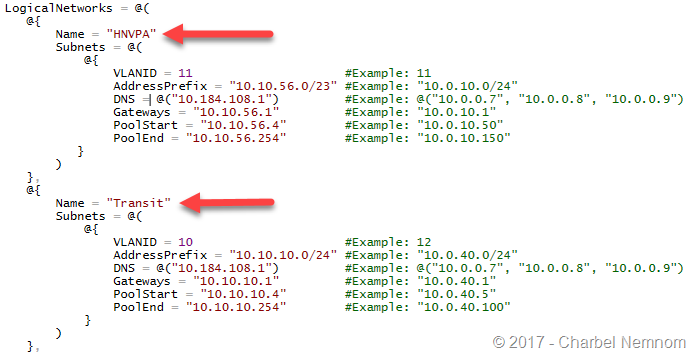
- The below set of Parameters is needed to create the Management Logical Network and other Logical Networks that are managed by Network Controller.
- Specify the IP address for the HNV Provider and the Transit logical networks. Please refer to the “Planned Logical Networks for Management and SDN Topology” section at the beginning of this article.
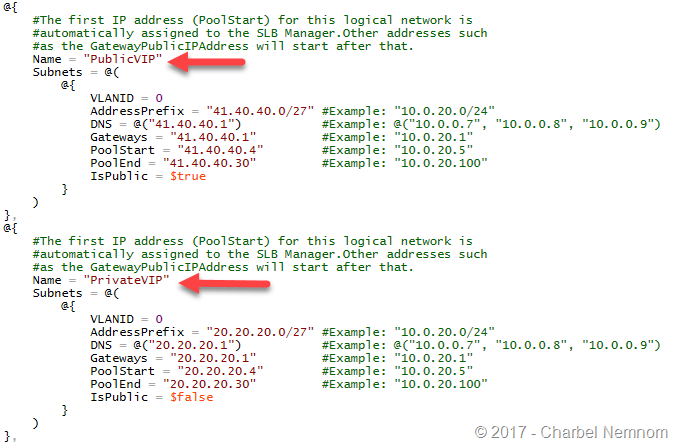
- Specify the IP address for the Public and Private logical networks that will be assigned to the Software Load Balancer (SLB) Manager.
- The following set of parameters are needed for importing the service templates into VMM (NC, GW and SLB), then configuring and deploying the service templates for you.The parameters below are self-explanatory. You need to make sure to create a domain user account and two security groups in the active directory before you go ahead with the deployment. The RestName must be unique and should not exist in the environment. Basically, the RestName is very important when you deploy a “Production” SDN with 3-Nodes. Because Network Controller is the cornerstone of SDN management, it is critical for Network Controller deployments to offer high availability and the ability for you to easily scale up or down Network Controller nodes with your datacenter needs. The NC service URL name will point to the 3-Nodes Network Controller on the backend.
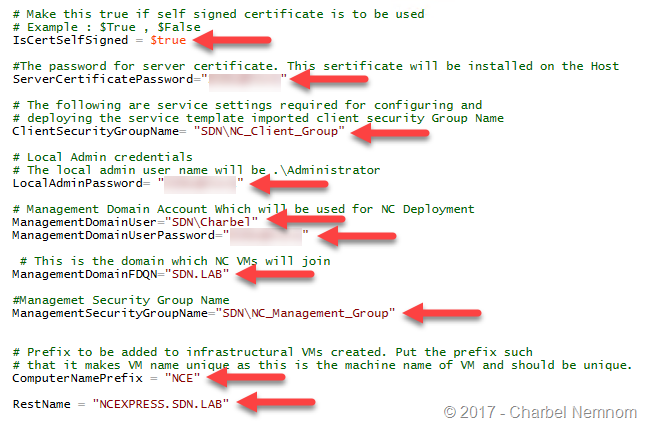
Please note that the “Management Domain User” account used for the NC deployment (i.e. SDN\Charbel) must be member of the “Client Security Group Name” and the “Management Security Group Name” in Active Directory or the deployment will fail later on.
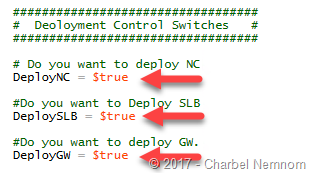
- Finally, you need to specify what you want to deploy. In this example, we are deploying the full SDN Stack (Network Controller, Software Load Balancer, and Gateway).
VMM SDN Express Deployment
The current VMMExpress.ps1 script has a small bug, if the folder named “scripts” does not exist before you launch the deployment, the script will fail. So please add the following command on line 50 as shown in below screenshot:
if (!(test-path "$($Logfile)")) {mkdir -Path (split-path $pwd) -Name scripts -Force}You need also to remove the backslash “\” before the word “scripts” at line 49.
This command will create a folder called “scripts” on the volume where the Express deployment script is located.
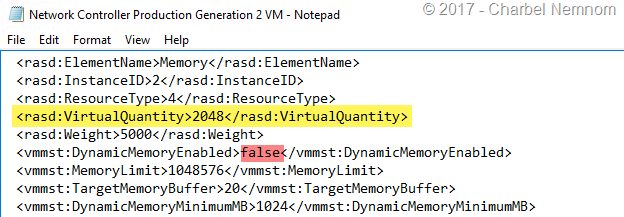
As a side note: If you are evaluating the SDN deployment using Nested Virtualization, you might need to update the .XML service template for NC, GW and SLB by decreasing the amount of memory to 2GB instead of 4-8GB.
We are ready now to deploy SDN Express.
Open an elevated PowerShell console and run the VMM Express deployment by specifying the ConfigurationDataFile as shown in below screenshot and press Enter.
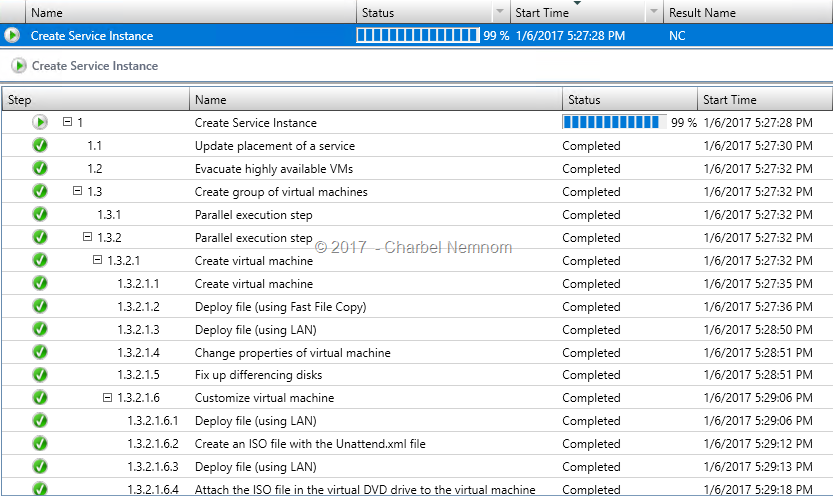
The SDN Express deployment will start, you can switch now to VMM Jobs view and see the deployment steps in details:
At this point, the script will create all the needed logical networks in VMM and import the service templates one at a time and create the services for you as shown in the next screenshot.
Here is the logical networks overview after the deployment.
The Network Controller is added as new Network Service in VMM. The connection string “serverurl=https://NCEXPRESS.SDN.LAB;servicename=NC” is the RestName that we specified in the fabric config file for highly available NC deployment with 3 nodes.
The entire VMM SDN Express deployment will take around 2 to 3 hours depending on your machine speed.
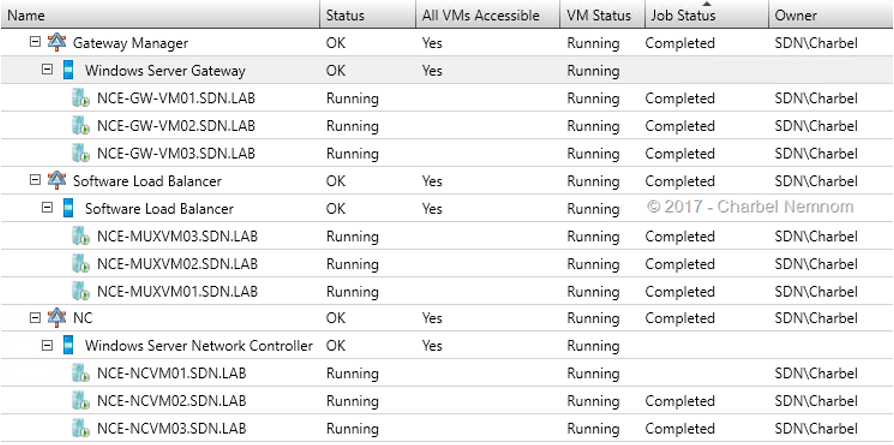
Once the deployment is completed, you will have 9 VMs deployed and configured as shown in the next screenshot (3-Nodes NC, 3-Nodes GW and 3-Nodes SLB).
Conclusion
Now as the entire SDN stack is deployed and on-boarded, you can go ahead and deploy tenant workloads and check if everything is good with Networking perspective.
To help you evaluate SDNv2, we have published a series of blog posts that covers how to manage a Software-Defined Networking deployment using System Center Virtual Machines Manage 2016 which was deployed using VMM SDN Express covered in this article.
How to Deploy and Manage Software-Defined Networking using SCVMM 2016 – Part I
How to Deploy and Manage Software-Defined Networking using SCVMM 2016 – Part II
How to Deploy and Manage Software-Defined Networking using SCVMM 2016 – Part III
I encourage you to deploy and evaluate SDNv2 stack in Windows Server 2016 managed by SCVMM 2016 and share your feedback in the comment section below.
I hope this post has been informative to you and I would to thank you for reading!


