Introduction
There are lots of posts regarding Hyper-V networking. But there doesn’t seem to be a single compiled and up to date guide covering fundamentals and some advanced topics alike. This article aims to fill that gap, without a wall of text but a few easy to understand diagrams, tables, and PowerShell snippets. We will take a look at Hyper-V’s basic networking concept, NIC teaming (Network Interface Card) and different approaches to let VMs (Virtual Machines) talk to specific VLANs or even VLAN trunks.
The first article in the Hyper-V Networking 101 series will cover everything you need to know about virtual switches and NICs. The last post is planned as a real-world example: A way to implement a secure Wi-Fi (and/or wired) guest network on top of a virtual firewall.
Physical vs. Virtual Networking
Networking in the virtual world isn’t that different from its physical counterpart. A basic VM, like any basic server, may use one (virtual) NIC that connects to a single subnet. You could add additional IP addresses to that NIC to reach even more subnets. Add additional NICs for load balancing and/or redundancy or to make your OS reach other networks. Even VLANs may be applied at any given stage. To be honest, there is absolutely no real difference that you may notice in your day to day work.
Hyper-V Networking
Hyper-V tries to keep things as simple as possible when it comes to networking. There are two logical layers between your VM and your physical uplink: A virtual NIC and a virtual Switch. The virtual switch itself is dumb, apart from a few advanced settings. There is no management interface, no Layer 3 functionality, no spanning tree configuration. It’s more like a logical abstraction layer in the background that provides network connectivity to your VMs.
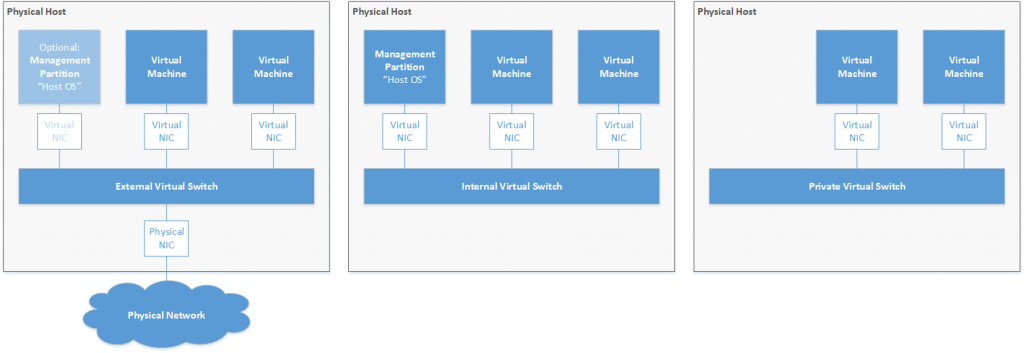
Figure 1: Virtual Switch Types
Hyper-V provides three types of virtual switches: external, internal and private. They are nearly identical, the only real difference between the different types is optional access for the management partition and access to external networks.
Table 1: Virtual Switch Types
Please note that each physical NIC that has been bound to a virtual switch cannot directly be used for other purposes anymore.
Management partition connectivity: “Allow management operating system to share this network adapter”
Remember that Hyper-V is a type 1 hypervisor. This means that there is just a small piece of software running on the hardware and the virtual machines. And: There’s absolutely no host operating system. Instead, the management OS is simply running as a virtual machine too.
Figure 2: Type 1 hypervisor vs. bare metal
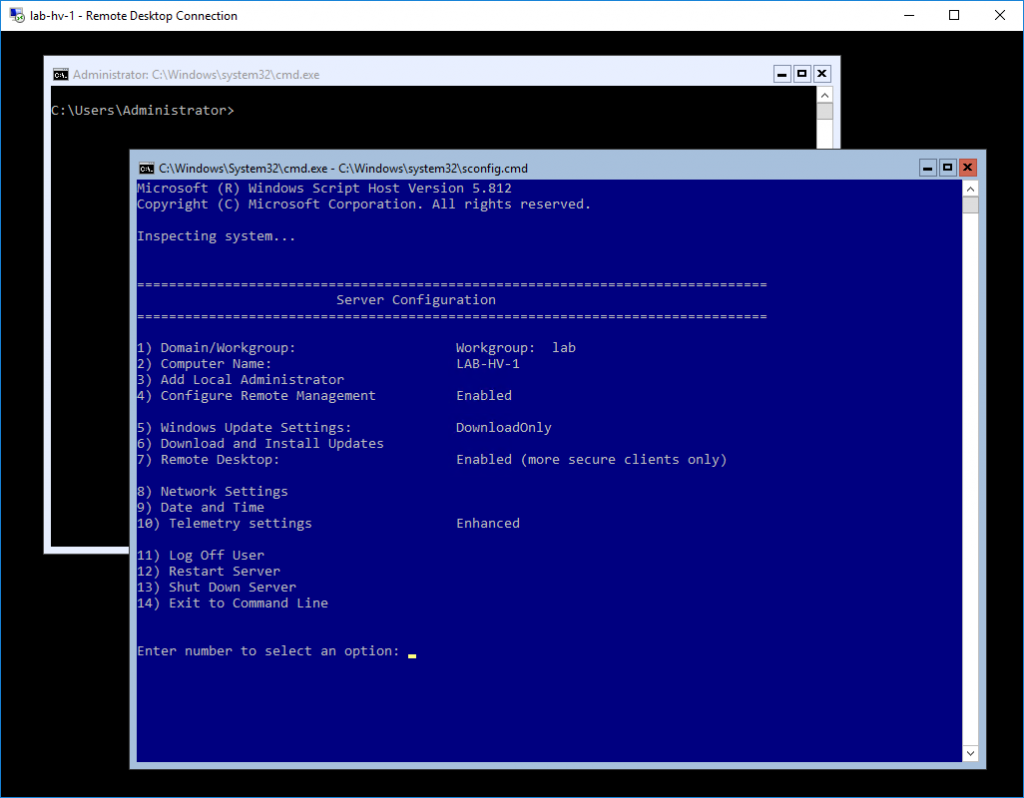
This is true even if you install Windows Server with a full-blown GUI. Once you activate the Hyper-V role and reboot the host, your previous bare metal operating system will run on a virtual machine. Below is a screenshot showing a Microsoft Hyper-V Server 2016. Even this minimal interface isn’t running directly on the hardware, but inside a virtual machine – the management partition:
Figure 3: Microsoft Hyper-V Server Management OS
What happens in the background when you allow your management partition to access a virtual switch is simpler than you might think, and there’s absolutely no magic involved: Hyper-V just adds a virtual NIC to the VM running the management OS. That new virtual NIC will be connected to your virtual switch, as shown in the following diagram:
Figure 4: Management OS – just another virtual machine
External Switch
Probably the most often used type. It provides access to external networks via physical uplinks, either teamed or single NIC(s). You may also allow the parent OS to access that switch. In this case, Hyper-V creates a new virtual NIC and connects that NIC to the virtual switch.
Figure 4: External virtual switch
Hints:
- Remember: Your Host-OS is just another VM, even if it looks like a regular physical installation.
- You cannot bind the same physical NIC to more than one virtual switch.
Create a new external switch using PowerShell
Get-NetAdapter -Name "pNIC" | New-VMSwitch -ComputerName localhost -Name "ExternalSwitch1" -AllowManagementOS $truePlease note that we do not provide the parameter SwitchType here because a virtual switch having a physical NIC is always an external switch per definition.
Internal Switch
The internal switch provides access between VMs and the parent partition. This could be used for local monitoring or backend services like databases for example, which are not supposed to talk to the outside world.
Figure 6: Internal virtual switch
Create a new internal switch using PowerShell
New-VMSwitch -ComputerName localhost -Name "InternalSwitch1" -SwitchType InternalPlease note that we do not provide the parameter AllowManagementOS here because granting access to the management OS is not optional for internal switches.
Private Switch
Private switches are identical to internal switches. The just don’t provide access to the management partition. There are a few use cases like a heartbeat connection for clustered VMs for example. But having clustered services on the same physical host rarely makes any sense…
Better use VLANs with external switches, which will be covered in a later article.
Figure 7: External virtual switch
Create a new private switch using PowerShell
New-VMSwitch -ComputerName localhost -Name "PrivateSwitch1" -SwitchType PrivateLike with the internal switch, we are not using the SwitchType parameter here.
Example: A redundant virtual firewall system using CARP
The following diagram demonstrates a possible use case involving two external and a private virtual switch. For example, two pfSense firewall VMs using CARP do need a private network to sync their states and configurations.
This is not what I would call best practices, because – like I said before – redundant systems on the same physical hardware hardly make much sense (in most cases). Better use another external switch, run tagged VLAN traffic on it and have your firewall VMs deployed to different hosts. I’ll talk about that in another article soon.
Figure 8: Scenario with multiple virtual switches
Conclusion & Outlook
This guide’s intention is to help you to understand how Hyper-V networking works. Like I said before, we’ll slowly dive into more details soon. The next article in the Hyper-V Networking 101 series will be about different types of teamed NICs.
Feel free to leave a comment in case you have any questions – or if you would like to have a specific topic covered during this series.
- Deploy Hyper-V VM Switches and vNIC consistency with PowerShell
- How to Optimize Microsoft Hyper-V Failover Cluster and Double Performance


