How does it work?
Being triggered, the Node Fairness service determines the current workload on the cluster hosts. If needed, it automatically migrates VMs to the less loaded host.
After the start, the cluster service checks the host for two factors:
- If the average host CPU load exceeds the tolerated threshold
- If the average host memory utilization is higher than the tolerated threshold
In case either of these criteria is met, the VM gets live migrated to the less loaded host. Neither guest system nor services do experience any downtime.
Node Fairness modes
There are several modes you can set for Node Fairness:
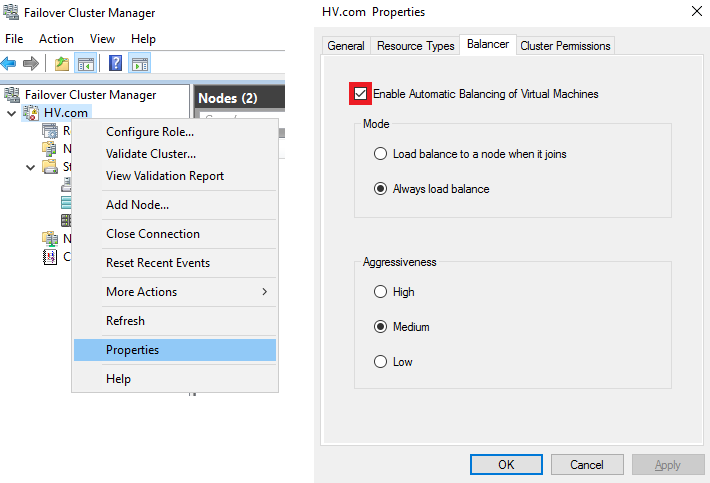
- Load balance to a node when it joins. This mode is applied to the host that was the last one to connect to the cluster.
- Always load balance. Under this mode, the load balancing runs on all cluster nodes. The diagnostic of hosts is activated every 30 minutes and the service decides whether to rebalance or not.
Also, there are three possible values you can configure for migrating VMs, or what is called the “Aggressiveness” of Node Fairness.
- VMs are migrated once CPU or RAM load exceeds 60 %.
- VMs will be migrated once CPU or RAM load exceeds 70 %.
- VMs migrate once CPU or RAM load exceeds 80 %.
WHEN YOU DON’T NEED NODE FAIRNESS?
If your VMs do not need automatic workload balancing, you should simply disable Node Fairness.
Also, Node Fairness is useless if the host workload reaches 100% and lasts for, let’s say, 20 minutes but is not noticed by a regular 30-minute check. In this case, no rebalancing occurs. Therefore, Node Fairness may simply get past a situation when a solution is required immediately. If that happens, you should better migrate your VMs manually.
It should also be noted that Node Fairness isn’t required for all of your VMs. In particular, that may be VMs that use migration-sensitive services.
How is Node Fairness configured?
Now, let’s configure the discussed feature.
There are two options for configuring Node Fairness:
- Failover Cluster Manager Console
- PowerShell
Let’s start with Failover Cluster Manager. Here is the setup I have:
- 2 nodes
- 4 virtual machines
Simple as that, let’s go.
All four VMs are running on one of the nodes:
To enable Node Fairness, go to the cluster properties. Afterward, open the Balancer tab and check the “Enable Automatic Balancing of Virtual Machines” box. In that tab, you also can set the required mode and aggressiveness of VM’s migration. I’ll go for Always load balance with Medium aggressiveness.
Once you apply the settings, the diagnostic of host workload will be run automatically. After that, the VM migrates to the host with more available resources.
Here you go, the VM has migrated successfully!
Now, let’s do the same via PowerShell.
Use the command below to check the existing rebalancing parameters:
Get-Cluster | fl AutoBalancer*
To set the required rebalancing parameters, type:
(Get-Cluster).AutoBalancerMode = 2
(0 – turn off load balancer; 1 – load balance to a node when it joins; 2 – always load balance)
(Get-Cluster).AutoBalancerLevel = 2
(1 – low; 2 – medium; 3 – high)
That’s it, you’ve configured the required parameters via PowerShell.
CONCLUSION
Say, you have rebooted one of your cluster nodes for patching and it appears bright and shiny, but there is one problem – VMs were moved to other hosts and now some of them may be overloaded while your refreshed node is underutilized. That’s when Node Fairness kicks in and saves the day by automatically spreading VMs among the Hyper-V Failover Cluster nodes. As you can see, setting this feature is quite simple for both Failover Cluster Manager and PowerShell. Although Node Fairness is not required for all of your VMs and there are certain scenarios I’ve mentioned when it fails to do its job, on the overall, it is a useful feature to optimize your workload utilization.


