

Introduction
In the previous article, I’ve described 3 scenarios for testing NVMe-oF performance and skimmed through their hardware and software configuration. Again, what I wanna do, is measure how virtualization influences the NVMe-oF performance (maybe, it doesn’t at all). For this, I’m gonna examine how NVMe-oF performs on a bare metal configuration, and on an infrastructure with Hyper-V and ESXi deployed. In each case, I’ll also evaluate the performance of iSER transport using LIO and SPDK iSCSI. Now that you have the overall understanding of the project, it’s time to move on to configuring our testing environment.
So here are all the steps.
Step 1. Preparing the server
First things first – installing all the required packages:
# apt install ibutils ibverbs-utils libibverbs1 librdmacm1 libmlx5-1 libmthca1 rdmacm-utils libibverbs-dev librdmacm-dev gcc g++ make git fio targetcliNow, installing nvme-cli. To do this, we need to execute the following commands:
# git clone https://github.com/linux-nvme/nvme-cli.git
# git clone https://github.com/linux-nvme/nvme-cli.git
# cd nvme-cli
# make
# make install
Afterward, we should configure our NIC Mellanox ConnectX-4, but first, check the NIC availability:

Next, adding the support of the required modules:
# modprobe ib_cm
# modprobe ib_core
# modprobe ib_ucm
# modprobe ib_umad
# modprobe ib_uverbs
# modprobe iw_cm
# modprobe rdma_cm
# modprobe rdma_ucm
# modprobe mlx5_core
# modprobe mlx5_ib
# modprobe nvme_rdma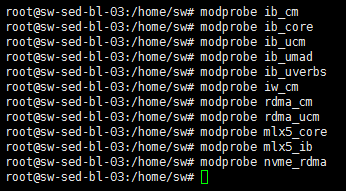
We can also add these modules to the /etc/modules file so that they could be loaded automatically when booting the system:
# vi /etc/modules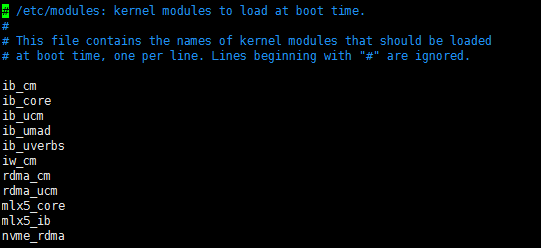
Assigning the IP address to the vi interface /etc/network/interfaces:
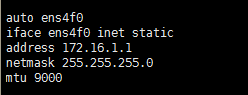
Re-starting the networking service:

Now, let’s check if our interface is up and running using the ibv_devinfo utility.
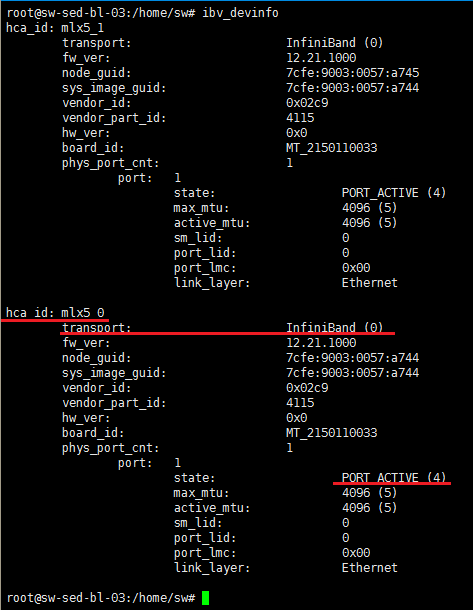
Everything seems fine, and we can proceed to the next step.
Step 2. Preparing the Client
The process here is the same as in the previous part (preparing the server), so we just perform all the same actions.
Step 3. Checking RDMA
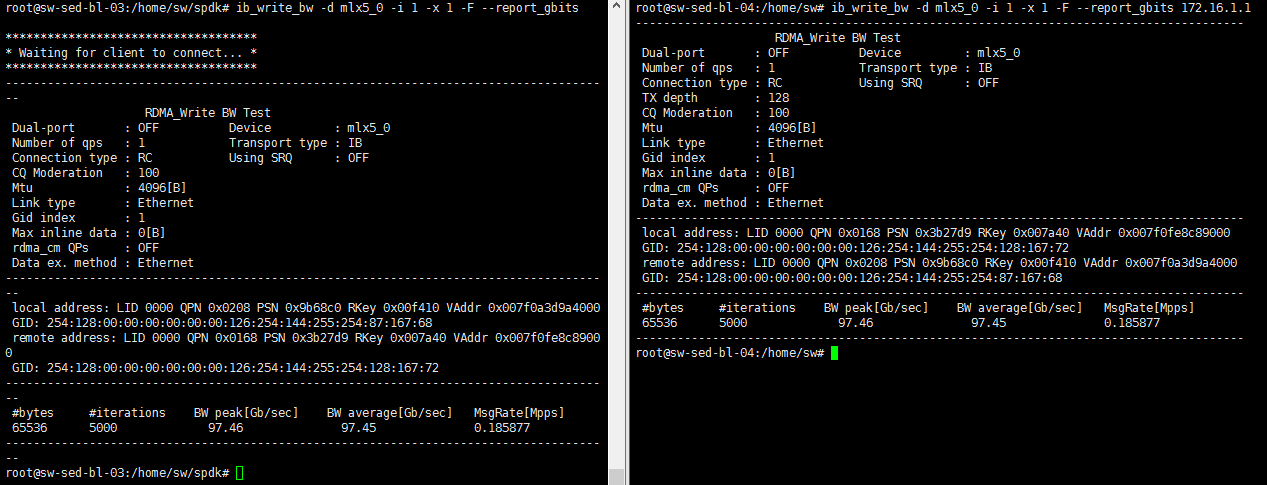
Now, we must check if the RDMA transport works between our hosts. For this, run the following command on the server:
# ib_write_bw -d mlx5_0 -i 1 -x 1 -F --report_gbitsand on the client:
# ib_write_bw -d mlx5_0 -i 1 -x 1 -F --report_gbits 172.16.1.1If everything’s OK, we should see the information as on the screenshot below:
Step4. Installing SPDK
Now that we know that the RDMA transport is working correctly, we can proceed to install SPDK and LIO. This won’t take much time.
First, getting the source code:
# git clone https://github.com/spdk/spdk
# cd spdk
# git submodule update –init
Next, installing prerequisites. The scripts/pkgdep.sh script will automatically install the full set of dependencies required to build and develop SPDK:
# sudo scripts/pkgdep.sh
Building
Linux:
./configure --with-rdma
make
Note that not all features are enabled by default. For example, RDMA support (and hence NVMe over Fabrics) is not enabled by default. You can enable it by doing the following:
And finally, to make sure that everything works correctly, run unit tests:
./unittest.shYou will see several error messages when running the unit tests, but they are part of the test suite. The final message at the end of the script indicates success or failure.
Step 5. Configuring and preparing NVMe-oF / SPDK iSCSI Target / LIO for testing
Here, I’ll show you how I’ve configured and prepared our targets for testing. Please note that I describe the configuration and preparation process for NVMe-oF, SPDK iSCSI Target, and LIO one by one. However, it shouldn’t be considered as a step-by-step process and each target must be configured and prepared separately.
The first one is NVMe-oF.
Let’s go to the catalog with default configurations:
# cd /home/sw/spdk/etc/spdkWe should copy the file with default configurations to the catalogue /home/sw/spdk/app/nvmf_tgt
# cp /home/sw/spdk/etc/spdk/nvmf.conf.in /home/sw/spdk/app/nvmf_tgt/nvme.confNow, editing the configuration file nvme.conf
In our case, the configuration file looks as following:
#--------------------------------------------------

[Global]
ReactorMask 0x00C000 # this option initiates NVMe-oF Target on Socket 1 since that’s the place where NIC is deployed

[Rpc]
Enable No
Listen 127.0.0.1

[Malloc]
NumberOfLuns 1
LunSizeInMB 10240

[Nvmf]
MaxQueuesPerSession 4
MaxQueueDepth 1024

[Nvme]
TransportId "trtype:PCIe traddr:0000:02:00.0" Nvme0 # in order to get PCIe traddr, it is necessary to execute the command provided below

RetryCount 4
Timeout 0
ActionOnTimeout None
AdminPollRate 100000
HotplugEnable No

[Subsystem1]
NQN nqn.2016-06.io.spdk:cnode1
Core 0
Listen RDMA 172.16.1.1:4420
AllowAnyHost Yes
Host nqn.2016-06.io.spdk:init
SN SPDK00000000000001
Namespace Malloc0

[Subsystem2]
NQN nqn.2016-06.io.spdk:cnode2
Core 1
Listen RDMA 172.16.1.1:4420
AllowAnyHost Yes
Host nqn.2016-06.io.spdk:init
SN SPDK00000000000002
Namespace Nvme0n1 1

#--------------------------------------------------
To get PCIe traddr, we should run the following command:
![]()
Now, preparing NVMe-oF for performance testing.
Before initiating NVMe-oF Target on the server, it is necessary to run the following command from the catalog:
# HUGEMEM=32765 scripts/setup.sh![]()
SPDK should connect NVMe and it should disappear from the list of block devices in the system.
Then, execute the following command from the catalog spdk/app/nvmf_tgt as demonstrated below:
# ./nvmf_tgt -c ./nvmf.conf![]()
NVMe-oF Target has been launched successfully:

In case you want to finish your job with NVMe and return it to the system, we can stop NVMe-oF Target and execute the command in the catalog with SPDK:
# scripts/setup.sh reset![]()
Next, we have to connect the device to the client by running the following command:
# nvme discover -t rdma -a 172.16.1.1 -s 4420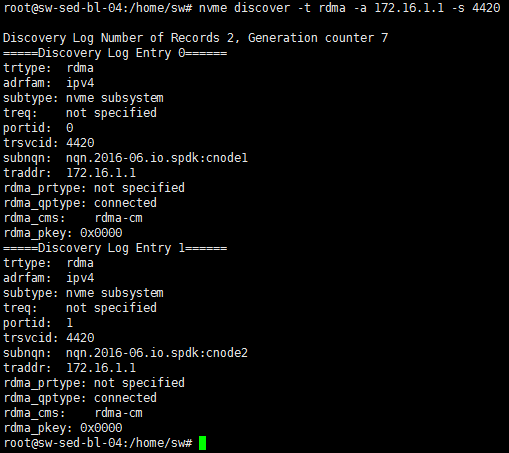
To connect the required device, execute the following command:
For RAM Drive:
# nvme connect -t rdma -n nqn.2016-06.io.spdk:cnode1 -a 172.16.1.1 -s 4420 -Q 1024For NVMe:
# nvme connect -t rdma -n nqn.2016-06.io.spdk:cnode2 -a 172.16.1.1 -s 4420 -Q 1024After executing the command, let’s check that the device is available in the system:

To disconnect the device, run:
# nvme -disconnect -d nvme0n1![]()
Configuring SPDK iSCSI Target
We’ve finished with NVMe-oF. Now, to SPDK iSCSI Target. The process is already quite familiar. Go to the catalog with default configurations:
# cd /home/sw/spdk/etc/spdkCopying the file with default configuration to the catalog /home/sw/spdk/app/iscsi_tgt
# cp /home/sw/spdk/etc/spdk/iscsi.conf.in /home/sw/spdk/app/iscsi_tgt/iscsi.confEdit the iscsi.conf configuration file
#-----------------------------------------------

[Global]
ReactorMask 0x00C000 (this option launches NVMe-oF Target on Socket 1 since that’s where NIC is deployed)

[iSCSI]
NodeBase "iqn.2016-06.io.spdk"
AuthFile /usr/local/etc/spdk/auth.conf
MinConnectionsPerCore 4
MinConnectionIdleInterval 5000
Timeout 30
DiscoveryAuthMethod Auto
DefaultTime2Wait 2
DefaultTime2Retain 60
ImmediateData Yes
ErrorRecoveryLevel 0

[PortalGroup1]
Portal DA1 172.16.1.1:3260

[InitiatorGroup1]
InitiatorName ALL
Netmask 172.16.1.0/24

[Nvme]
TransportID "trtype:PCIe traddr:0000:02:00.0" Nvme0 (In order to get PCIe traddr, it necessary to perform the command below)
RetryCount 4
Timeout 0
ActionOnTimeout None
AdminPollRate 100000
HotplugEnable No

[Malloc]
NumberOfLuns 1
LunSizeInMB 10240

[TargetNode2]
TargetName disk2
TargetAlias "Data Disk2"
Mapping PortalGroup1 InitiatorGroup1
AuthMethod Auto
AuthGroup AuthGroup1
UseDigest Auto
LUN0 Malloc0
LUN1 Nvme1n1
QueueDepth 1024

#-----------------------------------------------
In order to get PCIe traddr, execute the following command:
![]()
Preparing SPDK iSCSI Target for performance testing
On the server:
Before launching SPDK iSCSI Target on the server, we need to execute the # HUGEMEM=32765 scripts/setup.sh command from the catalog with SPDK as shown below:
![]()
SPDK should connect NVMe and it should disappear from the list of block devices in the system.
Further, we should run the following command from the catalog spdk/app/iscsi_tgt:
# ./iscsi_tgt -c ./iscsi.confThe successful launch of iSCSI Target should look like this:

If there is a need to return NVMe to the system, stop SPDK iSCSI Target and execute the command in the catalog with SPDK:
# scripts/setup.sh reset![]()
On the client:
Edit /etc/iscsi/iscsid.conf
node.session.cmds_max = 4096
node.session.queue_depth = 1024
After that, we should execute the command for changes to take effect:
# systemctl restart open-iscsiTo connect the devices, run the following commands:
# iscsiadm -m discovery -t st -p 172.16.1.1:3260![]()
# iscsiadm -m node -l -T iqn.2016-06.io.spdk:disk2
Next, Finding /dev/sdX nodes for iSCSI LUNs:
# iscsiadm -m session -P 3 | grep "Attached scsi disk" | awk '{print $4}'
After the targets are connected, they can be tuned.
Tuning
# echo noop > /sys/block/sdl/queue/scheduler
# echo 1024 > /sys/block/sdl/queue/nr_requests
# echo noop > /sys/block/sdm/queue/scheduler
# echo 1024 > /sys/block/sdm/queue/nr_requests
If you need to disconnect from the target, run:
# iscsiadm -m node --logout
# iscsiadm -m node -o delete
Configuring LIO:
We’re done with NVMe-oF and SPDK iSCSI and can now move on to iSER. Just to remind you, SPDK doesn’t allow using iSER, so I’ve decided to use LIO.
On the server:
Prior to configuring LIO, it is necessary to perform all the steps described in the previous part. After that, connect devices locally and check whether they are available in the system. The procedure is the same as with NVMe-oF.

Now, we can proceed to LIO configuration.
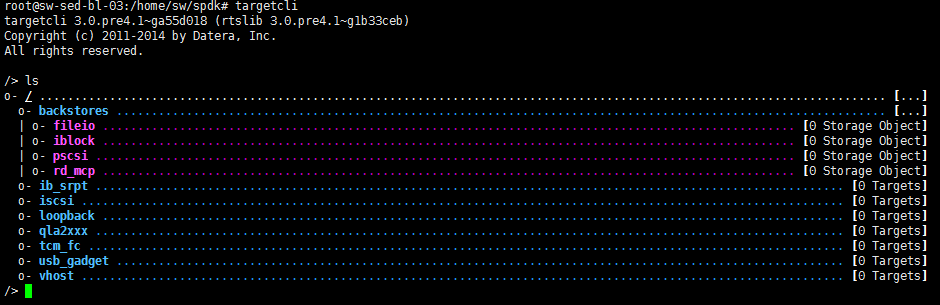
First, run the targetcli command to enter the LIO CLI console:
Next, connecting our drives:
# cd /backstores/iblock
# create ramdrive /dev/nvme0n1
# create nvmedrive /dev/nvme1n1
# ls /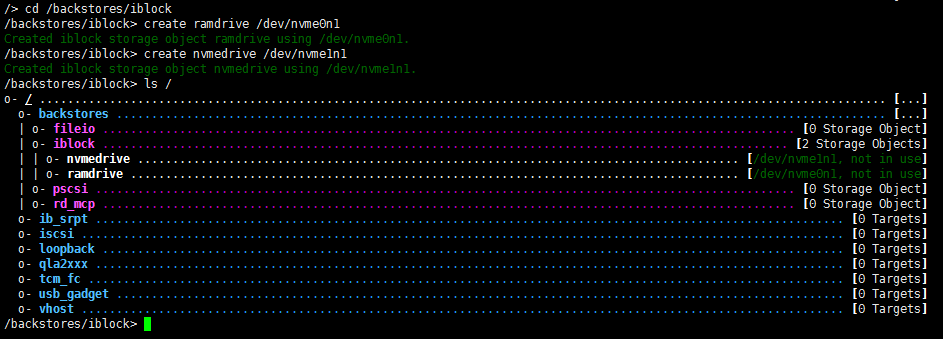
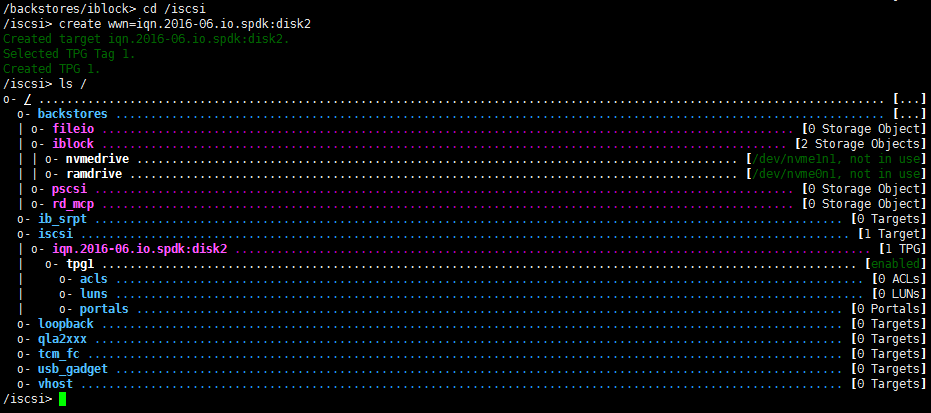
Creating iscsi target:
# cd /iscsi
# create wwn=iqn.2016-06.io.spdk:disk2
# ls /
Allowing access from any server:
# cd iqn.2016-06.io.spdk:disk2/tpg1/
# set attribute authentication=0 demo_mode_write_protect=0 generate_node_acls=1 cache_dynamic_acls=1
Creating LUN:
# cd luns
# create /backstores/iblock/ramdrive
# create /backstores/iblock/nvmedrive
Creating portal:
# cd ../portals
# create 172.16.1.1
# ls /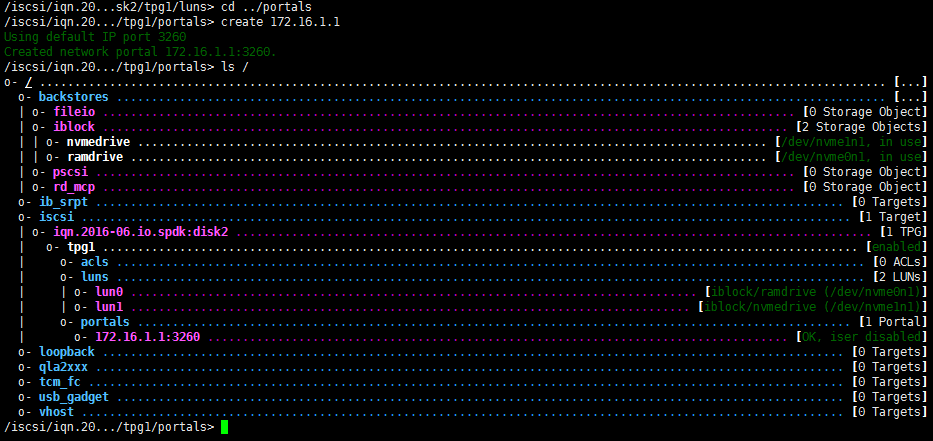
Enabling iSER on this portal:
# cd 172.16.1.1:3260
# iser_enable=true
# ls /
Saving our configuration and exiting:
# saveconfig
# exit
Preparing iSER for performance testing
Steps here are practically the same as when we were preparing SPDK iSCSI.
On the client:
Edit /etc/iscsi/iscsid.conf
node.session.cmds_max = 4096
node.session.queue_depth = 1024
To confirm the changes, run the following command:
# systemctl restart open-iscsiTo connect the devices, run:
# iscsiadm -m discovery -t st -p 172.16.1.1:3260![]()
NOTE: we have to change transport to iSER:
# iscsiadm -m node -T iqn.2016-06.io.spdk:disk2 -o update -n iface.transport_name -v iser
# iscsiadm -m node -T iqn.2016-06.io.spdk:disk2 | grep transport
# iscsiadm -m node -l -T iqn.2016-06.io.spdk:disk2
Finding /dev/sdX nodes for iSCSI LUNs:
# iscsiadm -m session -P 3 | grep "Attached scsi disk" | awk '{print $4}'
Tuning
# echo noop > /sys/block/sdl/queue/scheduler
# echo 1024 > /sys/block/sdl/queue/nr_requests
# echo noop > /sys/block/sdm/queue/scheduler
# echo 1024 > /sys/block/sdm/queue/nr_requests
If there is a need to disconnect from a target
# iscsiadm -m node --logout
# iscsiadm -m node -o delete
Conclusion
Everything is ready for testing. We’ve prepared the server and the client and configured NVME-oF, SPDK iSCSI and iSER transport. The only few things that are left to do are to create and prepare a VM in Hyper-V and ESXi, but I’ll cover these steps in the corresponding posts where I’ll be benchmarking the NVMe-oF performance. In my next post, I’ll run the first test and measure how well NVMe-oF performs on a bare metal configuration.
Intel SPDK NVMe over Fabrics [NVMe-oF] Target Performance Tuning. Part 1: Jump into the fire©
