INTRODUCTION
PowerShell is a powerful but sometimes a bit tricky tool. It makes your infrastructure-related routines not that tedious: you can just write the script saving yourself the hassle. However, commands or scripts may work not as one would expect them, and that’s what often makes you mad. Well, I also get mad for that reason sometimes, and that’s, actually, how I came up with the idea of this article! In my today’s topic, I discuss why PowerShell behaves like that. Specifically, I shed light on why you cannot run scripts or access a computer on a different domain. Also, I’ll take a closer look at how some cmdlets work.
So, here’s a brief overview of what I’m gonna to describe in this article:
- PowerShell execution policy: how to change it (and why you should not do that);
- Orchestrating remote computers with PowerShell;
- Get-Vm cmdlet;
- Get-ChildItem weird output and how it may come in handy;
- Running Copy-Item and Move-Item on the remote machines.
BEFORE WE START…
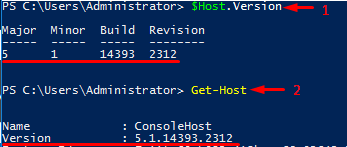
Before I start, I’d like you to check your PowerShell version. Here are the cmdlets allowing you to do that. To check the PowerShell version installed locally, run either $Host.Version or Get-Host. Note that both these commands provide you ONLY with the PowerShell version installed on the PC or server where you run them.
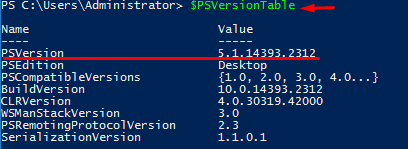
To check the PowerShell version of the remote host, you should run only $PSVersionTable. Well, sure, you still can deploy this cmdlet locally. Here is the output that I got after running $PSVersionTable locally:
Well, PowerShell evolved, and some bugs were fixed. Yet, you may still experience some issues, and today I shed light on how to avoid some of them. Everything I write in this article applies to all 3 PowerShell versions: 4.0, 5.1.14393.2312, and 6.0.0.
SOME THINGS ABOUT POWERSHELL EXECUTION POLICY
Execution policy determines how PowerShell runs scripts and whether they can be run at all. If the policy is set Restricted, there is no way for scripts to run. Actually, it is set to Restricted by default, so don’t get mad next time due to being unable to deploy a script. You can verify execution policy status with the command below:
Get-ExecutionPolicyHere’s what you typically get when trying to run a script having PowerShell execution policy set to Restricted.
Well, I wanted to run the script consisting of Write-Output “The script worked successfully!” alone. So, as any scripts cannot be deployed, I could not see the “The script worked successfully!” message 
CHANGING POWERSHELL EXECUTION POLICY
Well, the easiest (but not the smartest) way is just changing the policy. Actually, there are 5 different execution policies:
- Restricted is set by default. It prevents you from running any scripts limiting environment orchestration to commands;
- All Signed enables you to run only scripts signed by a trusted publisher;
- Remote Signed – Local scripts run without being signed. Downloaded scripts must be signed by the trusted publisher before running;
- Unrestricted removes all restrictions for running scripts. For downloaded scripts, you may be asked for confirmation;
- Bypass – Do whatever you want: no restrictions and no warnings at all!
You can change the PowerShell script execution behavior with the Set-ExecutionPolicy cmdlet. Let’s change its setting on, let’s say, Unrestricted. Note that you do that on your own risk. So, think twice since your environment security may be compromised. Also, you must have administrator permission to change the policy. Otherwise, you’ll just end up with an error. Here’s how setting a different policy looks like:
I deployed just the same script consisting only of Write-Output “The script worked successfully!” command. See, it works this time!
USING EXECUTION POLICY FLAGS
Obviously, in some cases, you just cannot (or do not want to) change the execution policy. Well, here’s a workaround – policy flags. Instead of changing the execution policy, just use its flag! This workaround works fine for one-time running a script. You can always check the execution policy with the Get-ExecutionPolicy command:
See, I deployed the script, but the policy setting did not change!
REACHING OUT THE REMOTE COMPUTERS WITH POWERSHELL
PowerShell allows you to run commands on the remote computers and provides you with the full access to the remote server. Well, that’s not a big deal to access a machine which is a part of a domain. Still, if you try to access computers that aren’t on a domain that may be a bit harder.
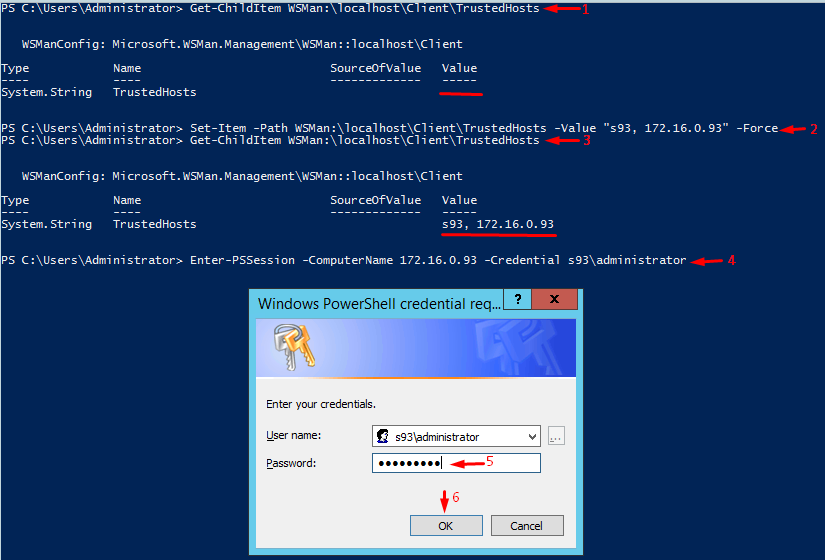
So, what’s going on? Let’s take a closer look at how you typically gain access to Windows devices. In any event of the remote connection (even with PowerShell) there’s challenge/response authentication. And, you cannot gain access using your domain credentials. Still, you can use HTTPS transport to access the destination machine. Note that the destination machine should have the appropriate SSL certificate. Well, if you do not want to bother with certificates, or you are totally sure that there are no security threats, type:
Set-Item -Path WSMan:\localhost\Client\TrustedHosts –Value "«computer_name», «ip address»" -ForceThis command adds the computer to the trusted host, so there should be no problems with running PowerShell commands afterward.
That’s it! Here’s how you can connect the remote machine and run some PowerShell commands there.
GET-VM
Well, you probably have noticed that there are some things about Get-Vm and Get-ChildItem deployment. Well, let’s think through them.
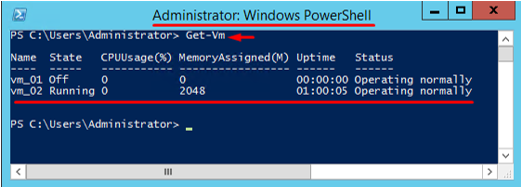
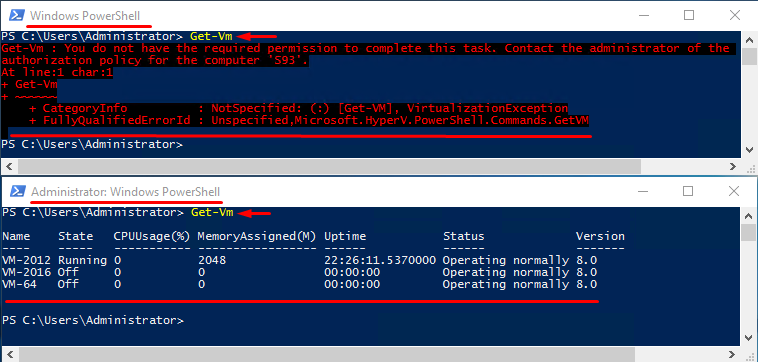
With Get-Vm, you can acquire information from Hyper-V host about guest VMs. This command works differently depending on the PowerShell version. For instance, in PowerShell 4.0, you will get nothing except a blank line if you run the command without administrator privileges. Note that you will see that empty line even though there may be VMs on the Hyper-V host.
Obviously, if you run the command as an administrator or just obtain administrator privileges, you’ll acquire all info on VMs.
In PowerShell 5.1.14393.2312, things look a bit different. Well, at least you’ll get something more than just a blank line after running Get-Vm without administrator privileges.
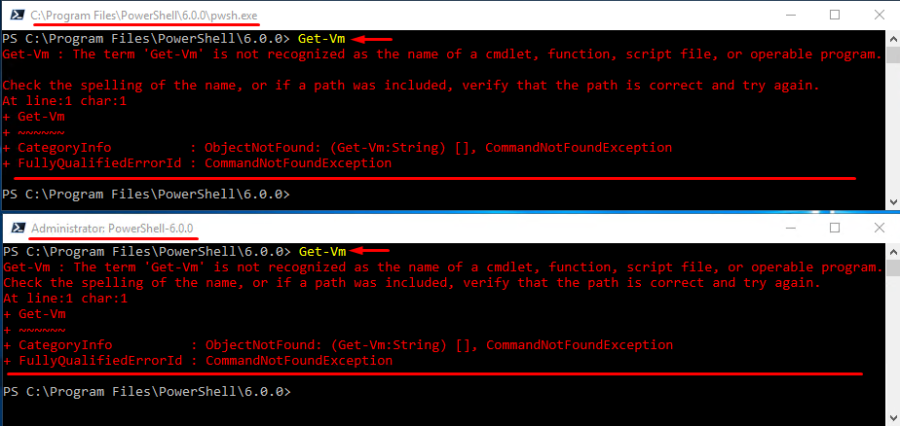
In PowerShell 6.0.0, the cmdlet is not recognized at all. Just look at the outputs below:
Look, this PowerShell version is still under development, and some modules are still under testing and do not work as they should. Sure, you still can run Get-Vm, but you do that at your own risk.
Here’s how you can do that:
- Run Install-Module WindowsPSModulePath –Force cmdlet to install the WindowsPSModulePath module;
- Next, type Add-WindowsPSModulePath to specify the path to the module;
- Afterward, create the profile.ps1 script consisting of Add-WindowsPSModulePath Locate this script in the following directory: C:\users\<username>\documents\PowerShell\. Should you often use that module, create profile.ps1 for each user;
- Reload PowerShell.
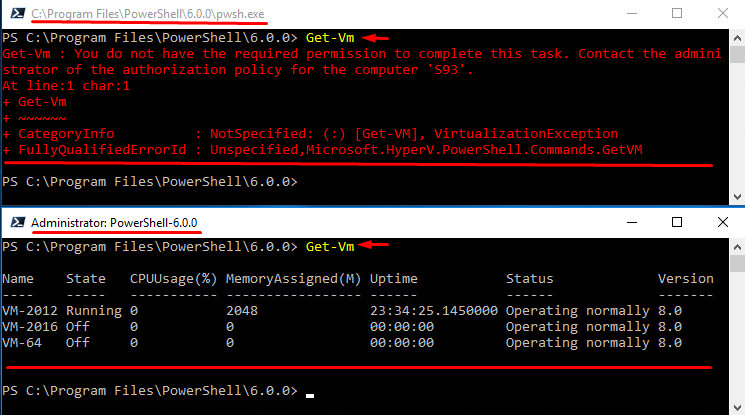
Note that you still need administrator privileges to run Get-Vm.
GET-CHILDITEM
Now, let’s talk about the Get-ChildItem command. This cmdlet enables to see the content of a directory. You may need this command while writing scripts for orchestrating your network infrastructure. Again, you need administrator privileges to run the cmdlet.
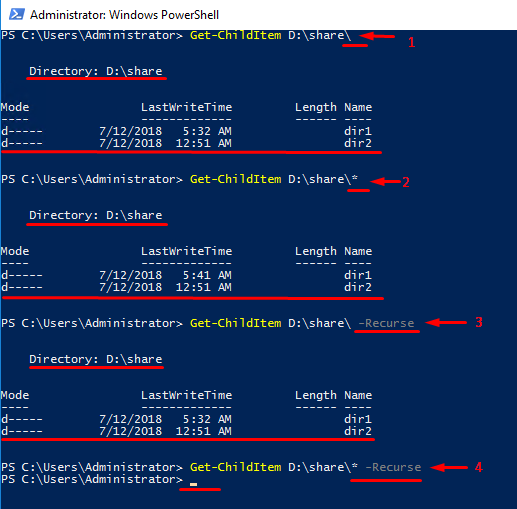
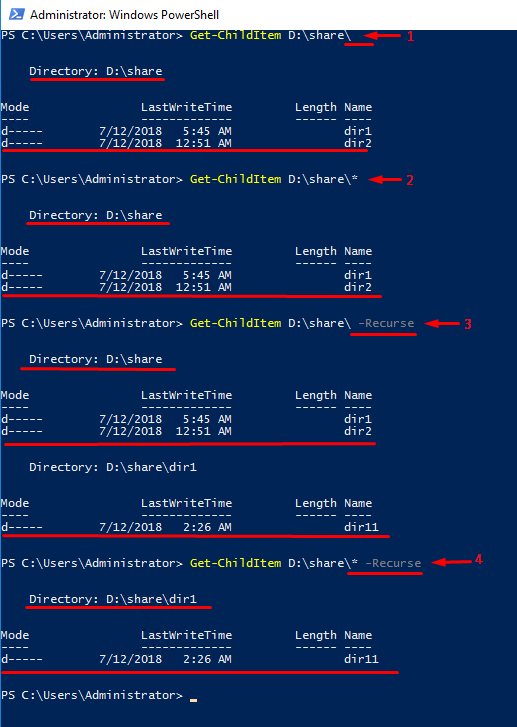
Let’s take a closer look at this command. Particularly, I’m going to talk about using it with the -Recurse parameter. This parameter acts as if you end the path to a directory with *. Just check out the lines 2 and 3 in the screenshot below. If you use both * in the end and -Recurse, there will be a weird output (look at line 4). If there are no sub-directories or files, there will be a blank line that looks pretty the same as if the command did not work out at all. If there is a sub-directory in a folder, it will be on the list be it empty or not.
See, ending the Get-ChildItem command with * and using -Recurse parameter in the same line gives you basically nothing. Still, even though that output looks like if there is an error, there’s no error at all! Furthermore, using the command like that may even come in handy. Now, let’s look at how to use it.
Let’s play with Get-ChildItem a bit. For test purposes, I created the folder inside the folder (D:\share\dir1\dir11) to see how the cmdlet behaves in this scenario.
Well, on the whole, command works as one could expect. But, when it comes to using both * and -Recurse you may see interesting things going on. In the output, the cmdlet displays only the first-level folder (dir1) containing the sub-folder (dir11) inside. Another folder (dir2), in its turn, is not displayed at all. See, if you understand how the cmdlet works, you can save some time.
This small trick works in any PowerShell version with any folder be it network folder or a shared one.
RUNNING COPY-ITEM AND MOVE-ITEM REMOTELY
Sometimes, Copy-Item and Move-Item work a bit differently than one would expect. As it comes from their names, the former allows copying files while the later enables to move them. If you spell the server name wrong and add * right after the folder name, the command won’t work out. Well, that’s obvious. The strange thing is, the output looks exactly the same as if the cmdlet worked out perfectly!
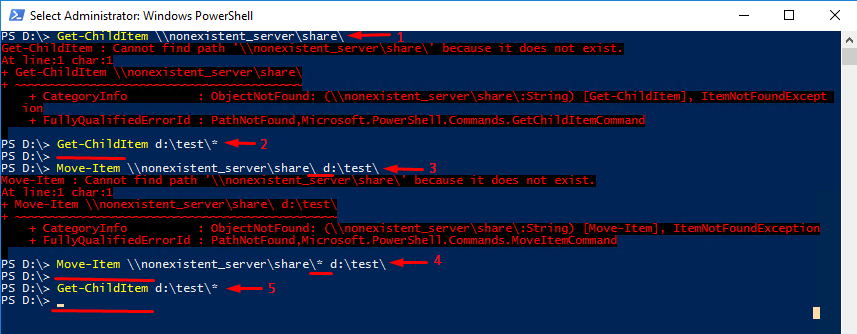
Well, let me show you what I’m talking about. In the further experiment, I try to move a non-existing folder. Obviously, there will be an error message, but what happens if I add * after the folder name?
Ok, let’s get started. First, at step 1, I check with Get-ChildItem whether the network folder (well, I named it “share” here) located on some server exists at all. Well, it does not, and the server itself does not exist too. So, I expect to encounter an error while moving the “share” network folder to d:\test\ (step 3). Let’s check whether the destination folder contains anything at all. For this purpose, I run Get-ChildItem again but with * at the end of the line. See, there’s nothing in d:\test\.
Ok, now let’s put * right after the folder name and deploy the Move-Item command one more time (step 4). See, there’s no error message! Everything looks just as if the command worked out. Well, let’s check whether a non-existing folder has been moved to the target directory. For that purpose, I run Get-ChildItem with * at the end of the line again. Oops, there’s still nothing in the folder, so, apparently, the cmdlet with * in the end just does not work!
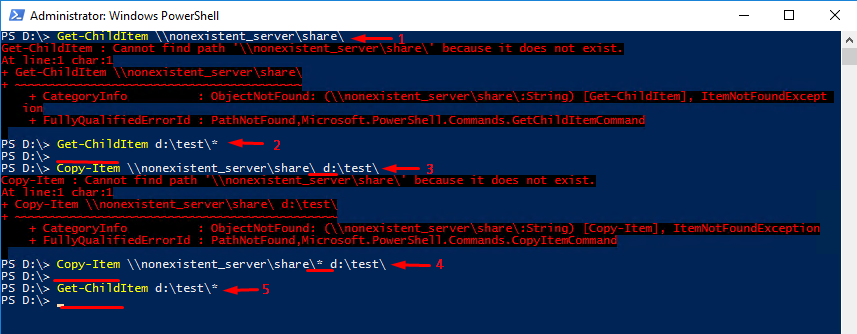
Copy-Item command works pretty the same, so I do not see any point to discuss it here.
Well, we all do typos in names and commands, but you can screw things up easily if you both do a typo and add *. So, stay vigil and doublecheck your commands.
CONCLUSION
In my today’s article, I shed light on some interesting things that you may encounter while working with PowerShell. I discussed a handy workaround allowing to run scripts without changing the PowerShell execution policy and how to access the machine that is not on the domain with PowerShell. And, I provided the lifehack allowing to get rid of empty folders in the Get-ChildItem listing. Hope, you find things I wrote here handy!


