Introduction
Sometimes, you need your VMs to access a LUN directly over iSCSI. Direct access comes in handy when you, let’s say, run SAN/NAS-aware applications on vSphere VMs, or if you’re going to deploy some hardware-specific SCSI commands. Also, with direct access, physical-to-virtual conversion becomes possible without migrating a massive LUN to VMDK. Whatever. To enable your VMs to talk directly to LUN, you need a raw device mapping file. Recently, I created vSphere VMs with such disks. Well, apparently, this case is not unique, so I decided to share my experience in today’s article.
Let’s start with the basics: what RDM is and why to use it
Raw device mapping (RDM) provides VMs with the direct access to the LUN. An RDM itself is a mapping file in a separate VMFS volume that acts as a proxy for raw physical storage. It keeps metadata for managing and redirecting disk access to the physical device. RDM merges some advantages of VMFS with direct access to the physical device. Well, RDM does not deliver you higher performance than a traditional VMFS, but it offloads CPU a bit. Check out their performance comparison:
http://vsphere-land.com/news/vmfs-vs-rdm-fight.html
RDMs can be configured in two different modes: physical compatibility mode (RDM-P) and virtual compatibility mode (RDM-V). The former delivers the light SCSI virtualization of the mapped device while the later entirely virtualizes the mapped device and is transparent for the guest operating system. Well, RDM-V disk is very close to what VMFS actually is. It behaves just as if it were a virtual disk, so I won’t talk about it today. Really, there are not that many benefits of using it.
So, the thing I gonna talk about today is RDM-P. That actually is the mode allowing the guest operating system to talk to the hardware directly. However, there’re some things about this RDM compatibility mode: VMs with such disks can’t be cloned, migrated, or made into a template. Still, you can just disconnect RDM from one VM and connect it to another VM or physical server.
You can find more about RDM here:
Look, if you are unsure which compatibility mode to pick, check out this article:
https://kb.vmware.com/s/article/2009226
The setup used
For this guide, I use a two-node VMware ESXi 6.5.0 (build 8294253) setup of the following configuration:
- 2 х Intel(R) Xeon(R) CPU E5-2609 0 @ 2.40GHz;
- 3 x 4 GB RAM;
- 1 x 160 GB HDD;
- 1 x 1 TB HDD;
- 1 x 500 GB SSD;
- 1 x 1 Gb/s LAN;
- 2 x 10 Gb/s LAN.
Hosts are orchestrated with VMware vSphere 6.5.0.20000 (build 8307201).
As a shared storage provider, today, I use StarWind Virtual SAN (version R6U2). You can get StarWind Virtual SAN Trial version here:
https://www.starwindsoftware.com/starwind-virtual-san#demo
Under the trial license, you are provided with completely unrestricted access to all StarWind Virtual SAN features for 30 days. Well, that should be enough if you just want to give the solution a shot.
I created a VM per host. Find its configuration below:
- 4 х Intel(R) VCPU 2.40GHz;
- 1 x 4 GB RAM (HDD);
- 1 x 100 GB disk (HDD);
- 1 x 900 GB disk (HDD);
- 1 x 400 GB disk (SSD);
- 1 x 1 Gb/s LAN (E1000E driver);
- 2 x 10 Gb/s LAN (VMXNET 3 driver).
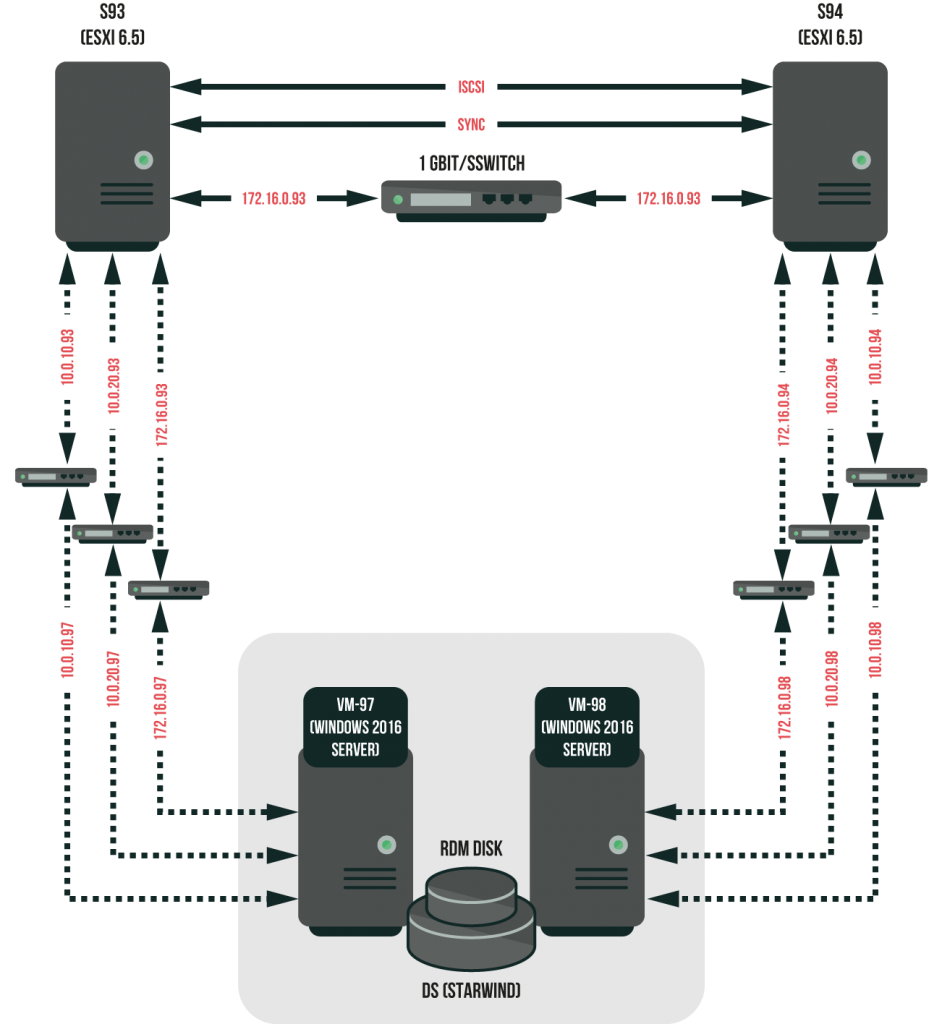
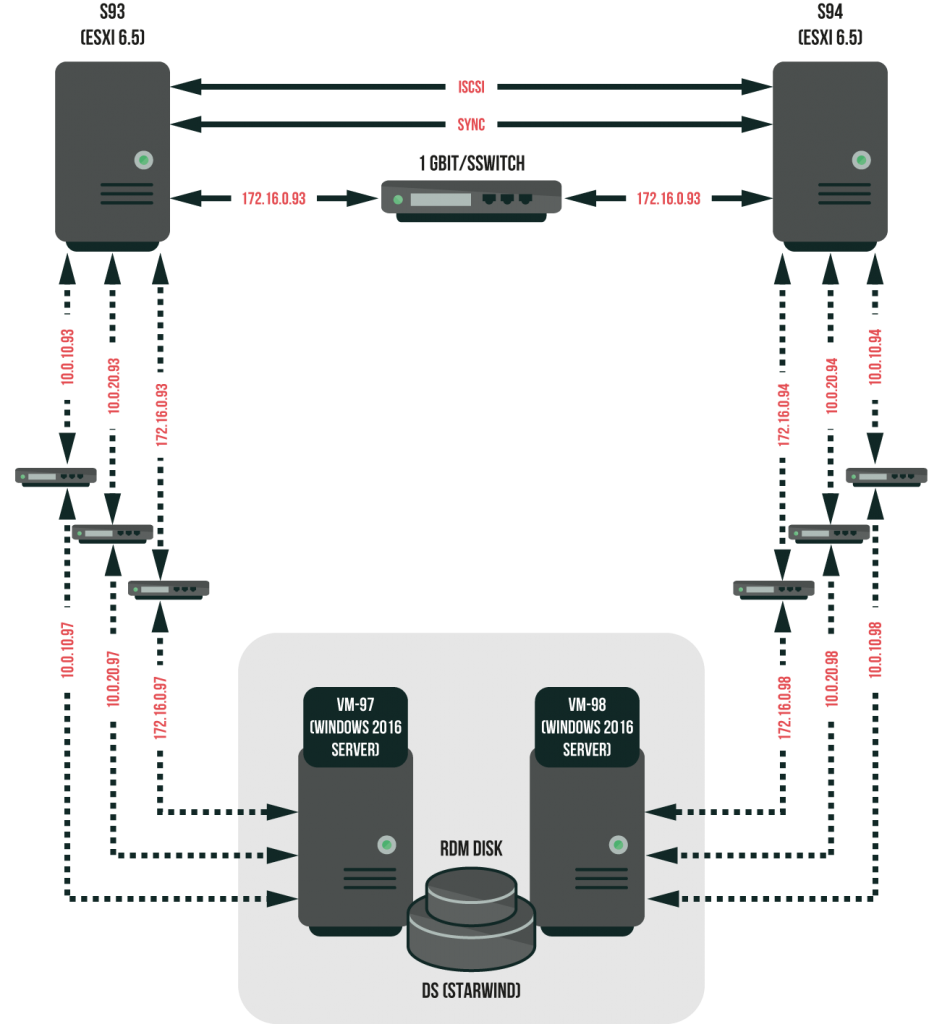
Find the configuration scheme of the setup below:
Let’s take a look at ESXi datastore configuration. Note that it’s the same for both hosts:
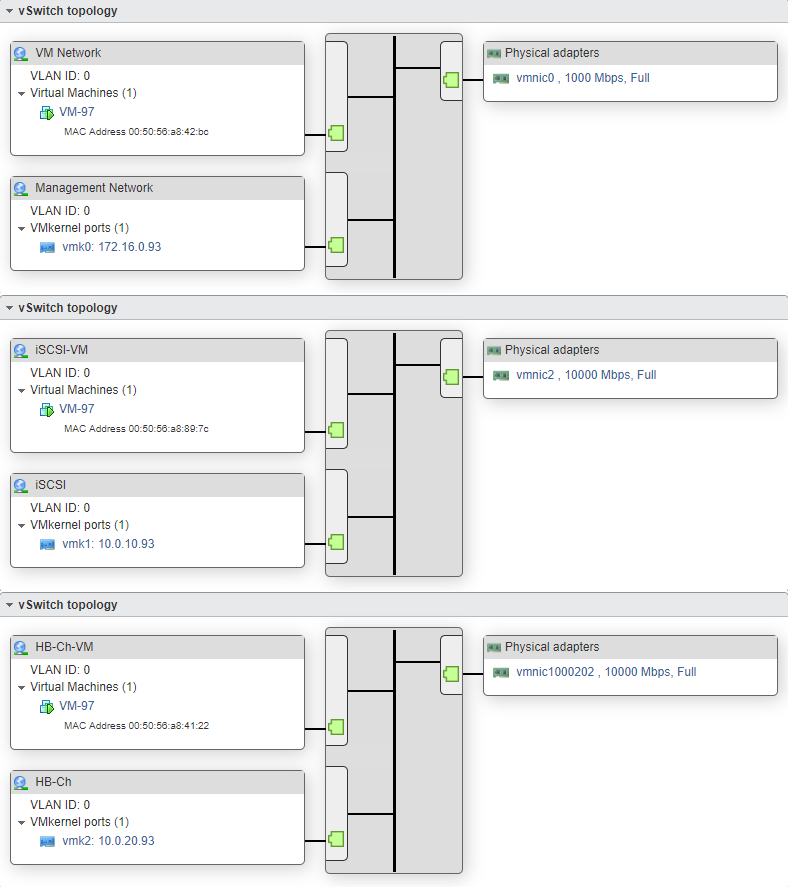
Now, look at ESXi hosts network configurations. Note that both hosts have just the same configuration:
One more time, today, I’m going to create an RDM-P disk. And, here’s how I do that. Step-by-step.
- Build the test environment and set it up
- Install and configure StarWind Virtual SAN target
- Set up ESXi hosts and connect the RDM disk to the VM
Important things and step sequence are highlighted in red. Now, let’s roll!
Installing and configuring StarWind VSAN
StarWind VSAN was installed according to the guide provided by StarWind Software:
To make the long story short, I highlight only the key points of the installation procedure. You should better follow the original guide if you also choose StarWind VSAN.
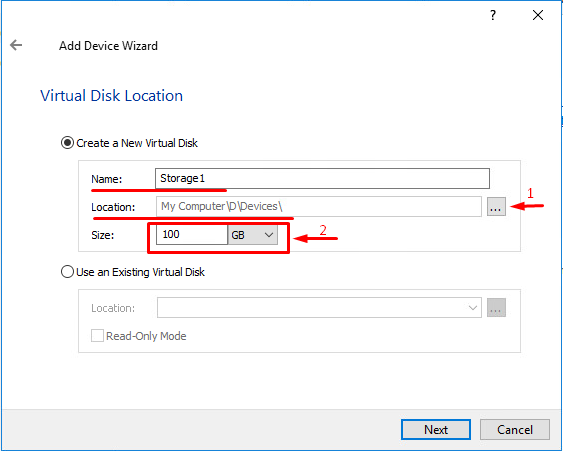
Right after StarWind Virtual SAN installation, I created a 100GB Virtual Disk:
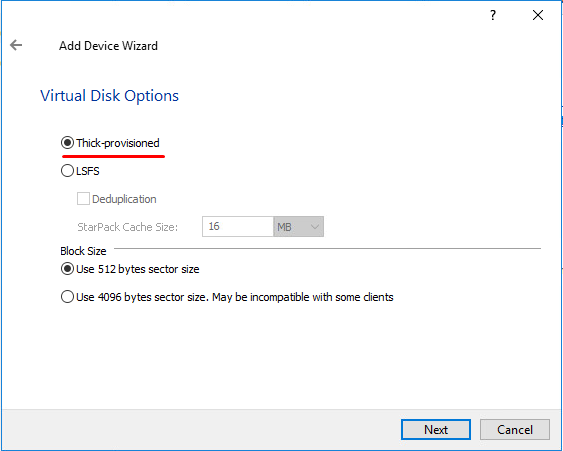
Next, select the device type. As I decided to create a thick-provisioned device, I ticked the self-titled radio:
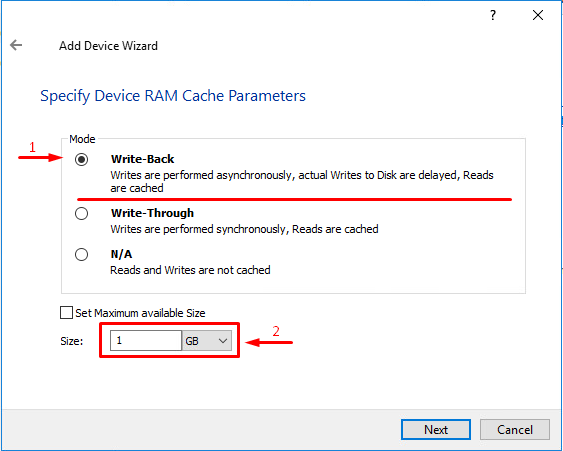
Now, that’s time to come up with RAM cache parameters. I use 1 GB Write-Back cache.
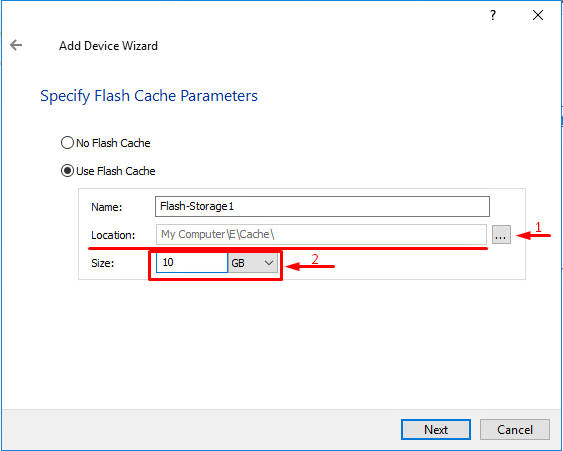
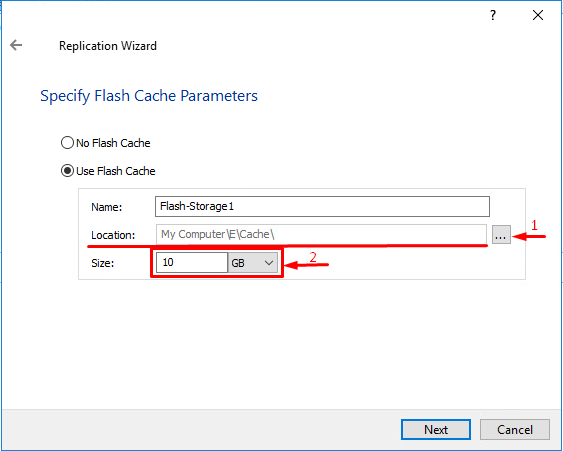
Afterward, specify Flash Cache parameters. Well, I have SSD disks in my setup, so I’d like to configure L2 flash cache. On each node, I use 10 GB of SSD space for L2 caching.
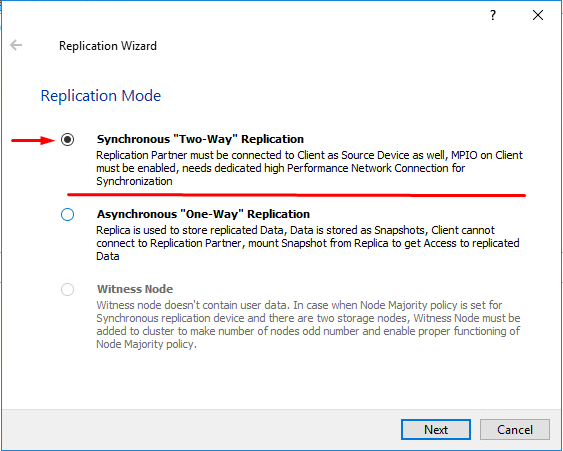
Create a StarWind virtual device and select Synchronous “Two-Way” Replication as the replication mode:
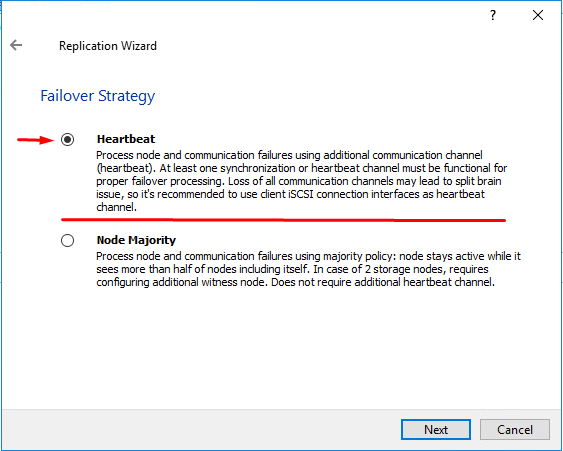
Select Heartbeat as the failover strategy:
Now, specify the L2 Flash Cache size for the partner node.
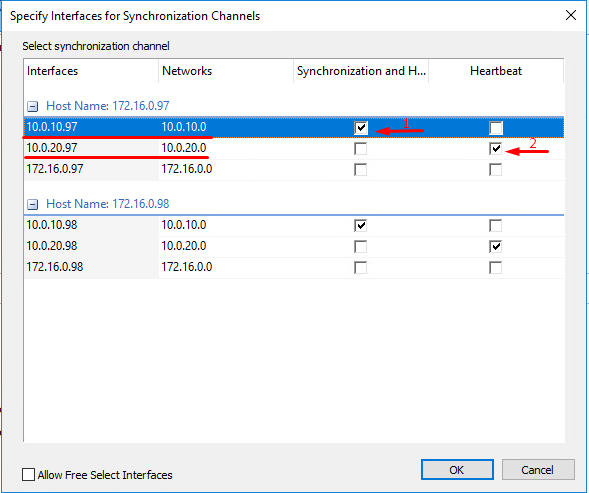
Next, select the network interfaces you are going to use for Sync and Heartbeat connections. Look one more time at the interconnection diagram:
And, check the corresponding checkboxes.
Once over with target creation and synchronization, select the device from the console just to doublecheck that everything is set alright.
Setting up ESXi host and connecting RDM disk to VMs
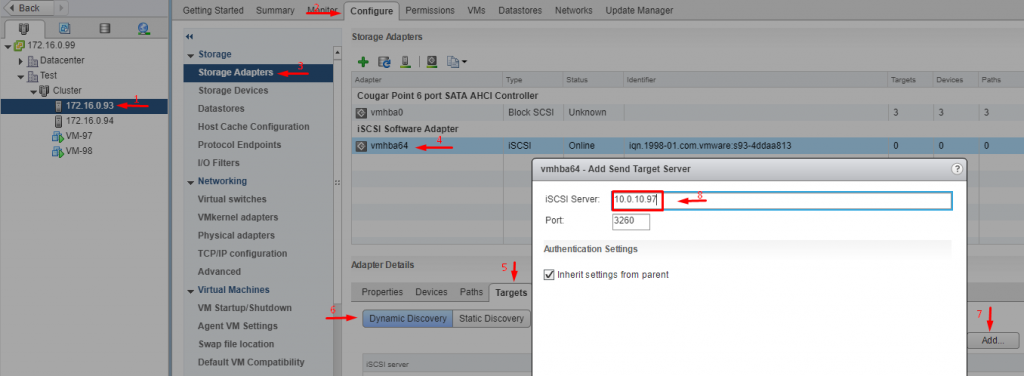
For target connection, you need to connect software iSCSI adapters on both nodes:
Set up the iSCSI targets list for each adapter.
Add here only iSCSI adapters IP addresses. Here, I use 10.0.10.0 subnetwork for iSCSI.
Do not forget to rescan storage to get all targets listed. StarWind recommends using the script for that purpose. The script itself and its deployment procedure are discussed in this guide, so I won’t cover on them here.
Now, let’s check whether the disk is available and visible on the partner device.
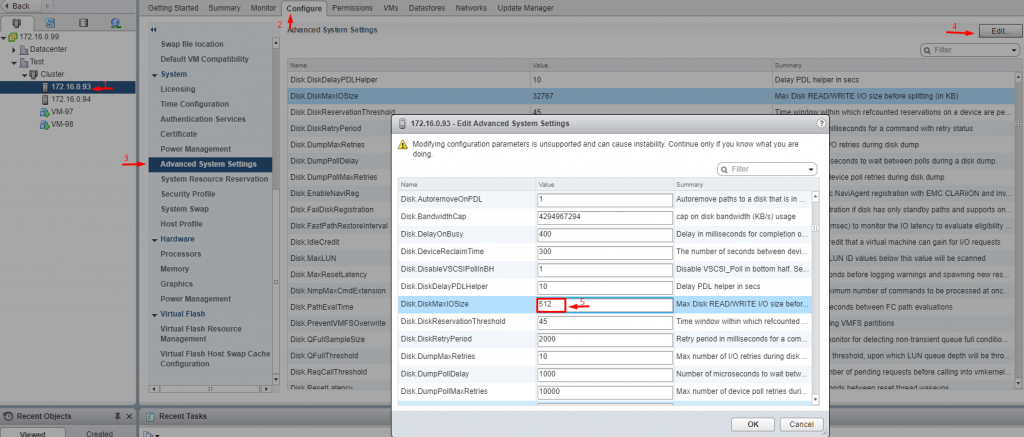
Change the Disk.DiskMaxIOSize value to 512. This parameter value is somehow derived and recommended by the vendor. Probably, it has something to do with optimization of how the software works with storage.
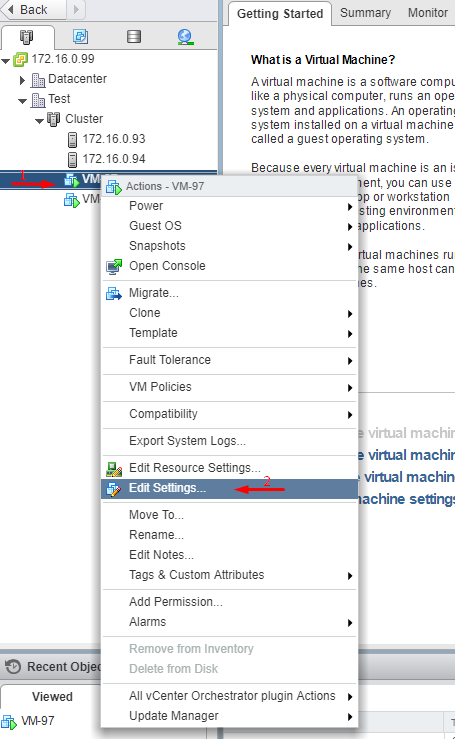
The only thing left to do is adding the recently created target as a VM RDM disk. To have the job done, first select the StarWind VSAN VM (VM-97) under Windows Server orchestration and click the Edit Settings button.
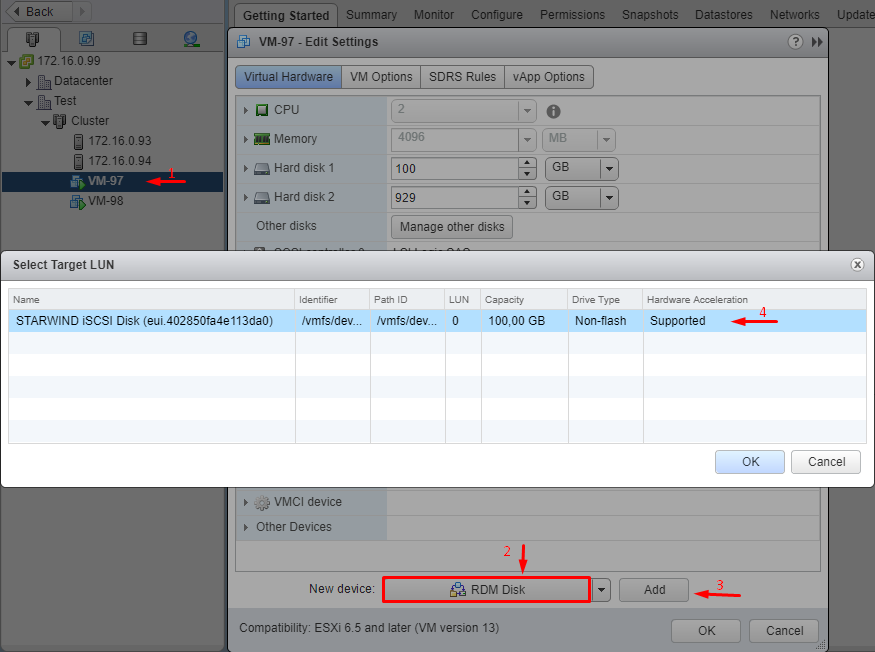
Next, select RDM Disk from the New device dropdown list and press Add. Pick the recently created target as the LUN.
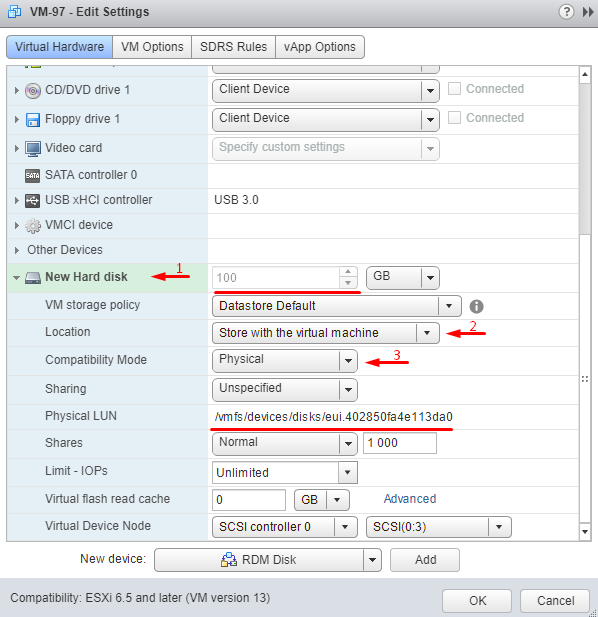
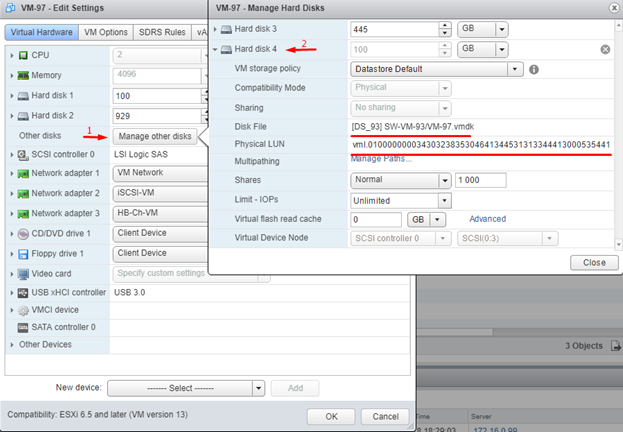
Check out whether everything is set properly and move on to some additional settings. Select the mapping file location from the Location dropdown list. By default, this file is stored together with the VMDK. The Compatibility Mode dropdown, as it comes from the name, serves for choosing RDM compatibility mode. As I want to create a physical RDM disk, I choose “Physical” from the dropdown.
Take a look at the recently created device parameters one more time:
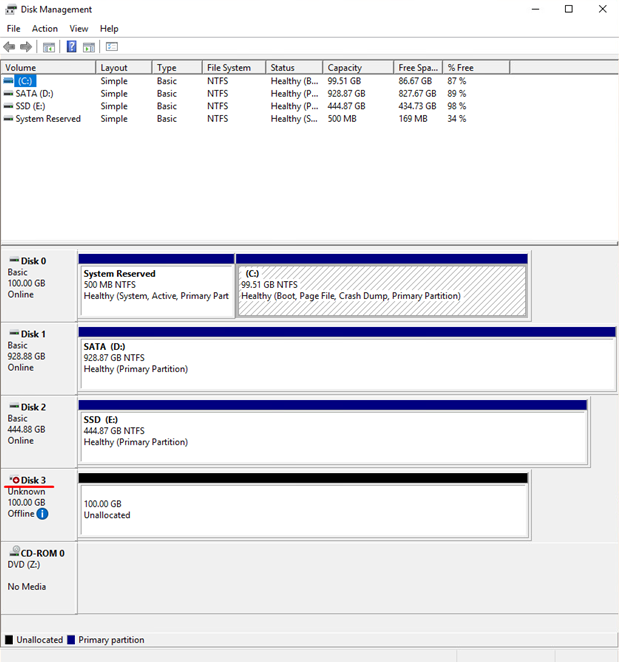
Now, go to VM Disk Management and ensure that the disk is connected.
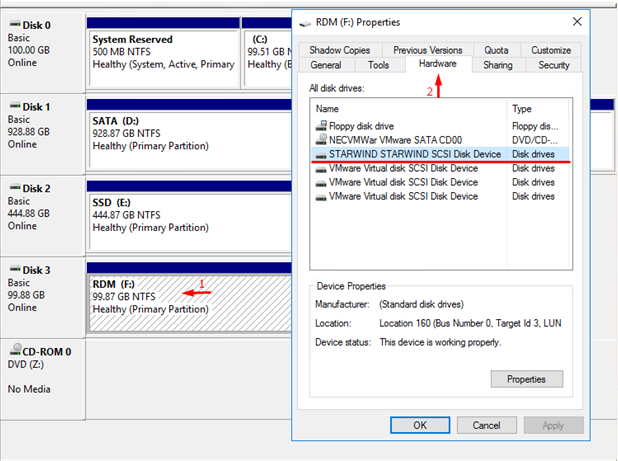
Well, there’s not that much left to do! Make the disk online, initialize it, and format it as NTFS. I guess that any admin can handle it, so I won’t discuss this step.
In the end, we get the ready RDM disk connected to the VM just like a regular SCSI device.
Well, that’s it!
Conclusion
In this article, I described how to create an RDM-P disk and how to connect it to VM. Such disk comes in handy once you need to provide your VM with the direct access to the LUN or you run SAN/NAS-aware applications on your VMs. Note that this guide also works for the virtual compatibility RDM, but do not forget to select the appropriate option from the dropdown.


