From day to day, admins troubleshoot issues remotely. And, pretty often, they cannot count on another guy who helps them to enable Remote Desktop (RD) on the remote host. There may also be the case when you loose the access to RD on another computer for some reason, and there’s no one in the remote office who can help you. Whatever, I hope you got the point. What do you need to do? Sure, you can just ask a fellow admin to enable RD on the remote host and wait a bit, but what if that’s something really urgent and you are to fix that issue in the middle of the night? Let’s think through what you can do in that case.
From day to day, admins troubleshoot issues remotely. And, pretty often, they cannot count on another guy who helps them to enable Remote Desktop (RD) on the remote host. There may also be the case when you loose the access to RD on another computer for some reason, and there’s no one in the remote office who can help you. Whatever, I hope you got the point. What do you need to do? Sure, you can just ask a fellow admin to enable RD on the remote host and wait a bit, but what if that’s something really urgent and you are to fix that issue in the middle of the night? Let’s think through what you can do in that case.
Before I start, I’d like to look at the things you should consider while enabling RD remotely:
1. Firewall: Is it turned on the remote host? If it is, are there any rules that prevent you from enabling RD?
2. Is the remote computer or server on the domain or is it in the P2P network?
3. WinRM: Is the service running on the remote host?
All those three pitfalls make you treat the remote computer or server like a black box! In this article, I describe some ways how you still can enable RD remotely.
My Environment
Let’s look at the model environment that I built for today’s article. I used two exactly the same from the hardware point of view Windows Server 2016 hosts in the P2P network. One server was playing the role of the machine with the console (“console”). Another one, in turn, was a client (“client”), the machine where I tried to enable RD.
PowerShell
You would be a lucky guy if there were no fine tuning after OS installation. Typically, you observe this scenario in a fresh install of Windows Server 2016. Yes, firewall is on (if it is disabled for some reason, you are REALLY lucky 
In order to enable RD, you need to set up everything on the “console” side first. Let’s see what exactly you should do.
START POWERSHELL ON THE “CONSOLE” MACHINE AND SET EVERYTHING UP FOR WORKING WITH THE “CLIENT”
So, first, check whether WinRM is running with the following cmdlet:
Get-Service WinRMIn my case, the service is stopped; therefore I need to enable it with the cmdlet below. You can just skip the following two steps if WinRM is running.
Start-Service WinRMCheck the service status again to ensure that it’s running.
Get-Service WinRMNext, list all the trusted hosts, the servers and PC that are allowed to run the PowerShell cmdlets remotely. In my case, that list was empty.
Get-Item wsman:\localhost\client\trustedhostsWell, obviously, you need to add there “client”. Use the following command to add the “client” name and IP:
Set-Item wsman:\localhost\client\trustedhosts "172.16.1.12,Client" –ForceAfterward, check whether the computer has been successfully added to the trusted hosts.
Get-Item wsman:\localhost\client\trustedhostsNow, check if you can access “client” remotely. For that purpose, connect to the remote computer with PowerShell. Use this cmdlet:
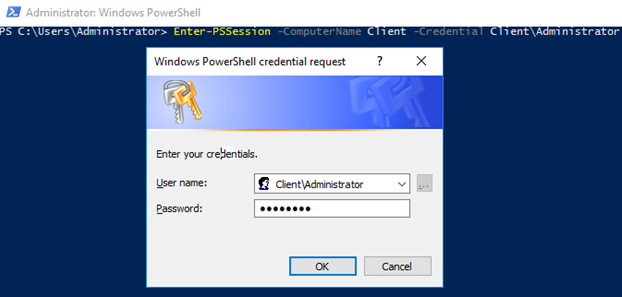
Enter-PSSession -ComputerName Client -Credential Client\AdministratorEnter the credentials. You need to use the local administrator’s, Client\Administrator, ones. The local administrator has enough rights to access “client” remotely via PowerShell and Remote Desktop. In this way, log in as the local administrator; otherwise, you won’t be able to do anything I write here!
Once you click Ok, the remote host responds you with the line like that:
This means that you’re on the right way. Let’s move on and set up the RD now!
SETTING UP THE REMOTE DESKTOP
Leave the session by typing Exit.
Now, let’s see whether you can RDP from “console”. Run the following cmdlet for that purpose:
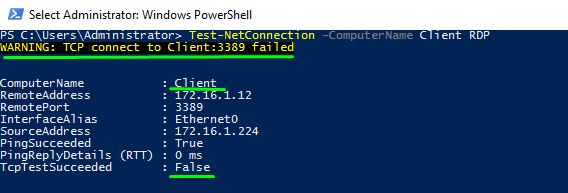
Test-NetConnection -ComputerName Client RDPHere I RDP via 3389 port since I did not choose any other port for that purpose. Sure, it can be any other port, so I believe it is not the thing one should worry about.
Well, anyway, I could not RDP. If you can either, you are to do something with it! First, you need to enter the remote session one more time using the command below:
Enter-PSSession -ComputerName Client -Credential Client\AdministratorNow, allow the connections with the remote terminal server. For that purpose, set fDenyTSConnections registry parameter value to 0.
Set-ItemProperty ‘HKLM:\SYSTEM\CurrentControlSet\Control\Terminal Server\‘ -Name “fDenyTSConnections” -Value 0Next, enable the remote terminal server connections for the computers only with network level authentication. This setting delivers higher connection security.
Set-ItemProperty ‘HKLM:\SYSTEM\CurrentControlSet\Control\Terminal Server\WinStations\RDP-Tcp\‘ -Name “UserAuthentication” -Value 1Set the firewall rule. Note that the name should begin with “Remote Desktop”. If you are as lazy as me to come up with the name, it’s ok to leave it just as “Remote Desktop” .
Enable-NetFirewallRule -DisplayGroup “Remote Desktop”Now, everything should work really fine.
Exit the session by typing Exit.
Now, try to RDP from “console”.
Test-NetConnection -ComputerName Client RDPSee, everything works great now!
Enable RD remotely with PowerShell via PsService
Now, let’s talk about the case when you cannot access the remote host via PowerShell as there’s no WinRM running on that host.
No worries, if the firewall is disabled or has some necessary rules set, you can start the service with PsServices, the utility from the PsTools. You can find more about the utility here: https://docs.microsoft.com/en-us/sysinternals/downloads/psservice. PsServices allows you to manage the services remotely even if it is not installed on “client”. Note that this utility requires the access to the open system and network layers.
That’s not rocket science to start the utility, you know. First, you need to extract the utilities from the PsTools package into some folder (it was c:\Tools\ in my case). Open the directory afterward and run WinRM remotely.
So, here’s the command allowing to access the right directory. Keep in mind that you won’t be able to start WinRM remotely without opening the directory.
cd c:\Tools\Find out now whether WinRM is running on the remote host.
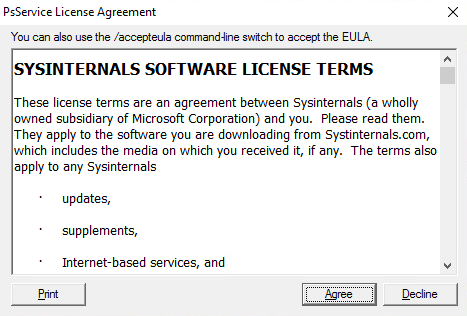
c:\Tools\psservice \\Client -u Client\Administrator -p testpass query WinRMYou need to read and accept PsService License Agreement during the utility first launch. Look through it and press Agree.
In my case, the service is not running on the remote host. Well, let’s make it running!
To start the service, deploy the following cmdlet:
c:\Tools\psservice \\Client -u Client\Administrator -p testpass start WinRMNote that username and password are not hidden. That’s not good in terms of security, but today I do not care about it.
See, WinRM has started pending. The further RD setting is held via the remote PowerShell session in just the same way I’ve described above.
Pre-conclusion
I believe those two methods described above to be the most efficient ones for setting the RD on the host in the P2P network. If none of them works, call for some specialist. Sure, there also are some “unrecommended” ways to gain access, but I don’t believe them to be legal, so I don’t discuss them in this article.
Enable RD with Group Policy Objects
If the remote host is in the Active Directory, you can gain the remote control over it fairly easily. And, here is how you can do that. I did everything using those “console” and “client” hosts that you already know. I added them to the Test.local domain.
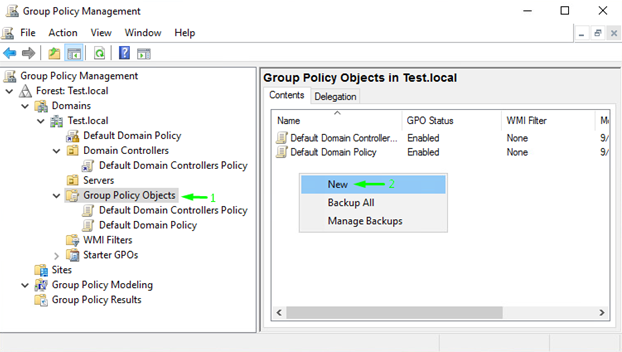
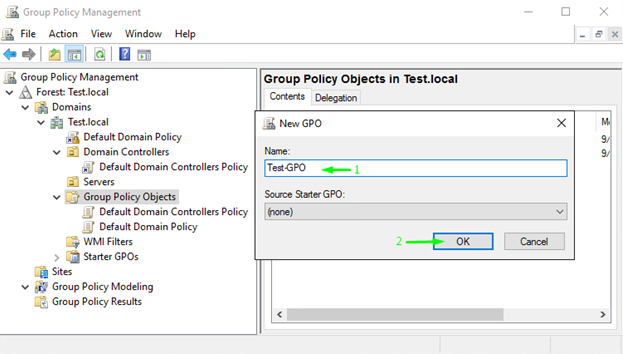
So, first, go to the domain controller (it should see “client”) and open Group Policy Management Console. Find the Group Policy Objects directory there and create a new policy.
I called it Test-GPO here, but you can use any other name that you are ok with.
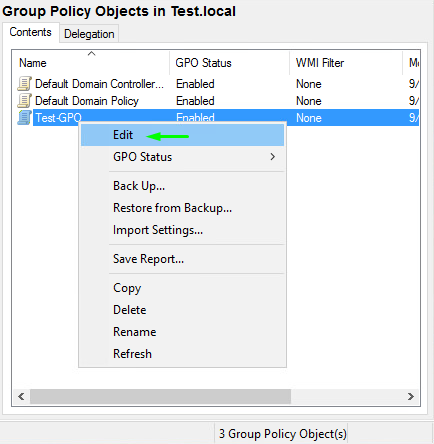
Right-click the policy and press Edit to open Group Policy Objects Editor.
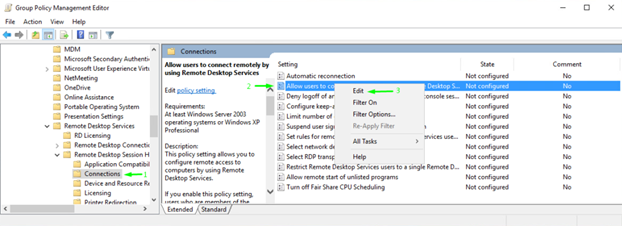
Now, go to the connections directory. Just follow this path: Computer Configuration \ Policies \ Administrative Templates: Policy definitions (ADMX files) retrieved from the local computer. \ Windows Components \ Remote Desktop Services \ Remote Desktop Session Host \ Connections.
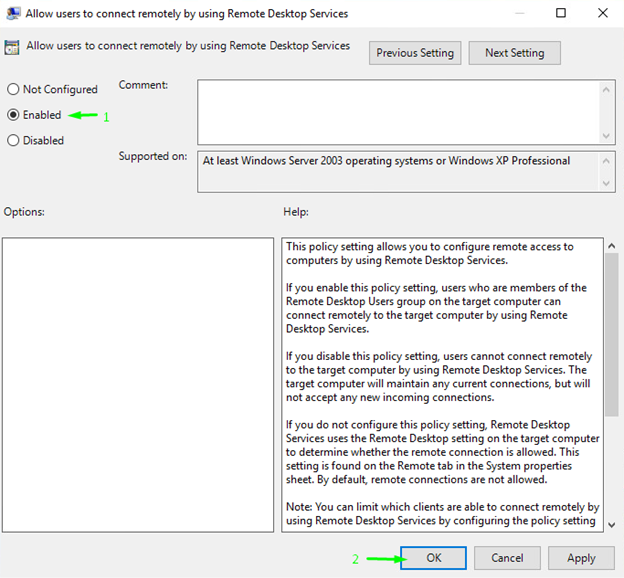
You need to enable remote connections there. For that purpose, change the Allow users to connect remotely by using Remote Desktop Services parameter to Enabled.
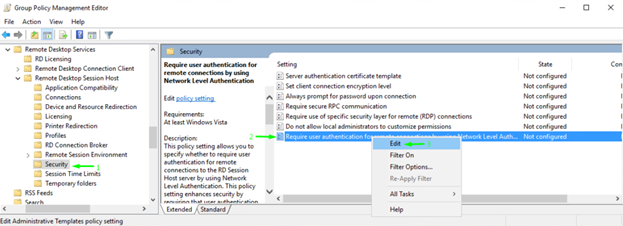
Once you are done with enabling RD connections, edit the security policy. Here’s the path: Computer Configuration \ Policies \ Administrative Templates: Policy definitions (ADMX files) retrieved from the local computer. \ Windows Components \ Remote Desktop Services \ Remote Desktop Session Host \ Security.
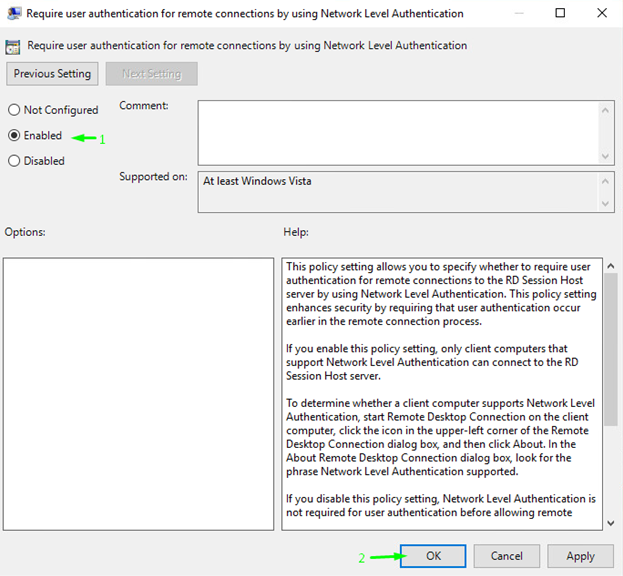
You need to enable user authentication there. Just change the Require user authentication for remote connections by using Network Level Authentication parameter to Enabled. Now, you can connect with the Network Level Authentication.
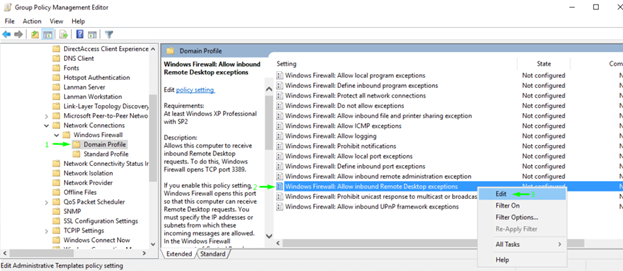
Edit the Domain Profile afterward. Follow this path: Computer Configuration \ Policies \ Administrative Templates: Policy definitions (ADMX files) retrieved from the local computer. \ Network \ Network Connections \ Windows Firewall \ Domain Profile.
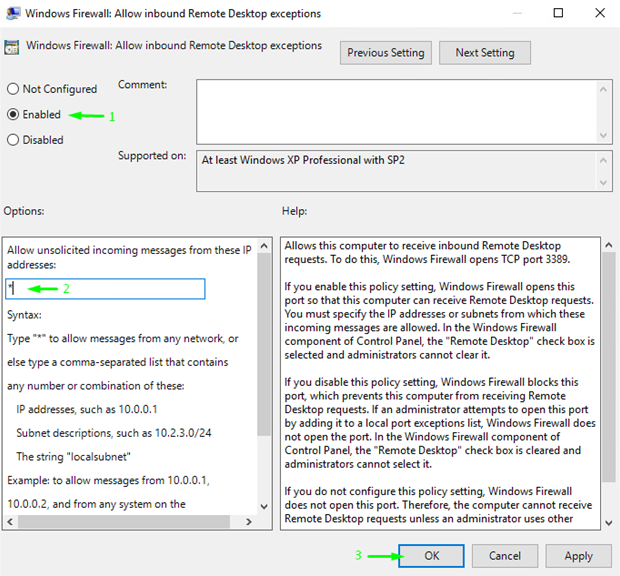
There, change the Windows Firewall: Allow inbound Remote Desktop exceptions parameter to Enabled. Add the IP or the subnetwork that will be allowed for connection. Otherwise, you can just type *, just as I did, to allow connections via firewall to the RD port from any IP.
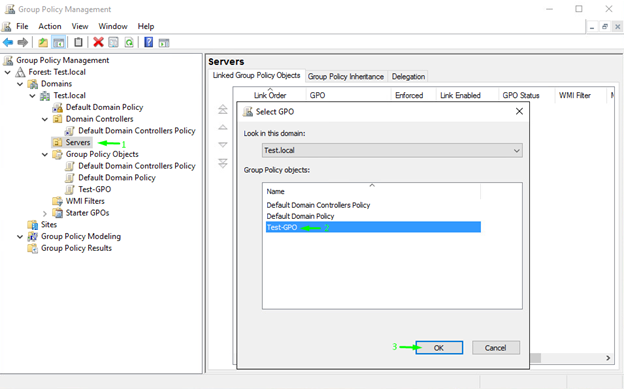
Once you press Ok, you are officially done with creating and setting up the policy. Now, go back to Group Policy Management Console and apply the policy to the Organizational Unit. In my case, it was called “Servers”. So, I right-clicked Servers and linked it as an existing GPO (there is the self-titled option). Afterward, In the Select GPO window, I selected the Test-GPO policy and pressed Ok.
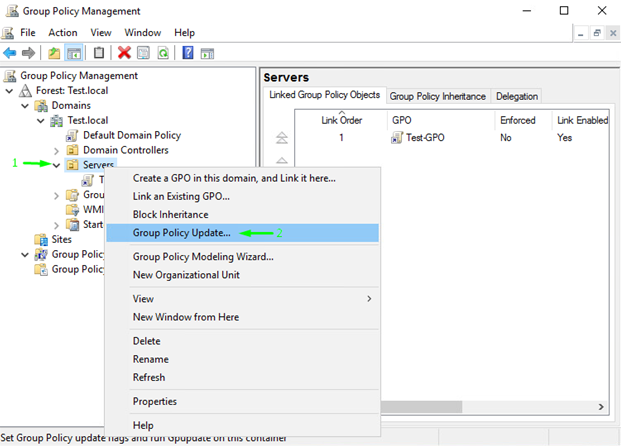
In order to have the settings applied quickly on the remote host, right-click “Server” and select Group Policy Update…
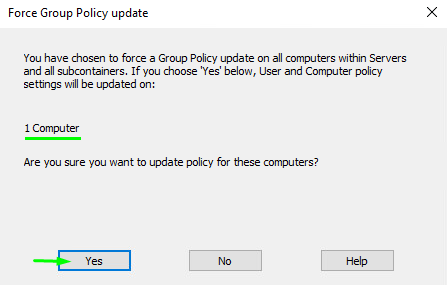
Confirm the force policy update. Note that I have only one computer in this Organizational Unit, and there are just as many hosts to be updated.
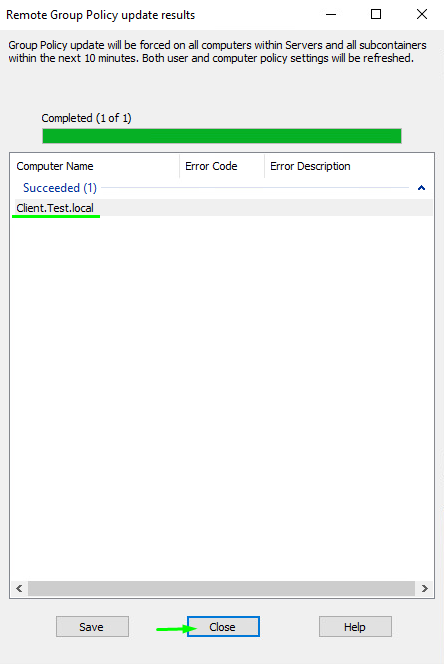
Wait until the Remote Group Policy finally updates.
Well, that’s it! Now, Remote Desktop works on “client”. Connect. Use it.
CONCLUSION
In this article, I described a couple of ways to enable Remote Desktop on another computer remotely. The last method always works. Well, unless, there was some firewall fine-tuning, of course. Honestly, here I provided only the methods that I know. Sorry, I did not examine the issue that deep. Sure, there are other methods how you can enable Remote Desktop. Do you know any? I really appreciate if you share them in comments.


