I´m currently preparing for 70-473 “Designing and Implementing Cloud Data Platform Solutions” Microsoft exam on a rather fast pace, and trust me, this exam requires that you know Azure SQL security options and features inside out (including when to use which one and how to use them). You can expect 25-30% of your exam questions to be about security. I think, one of the most interesting security features of SQL Server/Azure SQL Database is Always Encrypted. It went to GA in 2016 and currently is available for SQL Server 2016 (13.x) or newer and Azure SQL Database.
In this blog post, I will do the general overview of this feature and additionally highlight things important to know for prospective 70-473 exam takers.
Always Encrypted feature protects your sensitive data enabling separation between data owners which supposed to be able to view the data and data managers who should not have access to it (despite having a very high level of permissions which is necessary and sufficient to manage your data). With this feature in place, high-privileged SQL users or cloud database operators cannot access your encrypted data. This feature ensures encryption of data at rest and in use.
In the past, we used to have column/cell level encryption which was introduced in SQL Server 2005 and similarly encrypted column values (using function Encryptbycert for that), yet it didn’t secure data in transit (meaning you can still see plain text data in SQL Server trace). Always Encrypted encrypts your data in transit – only client’s app, which performs encryption/decryption using API and the client-side driver can see plain text data and encryption keys are not revealed to Database Engine. Hence, with Always Encrypted SQL Server trace won’t contain your encrypted data in plain text.
Let’s now have a closer look at Always Encrypted starting from answering basic questions about this feature.
How does it work? By means of implementing client-side encryption Always Encrypted ensures that data stored in a database remains encrypted at all times, even during query processing. Essentially, we move out encryption/decryption outside of SQL Server, moving the keys as well as encryption/decryption of data to the application level. Always Encrypted relies on a client-side application to automatically encrypt and decrypt sensitive data. This involves special driver which encrypts the data in sensitive columns before passing it to the Database Engine and automatically rewrites queries so that the semantics are preserved. The same driver does transparent decryption of encrypted columns contained in query results.
Why may you want to use it? To prevent data breaches of sensitive data. Think of any kind of sensitive personally identifiable information, or PII (we all remember about GDPR, right? 
When can you use it? In several scenarios. Firstly, when both your client and data are on-premises you may want to use Always Encrypted when hiring external vendor or contractors to administer your SQL Server to prevent them from seeing sensitive data and eliminate need for strict NDAs which would have been necessary without Always Encrypted.
Secondly, when your client is on-premises and data must be stored in Azure SQL database you can store Always Encrypted Keys in a trusted key store hosted on-premises, thus eliminating possibility for Microsoft cloud administrators to access your sensitive data.
And thirdly, in case when both your client and data are hosted in Azure. In this scenario, albeit you are not getting complete data isolation (as Azure administrators are in control of both data and encryption keys) you still greatly reduce attack surface as your sensitive data is always encrypted in the database.
For 70-473 exam purposes your take away from this introductory part should be understood that when you see exam questions which stipulate requirement for data to be encrypted at all times, you should know that it is Always Encrypted feature which can meet this requirement.
I think you are now more or less clear on what is Always Encrypted conceptually and ready to have a look at practical side of things. And there is no better way to do it than going through all the configuration steps together exploring additional requirements and considerations.
As I mentioned before, With Always Encrypted we are moving our trust boundary from SQL Server to client application, and this means that there are certain client-side prerequisites for this feature. Those are the following:
- SQL Server Management Studio (SSMS) version 13.0.700.242 or later
- .NET Framework 4.6
- Visual Studio (for development using .NET Framework Data Provider)
- Azure PowerShell (version 1.0 minimum required for Azure Key Vault)
Note that for steps we going to go through here we don’t need Visual Studio.
Let’s consider basic example of Always Encrypted set up and usage. I have created Azure SQL Database with the following table to act as our data source:
And I also created corresponding K2 SmartObject for this table:
To further expose our SQL data on a web page I created generic K2 SmartForms list view from above mentioned SmartObject. This list view will be my sample client application working with encrypted data:
NOTE: If you don’t have K2 software or not familiar with it you can just ignore steps related to it and only use SSMS which will also be sufficient. I’m using K2 as an example of app consuming SQL data and in your case, it can be something else (including some custom web application).
As an example of sensitive data which we want to encrypt we are going to use CreditCardNumber column of Subscribers table. Let’s now configure encryption for it. For that we fire off SQL Server Management Studio, locating our table and clicking on “Encrypt Columns…” from table’s context menu:
This action starts Always Encrypted wizard which will guide you through the process of encrypting table columns:
Once you click Next button on introductory page (you can tick “Do not show this page again” to skip this page in the future) you will procced to Column Selection Step, in our scenario we are selecting CreditCardNumber column to be encrypted:
Once a column has been selected we can see the purple star sign which means that encryption is not yet configured for the column, and we need to select Encryption Type from drop-down menu:
For Encryption Type, we need to select between Deterministic and Randomized. The basic rule here is that deterministic encryption is less secure yet allows you to perform grouping, filter by equality, and joining tables on encrypted columns. Deterministic Encryption produces the same encrypted value for any given plaintext value. Randomized encryption generates different encrypted value for the same plaintext each time, which makes this option more secure yet prevents equality searches, grouping, indexing and joining on encrypted columns.
Deterministic encryption is especially weak when used for small set of unique values making it too easy to decipher those. If you going to take 70-473 Microsoft exam you should be very clear on these encryption types and their limitations and be able to translate use case requirements into right encryption settings.
You can also see on the same wizard page that it is going to create new encryption key for us (CEK_Auto1). Before we move on to next page of the wizard it is worth mentioning that encrypted columns supposed to have binary2 collations (see my blog post about binary collations for more details) and if column to be encrypted does not have this collation wizard will be changing column collation for you:
Once we click Next wizard moves on to Master Key Configuration step:
Our option here includes decision on whether we want to auto-generate column master key or use existing one or use existing one and where we going to store it – either locally in Windows certificate store or in Azure Key Vault. For this demo, I’m selecting Windows certificate store and master key source Local Machine.
Once we click Next here we presented with Run Settings dialogue, where we either can execute our configuration steps immediately or generate PowerShell script to run later:
For those who preparing for 70-473 exam or interested in automation of Always Encryption configuration it is recommended to save and review PowerShell script to familiarize yourself with related PowerShell cmdlets and so on otherwise you can select Proceed to finish now and execute configuration steps immediately. I’ve selected Generate Script and you can see how this sample script looks here (I’ve added some little useful additions in this autogenerated script).
On the Summary page we just reviewing your selections and click Finish:
As I opted out for creating PowerShell script option it was necessary for me to run PowerShell script to complete configuration process (be aware that PowerShell script approach may require installing additional modules and some other tricks).
Once wizard or PowerShell script completed their work we can have a look what’s changed once configurations steps were completed and our column was encrypted.
As we selected Windows certificate store for our certificate we can open Certificates snap-in (certmgr.msc) for local computer and find our Always Encrypted Auto Certificate in Personal certificates:
We can open certificate and see that certificate which has been created is valid for one year and uses SHA256RSA as a signature algorithm:
Let’s now try to execute SELECT statement to list data from Subscribers table:
All column values are encrypted. But wait, we have all prerequisites in place and certificate, so we supposed to see the data just fine, right? Yes, but you need to specify special connection string parameter for that. For SSMS you just need to reconnect to the database, and click on Options to specify it:
Once you clicked on Options button, switch to Additional Connection Parameters tab and type in Column Encryption Setting = Enabled and click connect and it supposed to be sufficient for you to see encrypted values in plain text again:
Once connected with this parameter specified and having right certificate you will also get the following prompt from SSMS:
It suggests enabling parametrization of Transact-SQL columns which will help you to perform inserts, updates or filter by values stored in encrypted columns. Let’s have a look what happens without this option in place, before enabling it and ticking “Do not show me this message again” option.
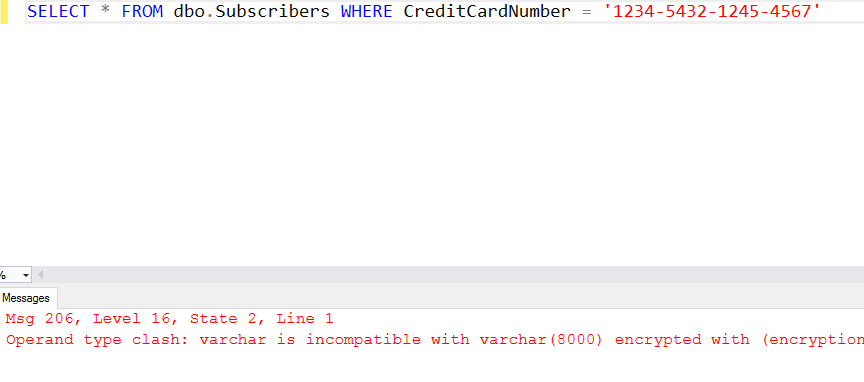
First, irrespectively of abovementioned setting queries which use encrypted column without parameters will fail with operand type clash error:
And if you will parametrize your query without enabling parametrization of Transact-SQL columns SSMS feature you will get Encryption scheme mismatch for columns/variables error:
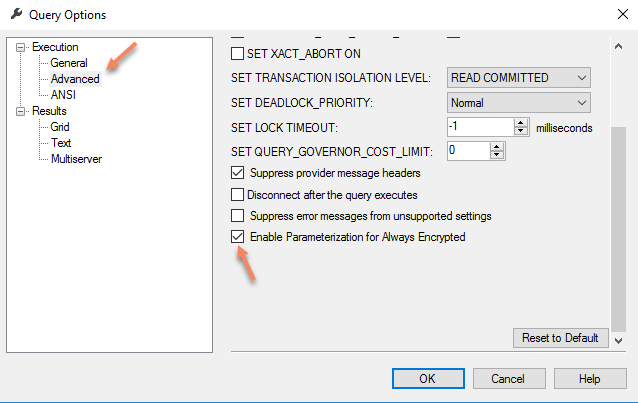
Now we will enable Parametrization for Always Encrypted SSMS feature as SSMS suggested us to do earlier:
With this setting in place you can re-run parametrized query and see that it works:
This Parametrization for Always Encrypted SSMS setting maps Transact-SQL variables to query parameters (SqlParameter objects, in .NET – SSMS uses .NET Framework Data Provider for SQL Server) and it refactors queries, using Transact-SQL variables, into parameterized statements. With help of SQL Server trace, you can see two RPC calls, instead of the single batch statement, on the server side. You may read more about this at SQL Server Security Blog.
Let’s now look at our sample app (K2 View) after we encrypted one of its columns. Unfortunately, it gives us an error:
Let’s switch over to SmartObjects Services Tester tool to see what we have there. If we execute SmartObject List method, we will get the same error message:
But actually, all we need to do is adjust our connection string, which in this case simply means adding Column Encryption Setting = Enabled parameter in our SQL Server Service Instance properties like that:
With this setting in place, I’ve got SmartObject List method working immediately yet for ListView it only removed error message while Credit Card Number Column was empty even after clearing browser cache and refreshing the page – this took IIS reset to resolve this and get perfectly working view again:
But removing certificate from machine will cause this error for your List View:
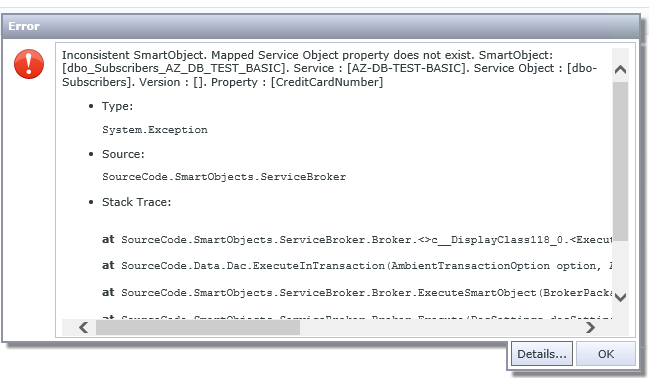
And removing Column Encryption Setting = Enabled parameter in our SQL Server Service Instance properties will give another error message about inconsistent SmartObject:
But that’s rather expected given how SmartObjects layer built at the moment – it just doesn’t expect sudden change of one of the column to super lengthy string of encrypted text (maybe better support for this SQL Server feature will be implemented from K2 side later, i.e. you will get more meaningful error message or will be seeing ciphertext). SSMS in these scenarios will be showing you encrypted values without any errors which obviously looks better and expected from the app built with all SQL features in mind.
I hope this overview gave you good understanding of SQL Always Encrypted feature, and though we haven’t discussed such things as storing the certificate in Azure Key Vault or in hardware security modules (HSM) you can explore these topics on your own with help of Microsoft’s documentation. If you have any further questions or comments here, just post them below this blog post and I will try to answer to those.


