How it happened
Last year, my colleague asked me for advice. He couldn’t add an iSCSI target, provided by AWS Storage Gateway, on VMware ESXi cluster. So, initially, this material was intended to serve as a manual. However, since I got a similar question once more just recently, I realized that this topic could be interesting to the others as well, which is why I decided to share this guide, hoping it will be useful.
AWS Storage Gateway what?
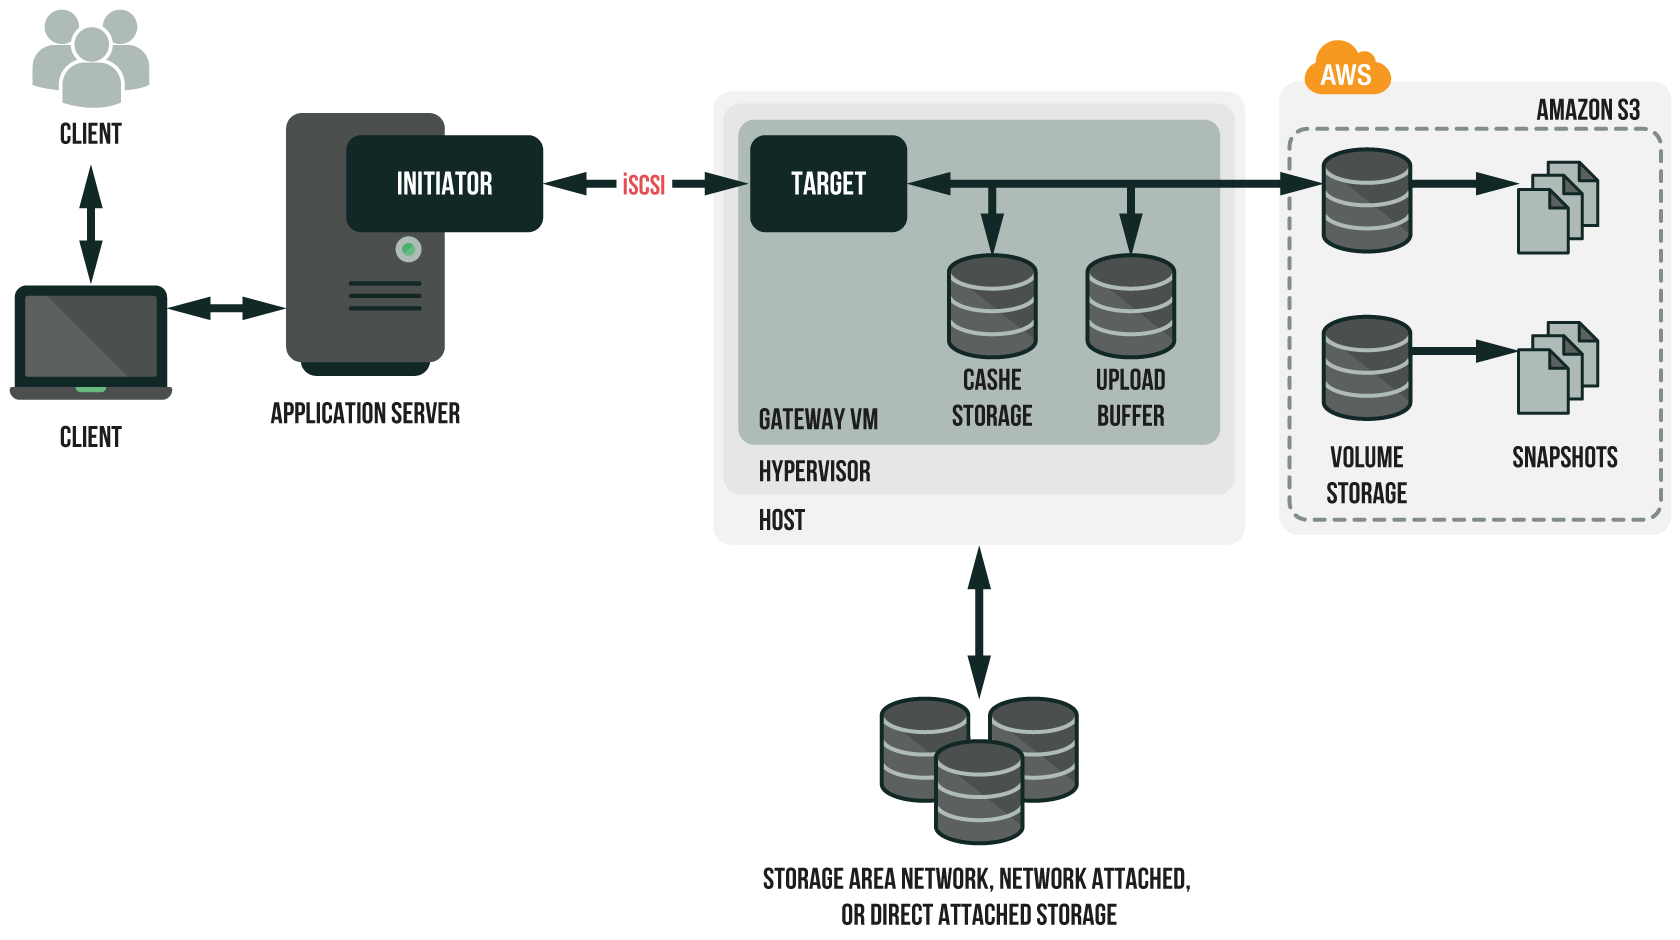
As you know, AWS Storage Gateway is a hybrid cloud storage service that connects your existing on-premises applications with the AWS Cloud. This service makes it easy for you to deal with scaling to cloud, disaster recovery, cloud backups, tiered storage, or cloud migration. Local applications seamlessly connects to Storage Gateway with NFS and iSCSI. Storage Gateway, in turn, integrates with AWS cloud storage services, enabling you to store files, data in volumes, and virtual tape backups online Amazon S3, Amazon Glacier, and Amazon EBS. Service has multiple features like optimized and secured data transfer, bandwidth consumption management, and local caching for low-latency access.
AWS SG.
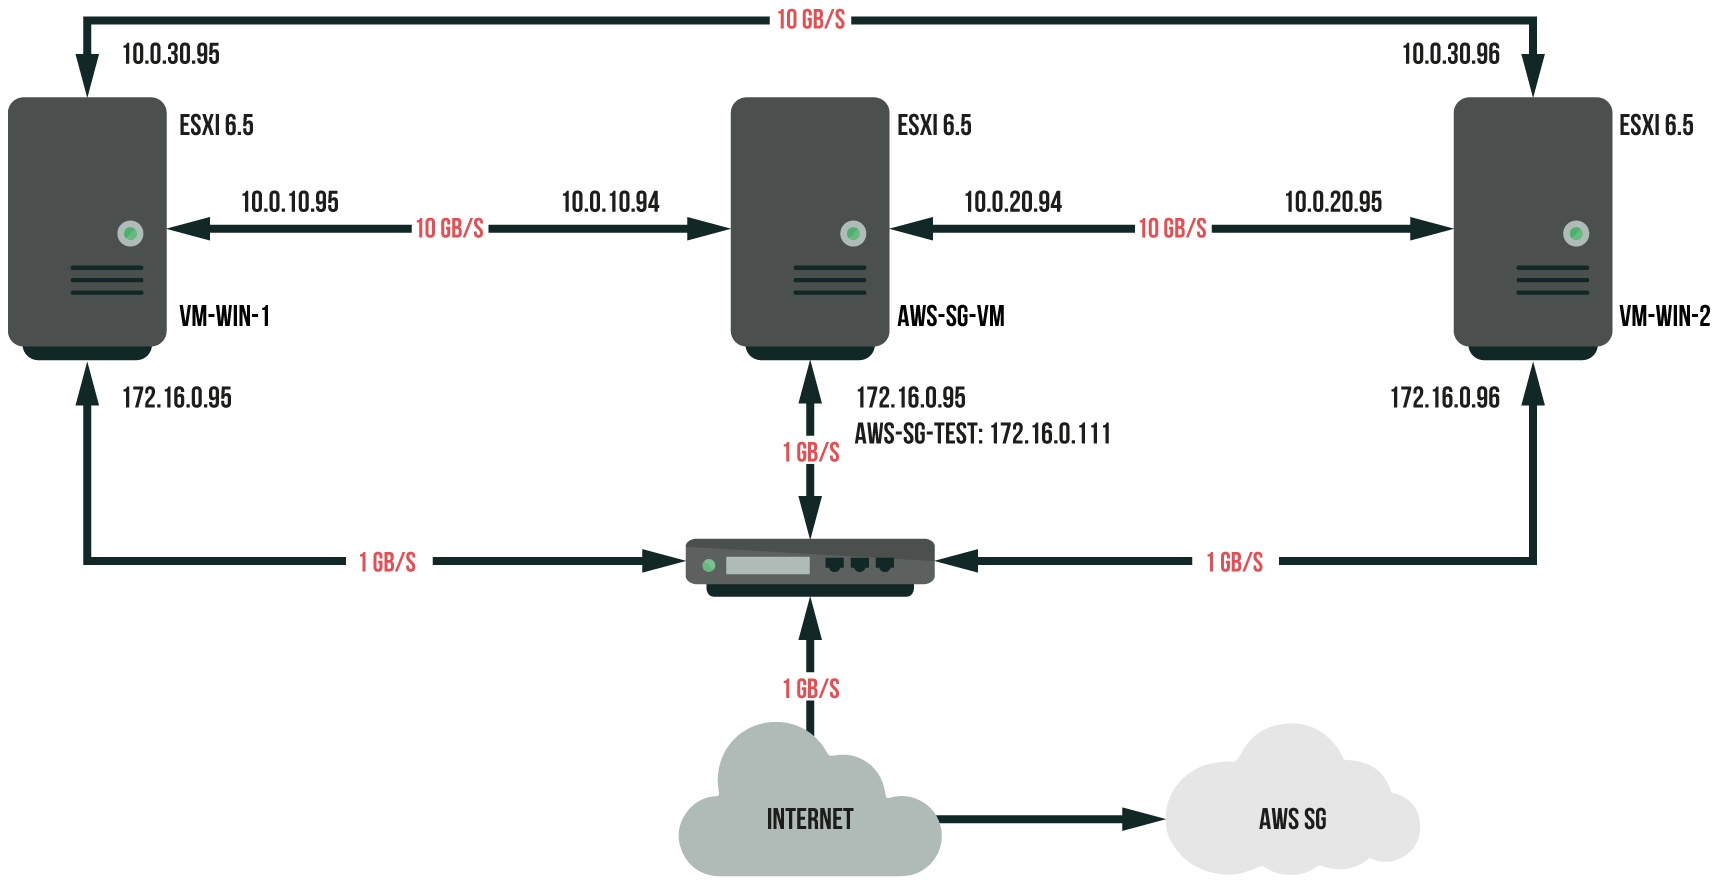
This example exploits 3-server ESXi 6.5 cluster configured in VMware vSphere 6.5.
Gateway virtual machine (VM) server:
- Intel Xeon CPU X3470@2.93 GHz;
- 24GB RAM;
- 1 x 500GB HDD;
- 1 x 2TB HDD;
- 2 x 500GB SSD;
- 2 x 1 Gb/s LAN;
- 2 x 10 Gb/s LAN;
- VMware ESXi, 6.5.0, 5969303.
Target connection server and guest VM server:
- Intel(R) Core(TM) i7-2600 CPU @ 3.40GHz;
- 12 Gb RAM;
- 1 x 140GB HDD;
- 1 x 1TB HDD;
- 2 x 1 Gb/s LAN;
- 2 x 10 Gb/s LAN;
- VMware ESXi, 6.5.0, 5969303.
The setup scheme.
To Do list:
- Create a cluster in VMware vSphere 6.5;
- Provide an iSCSI target and the physical disk using AWS Storage Gateway;
- Download and deploy a gateway VM on the VMware ESXi server;
- Configure a gateway VM;
- Use iSCSI target on VMware ESXi servers;
- Test an iSCSI target performance.
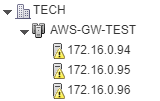
Create a test 3-server cluster AWS-SG-TEST.
For cluster performance to run fast and smooth, let’s use 10 Gb/s LAN cards.
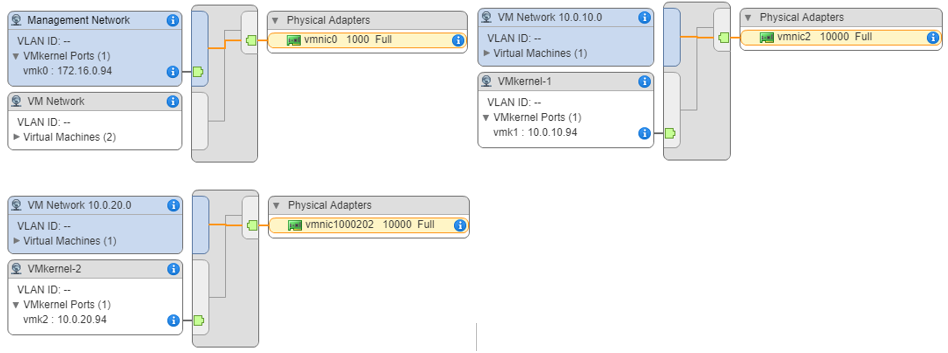
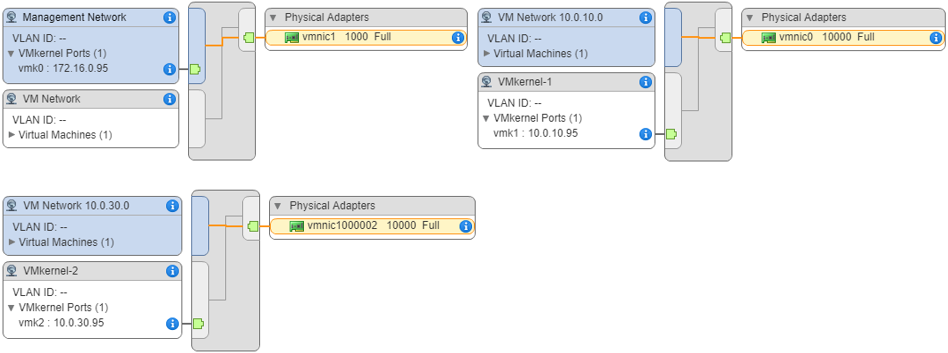
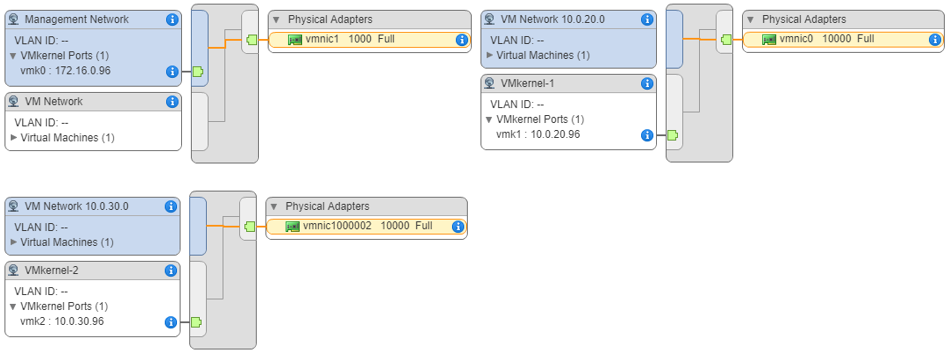
Create 3 virtual switches on each server. One virtual switch to enable external communication that uses 1 Gb/s Intel PRO/1000PT adapters to connect to 1 Gb/s physical switch. 2 other virtual switches to enable connection with 10 Gb/s LAN cards of the other servers through the physical uplink. In my case, it was a necessary measure to take, since no free switch with 10 Gb/s ports was available.
Connecting to the virtual switches on server 172.16.0.94.
Network connections on the other servers are configured similarly:
Connecting to the virtual switches on server 172.16.0.95:
Connecting to the virtual switches on server 172.16.0.96:
In order to be able to work with iSCSI protocol, you need to add iSCSI Software Adapters in each server and the cluster, but we’ll talk about it later.
Connect and set up AWS SG.
We won’t be making any stops at describing registration and financial details of AWS SG service, so let’s move directly to creating and connecting the target.
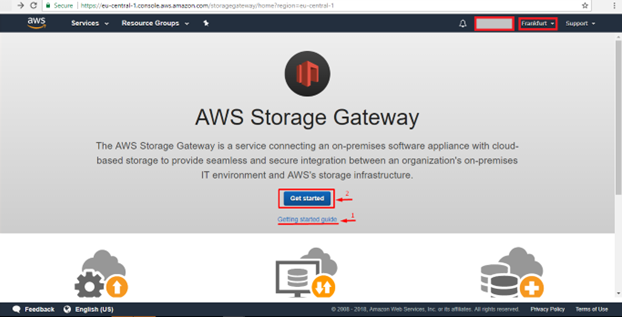
Sign into your AWS SG account at the following link https://console.aws.amazon.com. In the console, choose Storage Gateway. Further, the important configuration stages will be marked red and numbered according to their respective order necessary for the configuration to complete successfully. Personal data will remain hidden for security measures. For the following work, let’s choose the Frankfurt region because it is the closest geographically (although it doesn’t really affect our task).
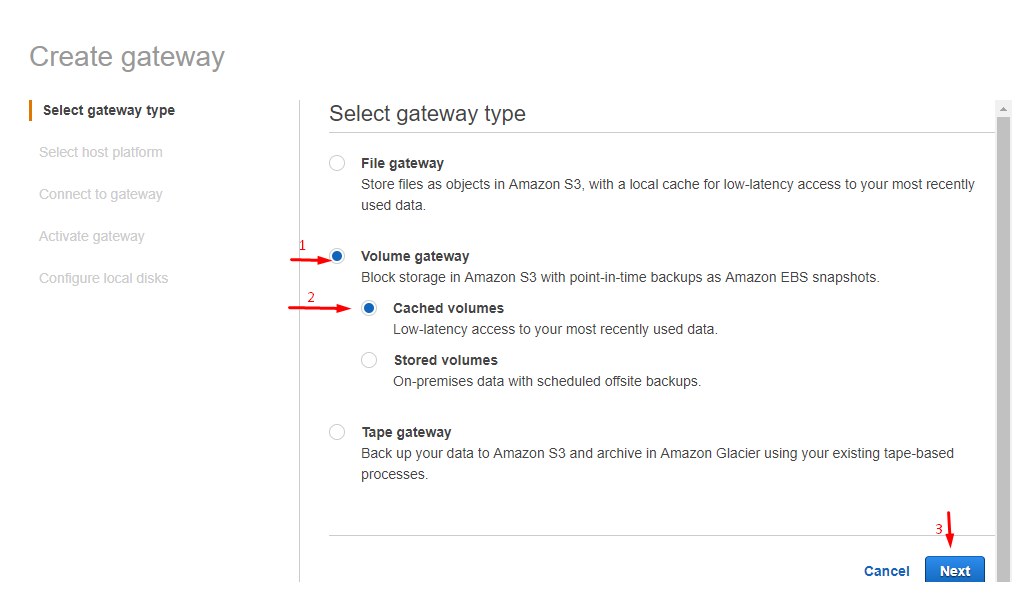
In this article, I will move onto exploring only one of the 4 possible ways to work with AWS Storage Gateway service, namely the Cached volumes scenario. It will be more than enough to cover the primary aspects of the iSCSI target setup.
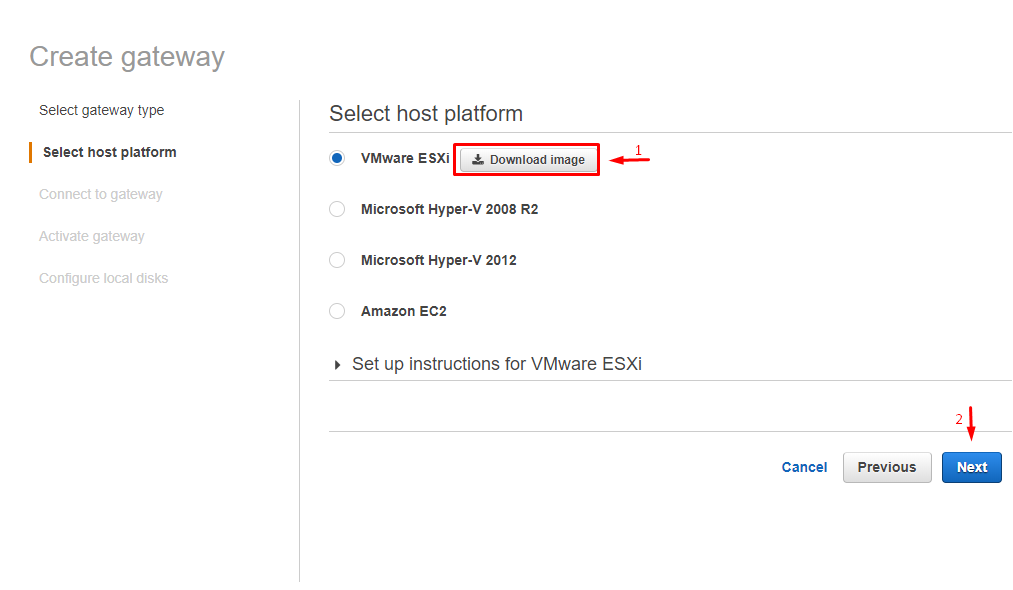
Download OVA file to create a gateway VM.
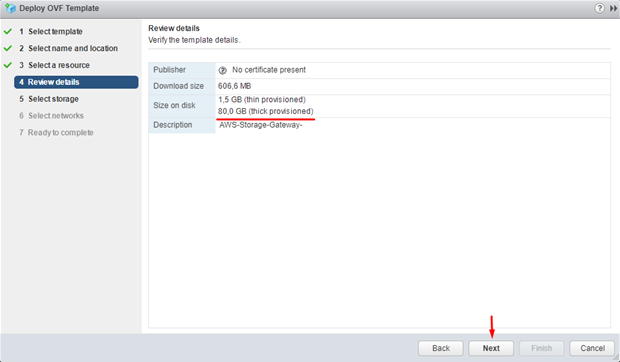
Now, deploy this file on the ESXi server. According to the AWS SG manual, the following VM should respond to these parameters:
- 4 CPU;
- 16 GB RAM;
- 1x 80 GB HDD (Thick provision);
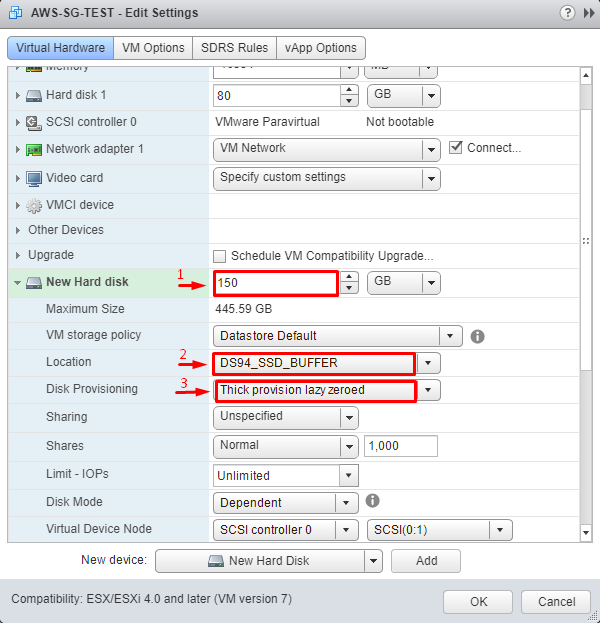
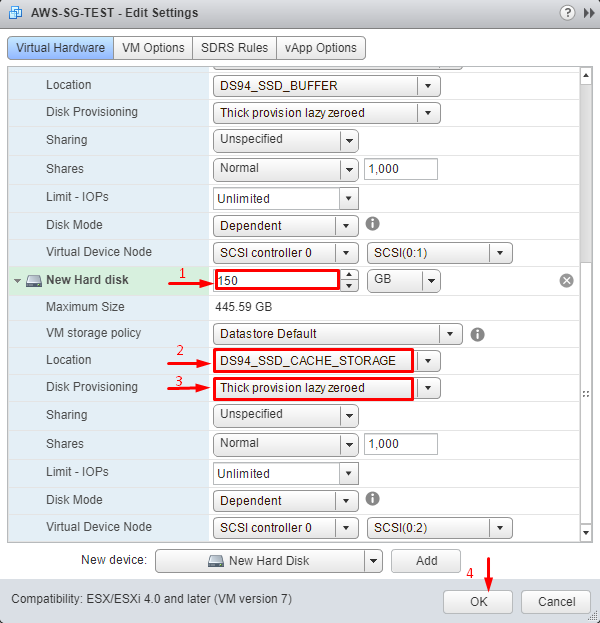
- 2×150 GB HDD (Thick provision) on SSD (1 x “Upload Buffer” ans 1 х “Cache storage”);
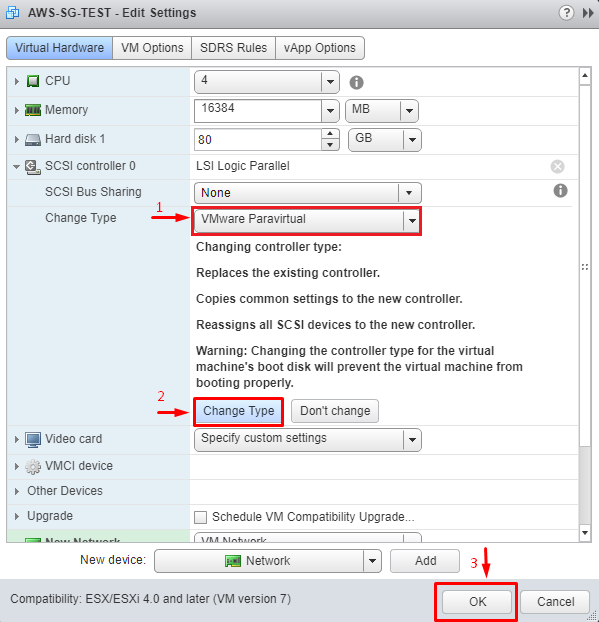
- 1 x VMware Paravirtual SCSI controller (change the controller type by default);
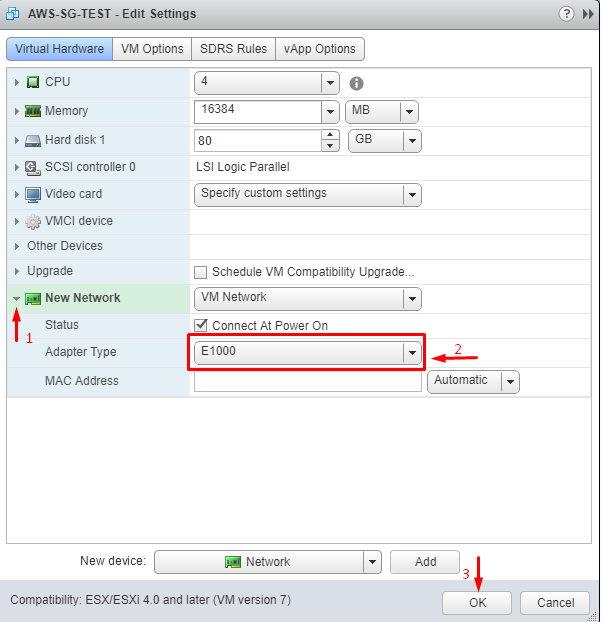
- At least 1 х E1000e virtual network adapter with a static IP address and Internet connection.
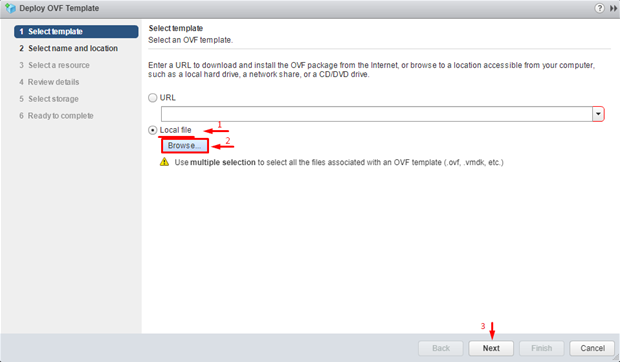
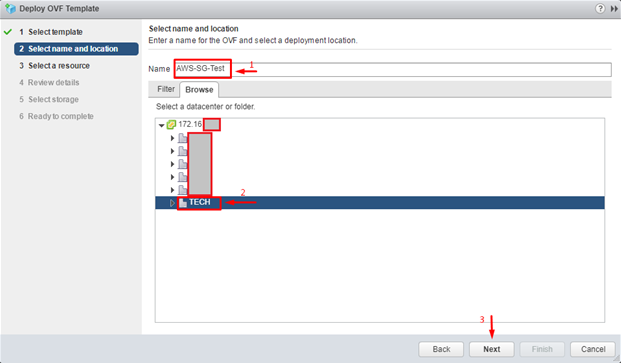
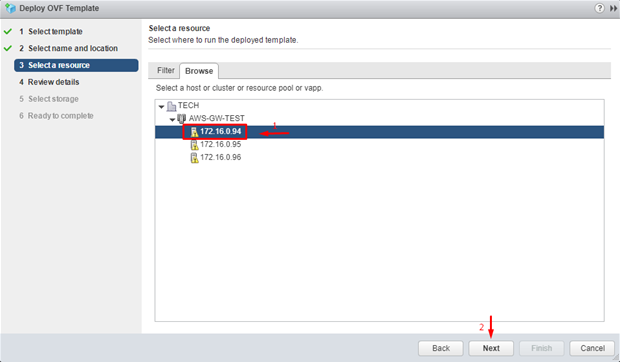
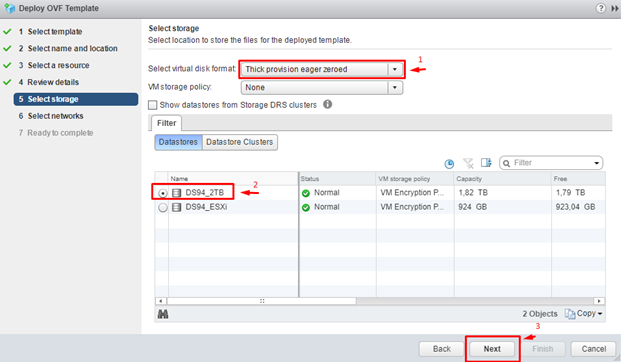
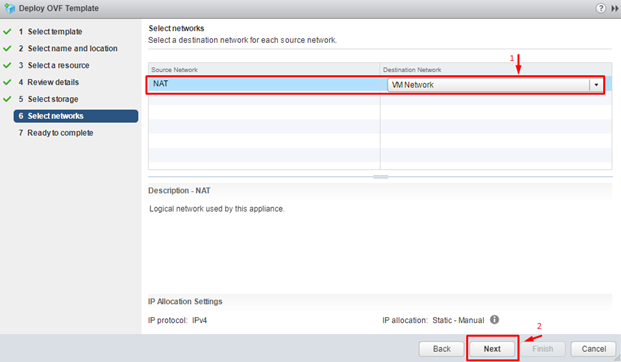
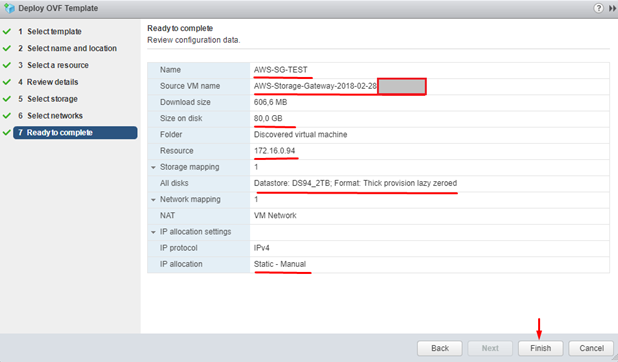
You need to unarchive the previously downloaded OVA file and import it into the gateway VM host server, which, in our case, is 172.16.0.94.
According to the AWS SG manual, choose thick provisioning as a type of storage pre-allocation in the gateway VM.
After creating the gateway VM on the ESXi server, you’ll need additional configuration in accordance with the AWS SG manual. If your network virtual adapter is not E1000, delete it and create a new one.
Change VMware SCSI controller type to Paravirtual.
Create and connect 2 virtual disks stored on SSD datastores. You will utilize them as AWS service local caches.
Connect disk for the network buffer.
Connect disk for the target caching.
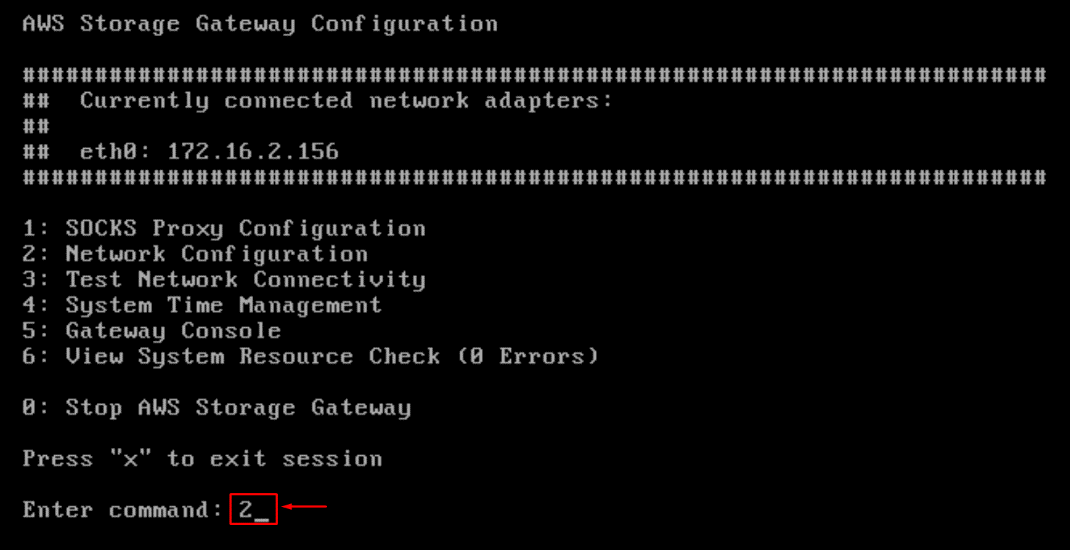
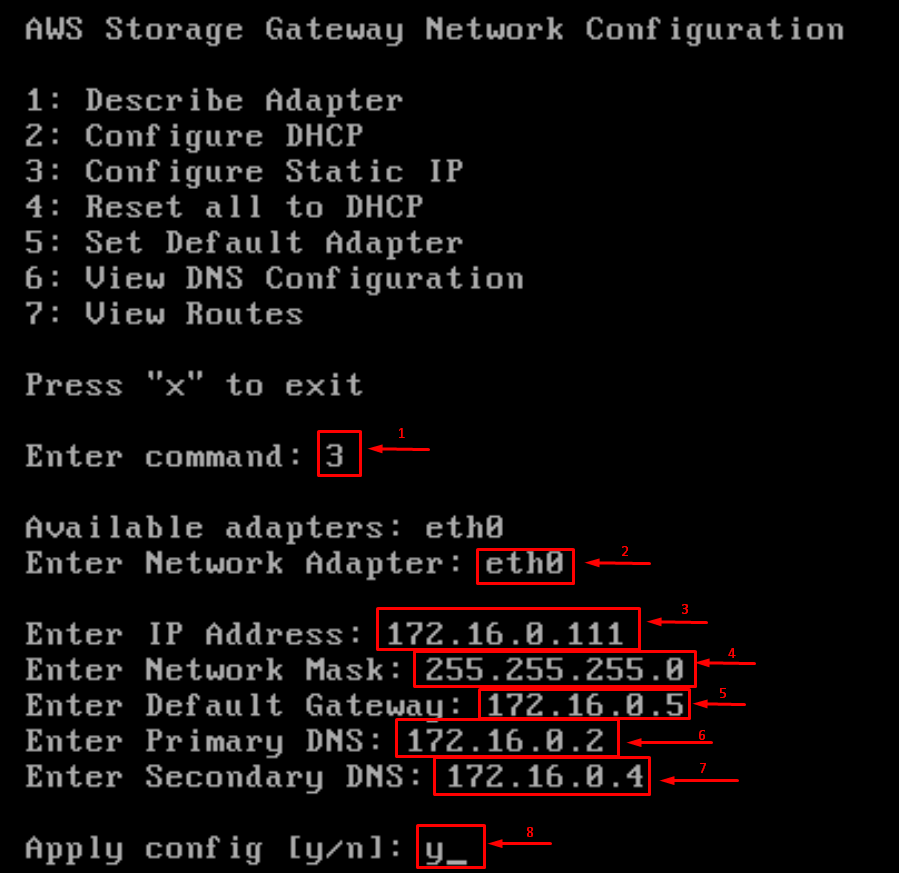
Start the gateway VM to continue configuration. According to the AWS SG manual, the credentials are sguser and sgpassword. For the actual work, you’ll need to change the password for security measures, but while testing, I won’t be highlighting this aspect, you can find all the information you need in the manual. Start fine-tuning the VM with changing the network adapter settings.
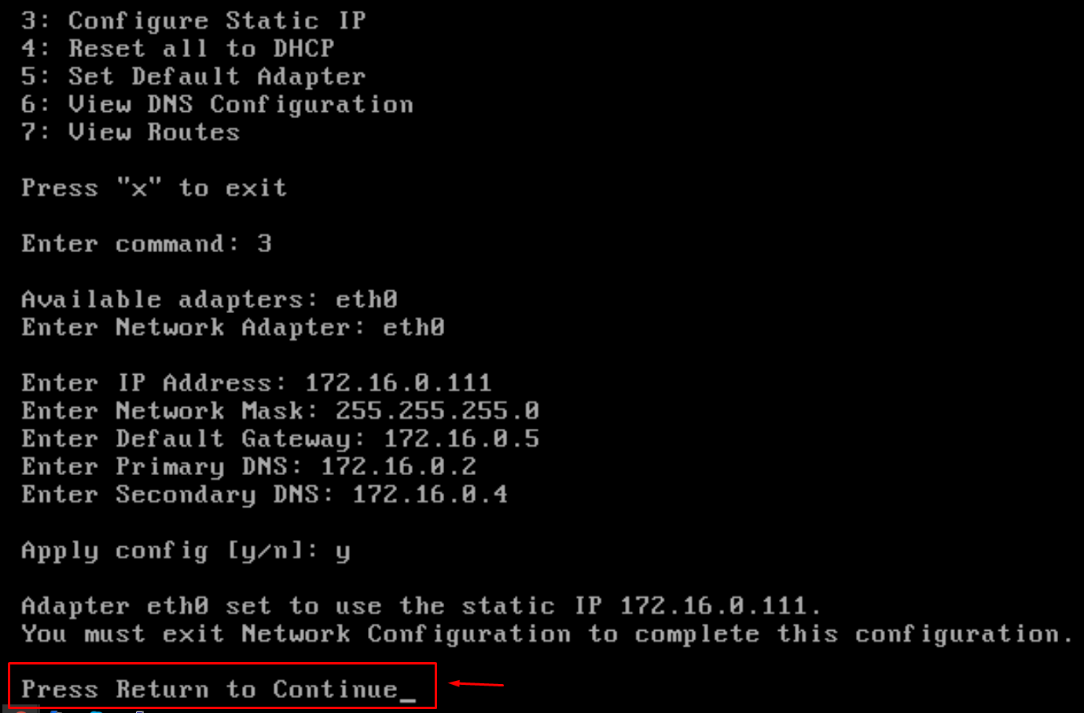
Choose a static IP address from the subnet 172.16.0.111 for the VM. It will be the IP address for establishing a connection with the target.
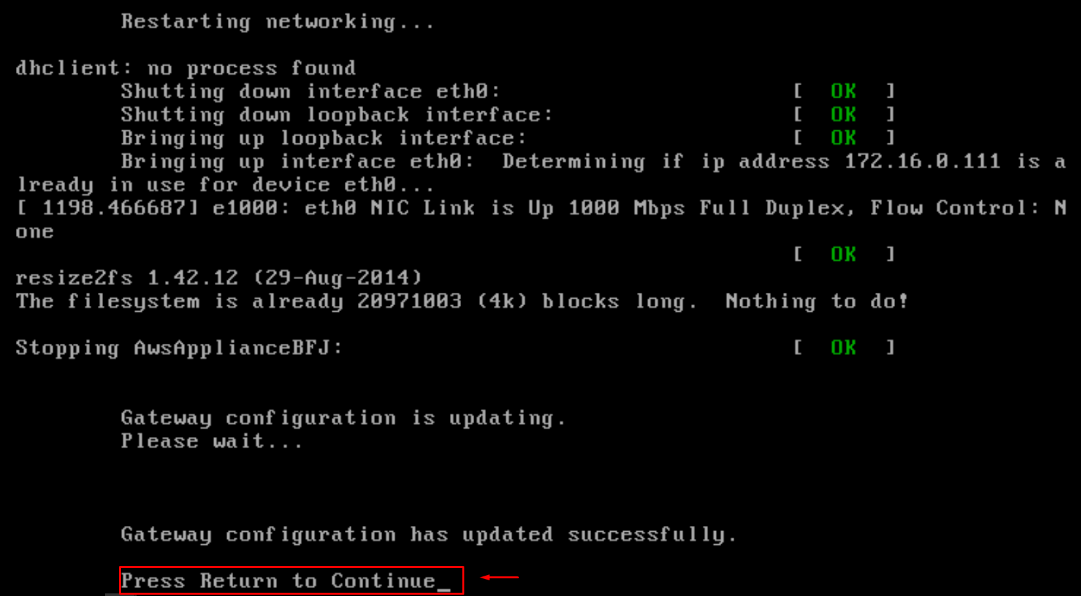
Make sure the parameters were set correctly.
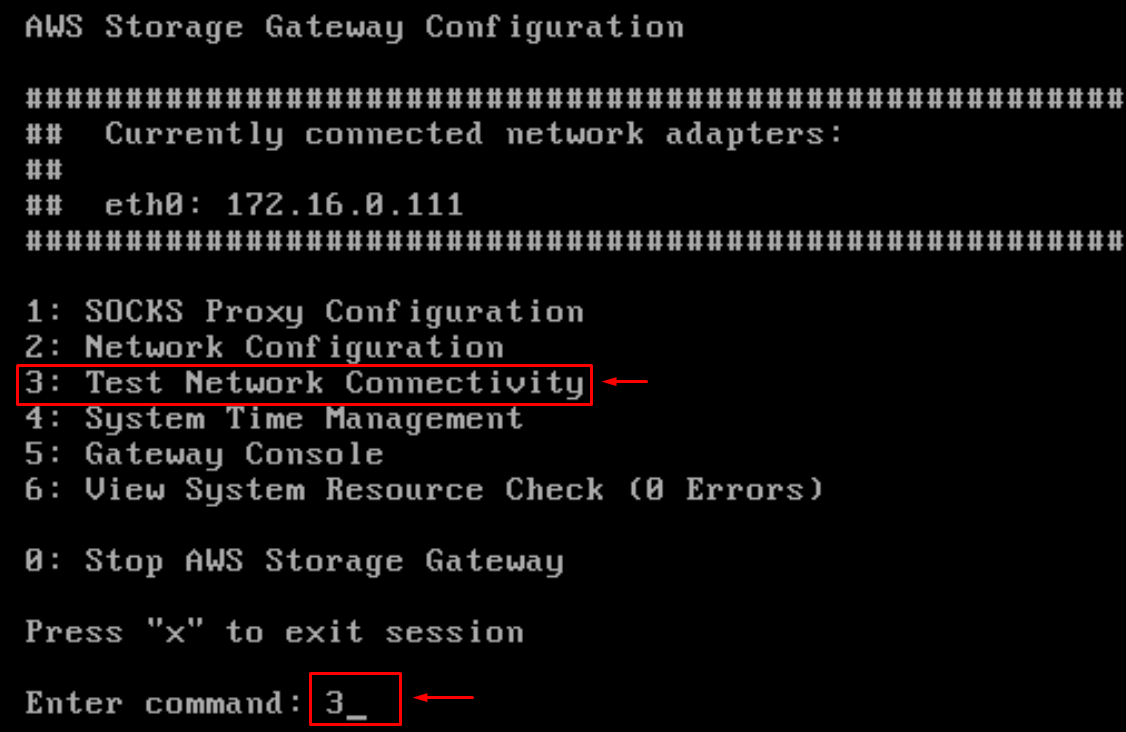
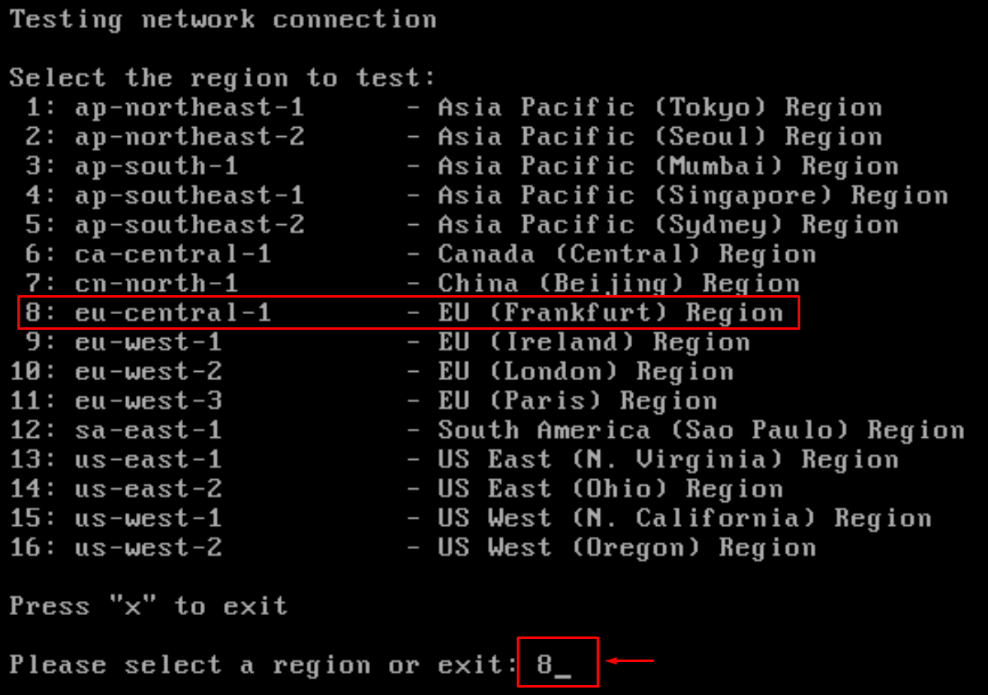
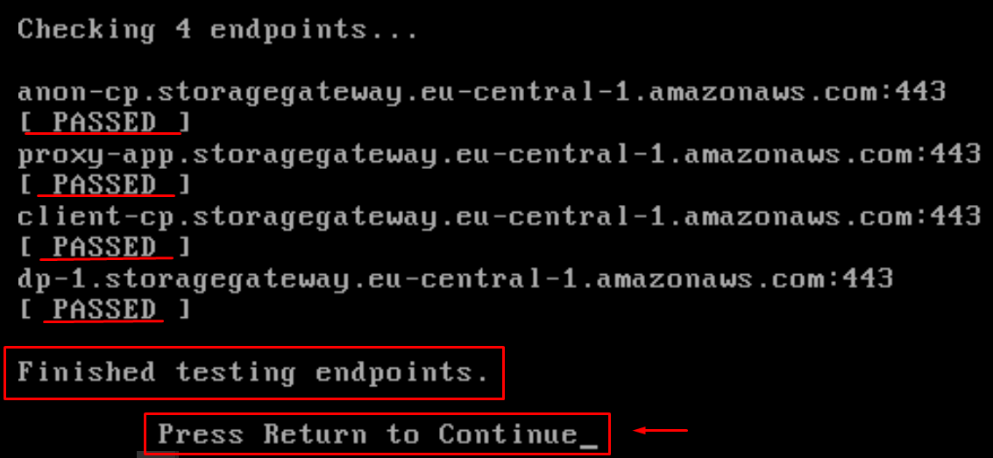
Move to the next stage and make sure you have a connection with the chosen AWS SG.
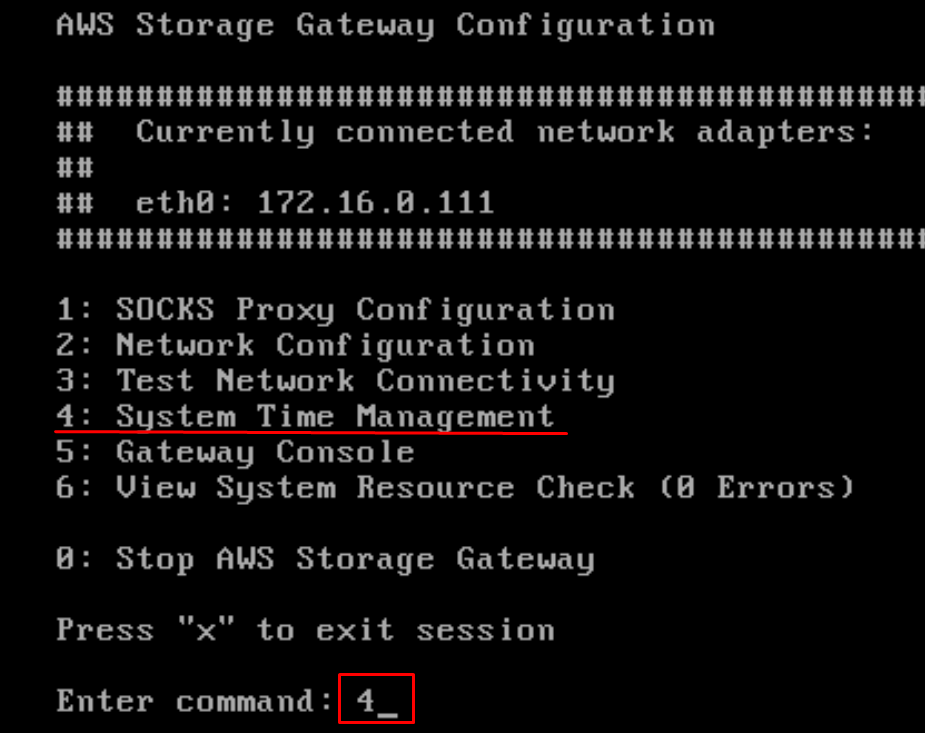
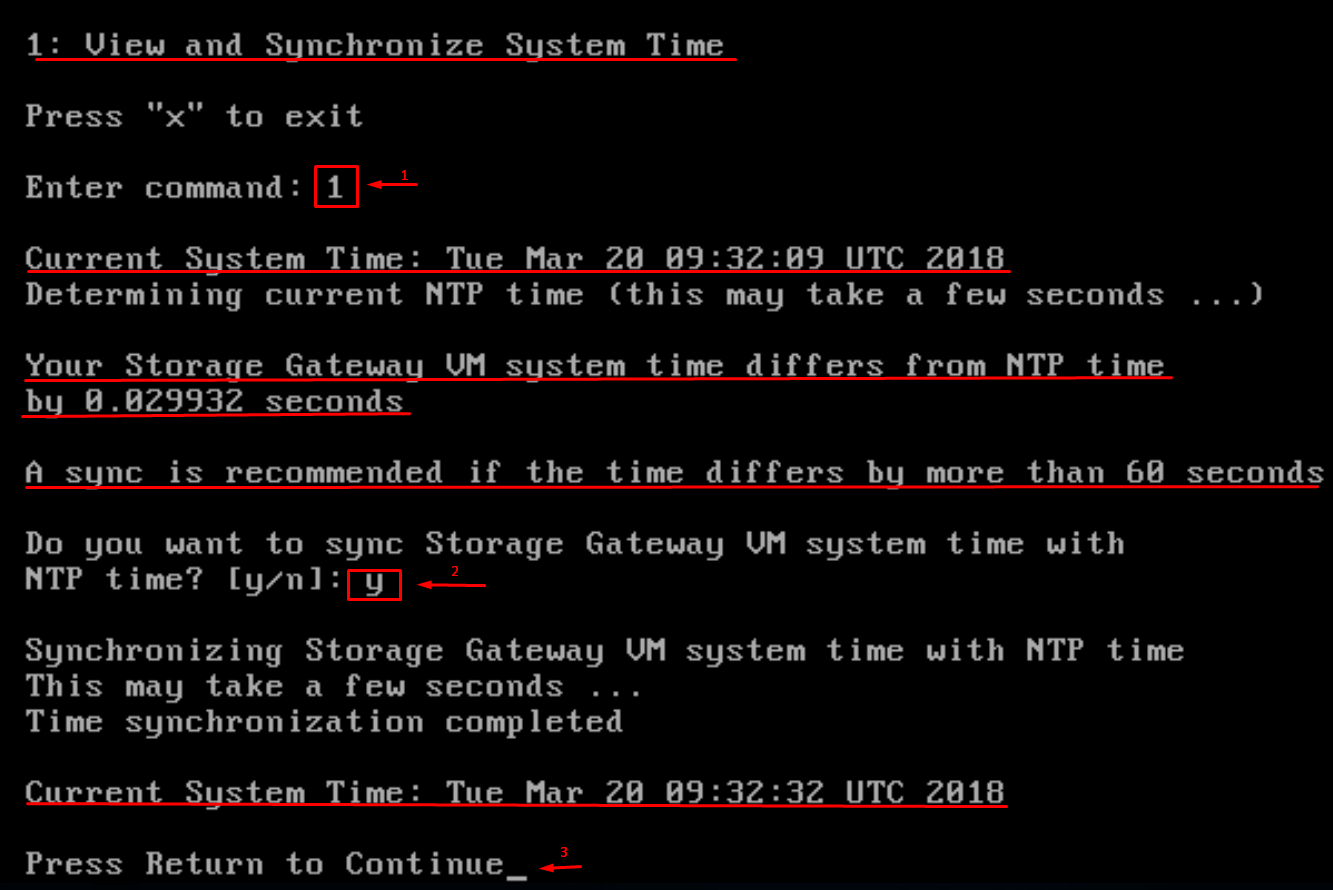
If the network is working as it should, move to the system time management.
You need time management to connect to the AWS SG successfully. Otherwise, an effort to add a gateway VM to the service may be in vain. The time difference between real-time and NTP server time is 60 seconds (which is not critical, though). Let’s synchronize the system time for clarity.
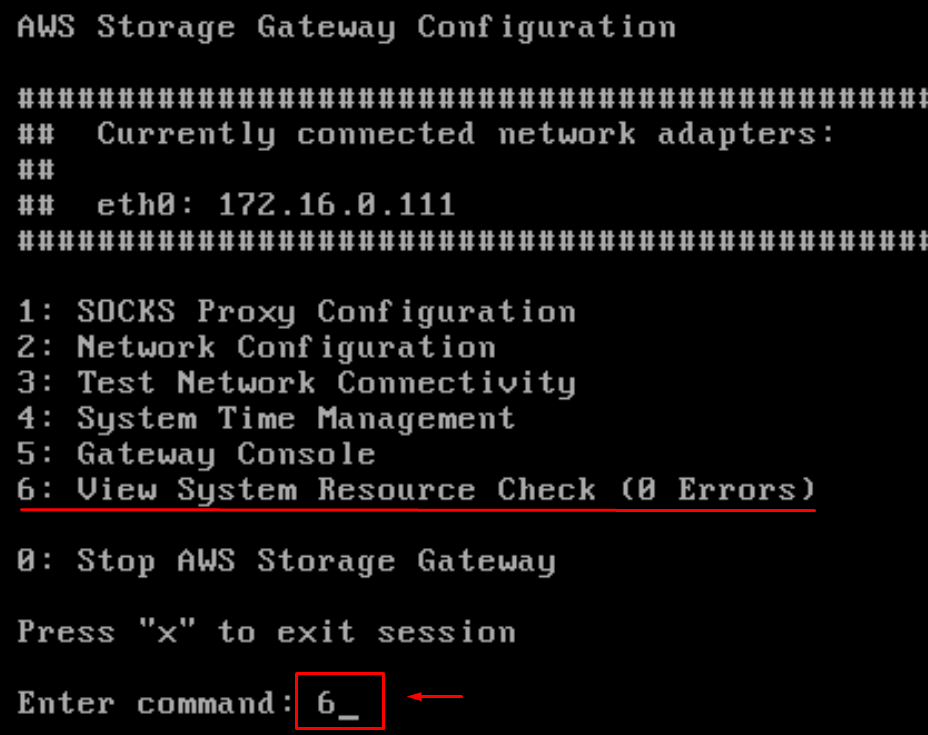
Furthermore, view the VM system resource check.
Once you make sure the gateway VM is fully configured, reboot the VM in vSphere and go back to target configuration in AWS SG console. You also need to check if the VM is working and active. Go at the gateway VM IP address (172.16.0.111), and if you have done everything right, you’ll get the gateway data at the screen.
Enter the static IP address appointed to our gateway LAN card (172.16.0.111).
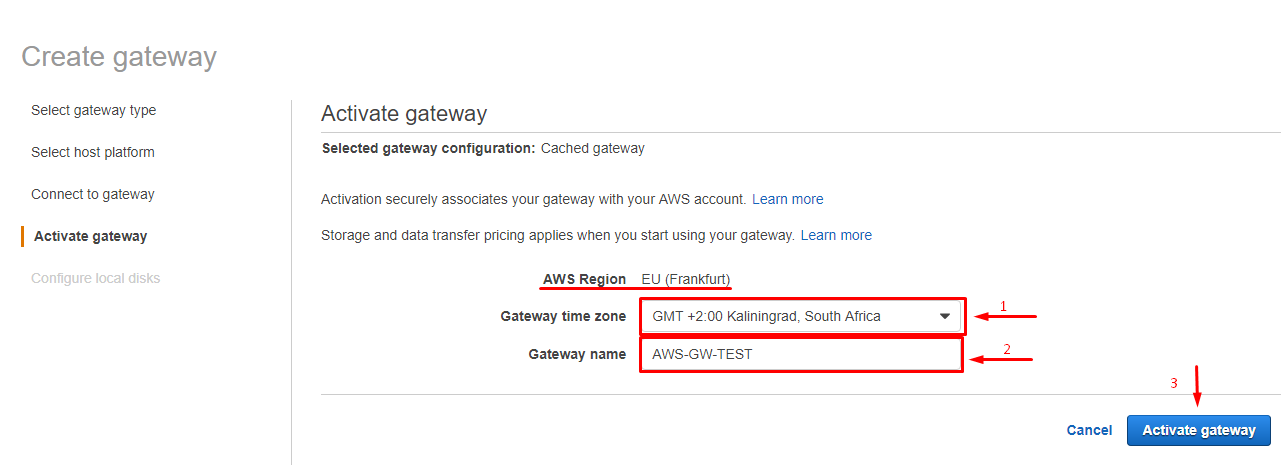
Enter the time zone and the gateway name.
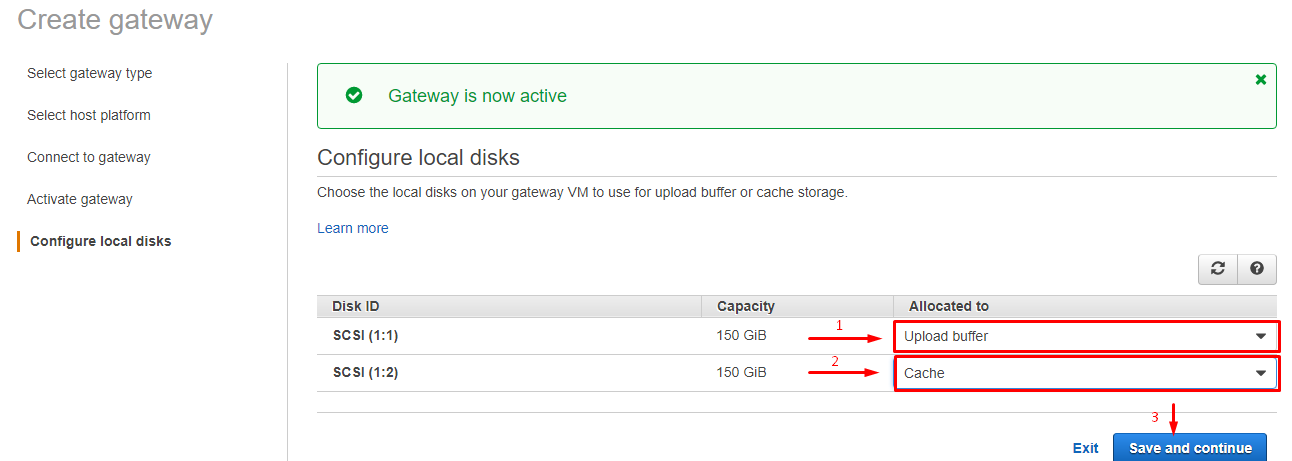
Configure virtual disks for the upload buffer and cache..
Save your settings and move to the next stage.
You’ll need a 50GB volume (given the necessity to move the test VM with 20 GB volume). Please, note that the target name must be unique! So, the more characters you use, the better.
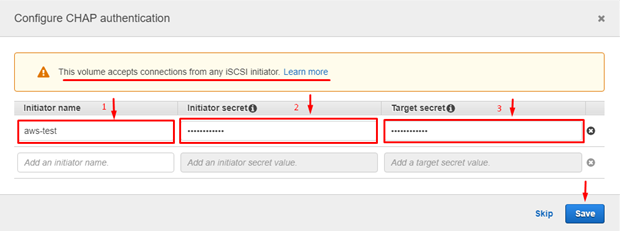
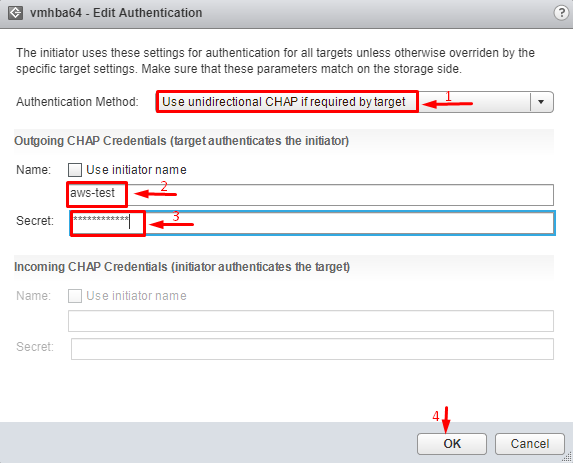
According to the AWS SG manual, CHAP configuration is required, as well. You should enter the initiator’s name and target secret (12 characters at least). This data will be required later, so you should keep that in mind.
Make sure that you have created volume correctly and that the CHAP permissions are working. Check the volume settings.
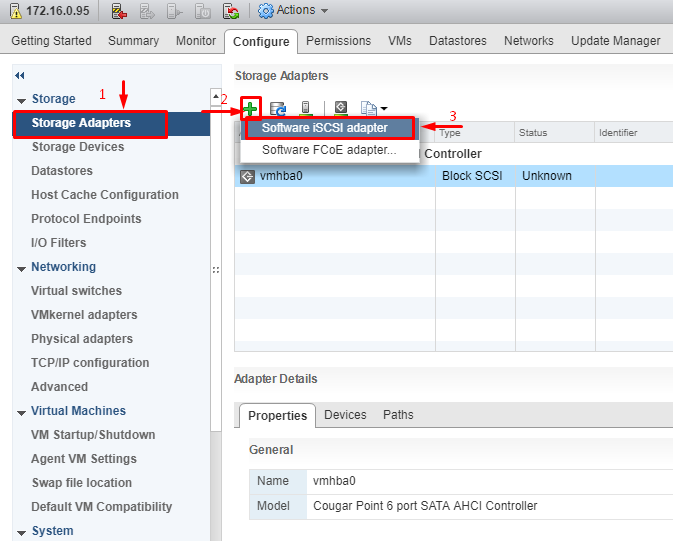
And now, we’re back to ESXi servers configuration. For the iSCSI targets to work, you’ll need to add an iSCSI virtual adapter on each cluster server.
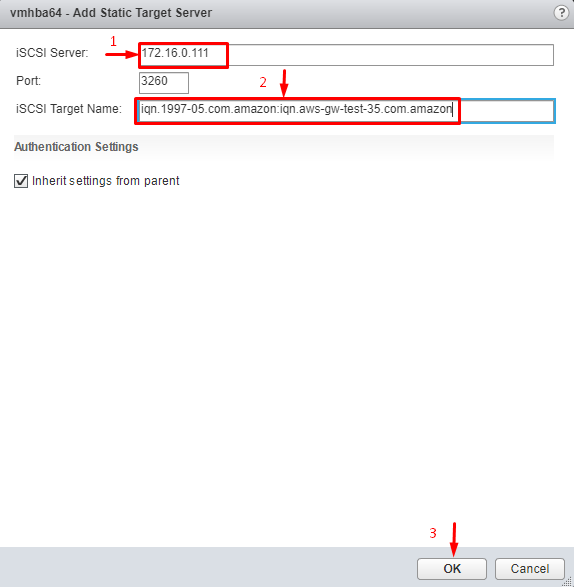
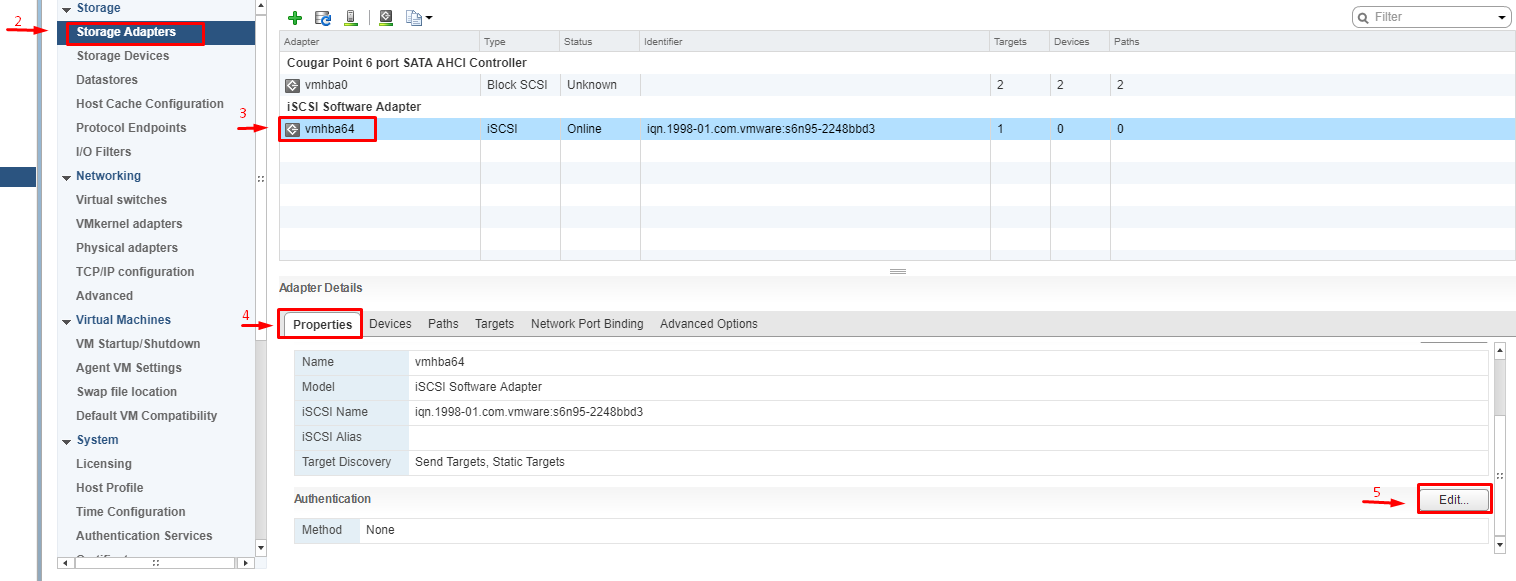
Configure settings to work with target.
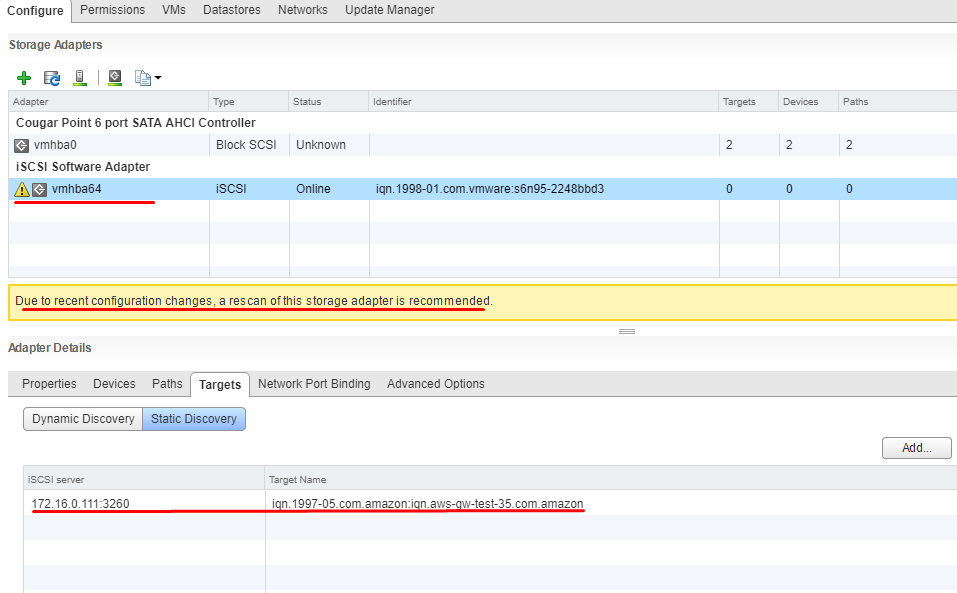
To connect to our target, the data regarding must be present on the static target servers. For finding that info, check the target properties.
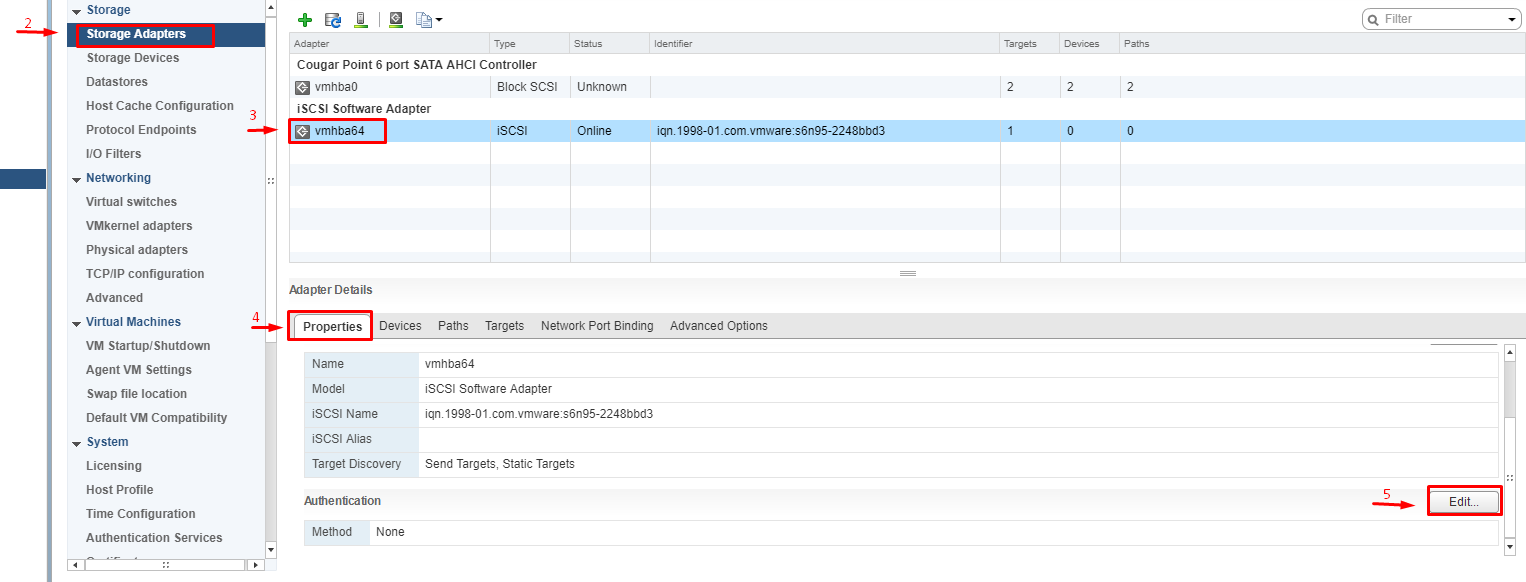
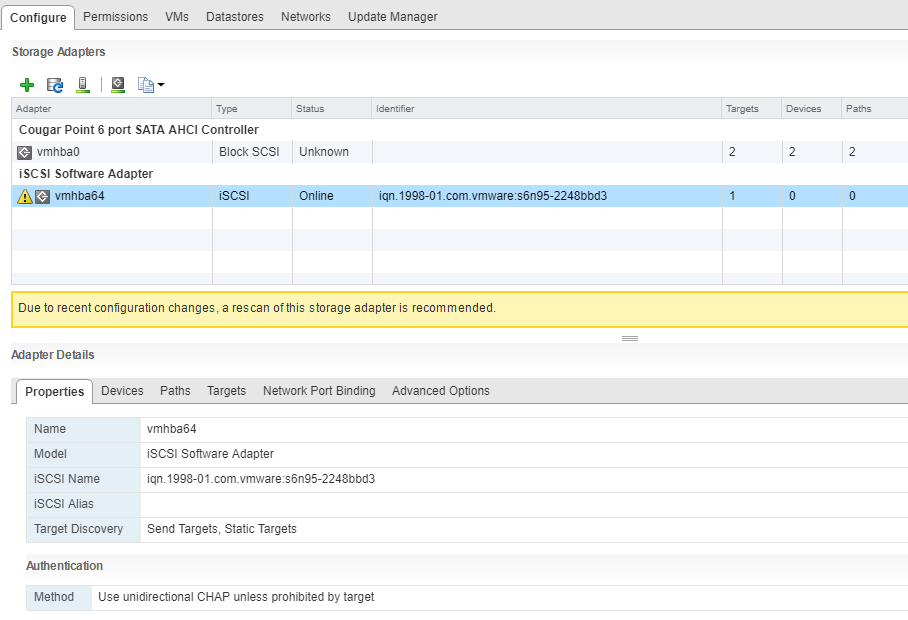
After the configuration changes, you will need a rescan of the storage adapter. Configure CHAP settings for connecting the target.
A rescan of the storage adapter one more time.
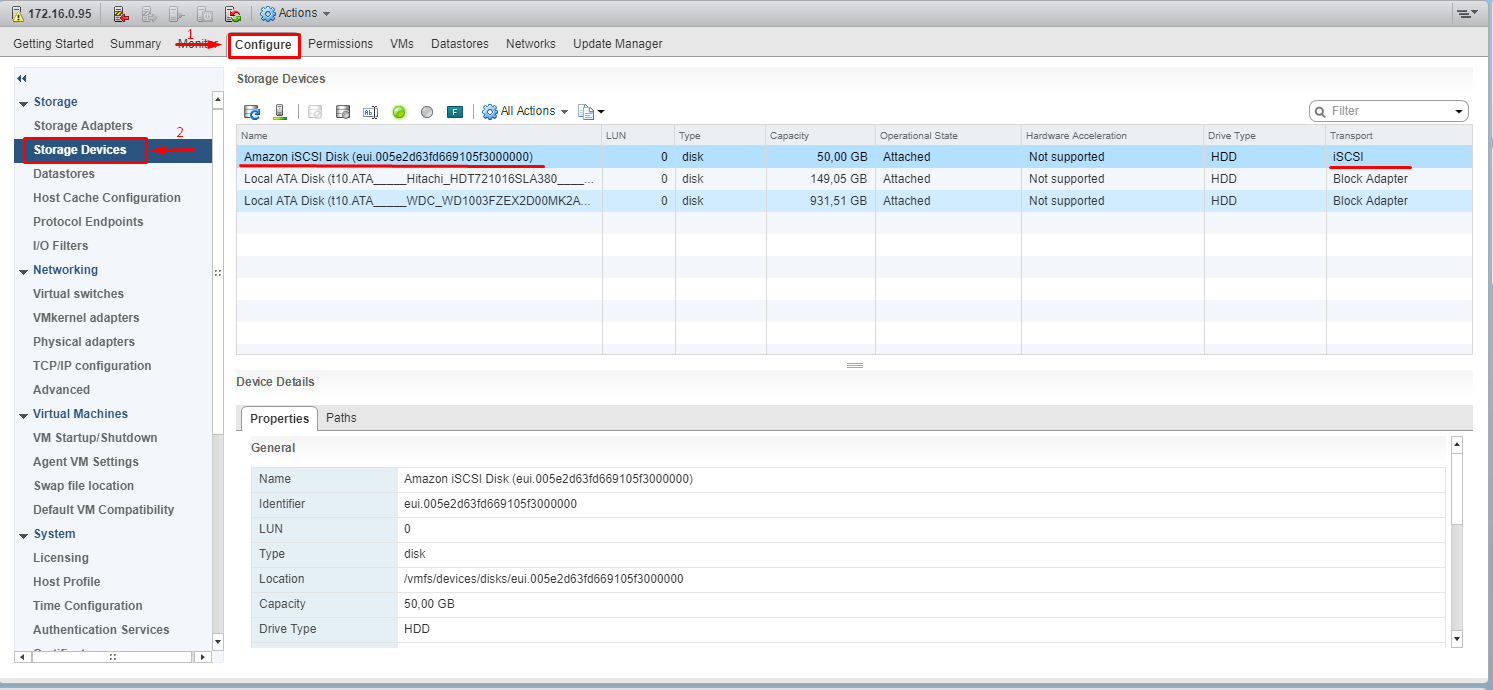
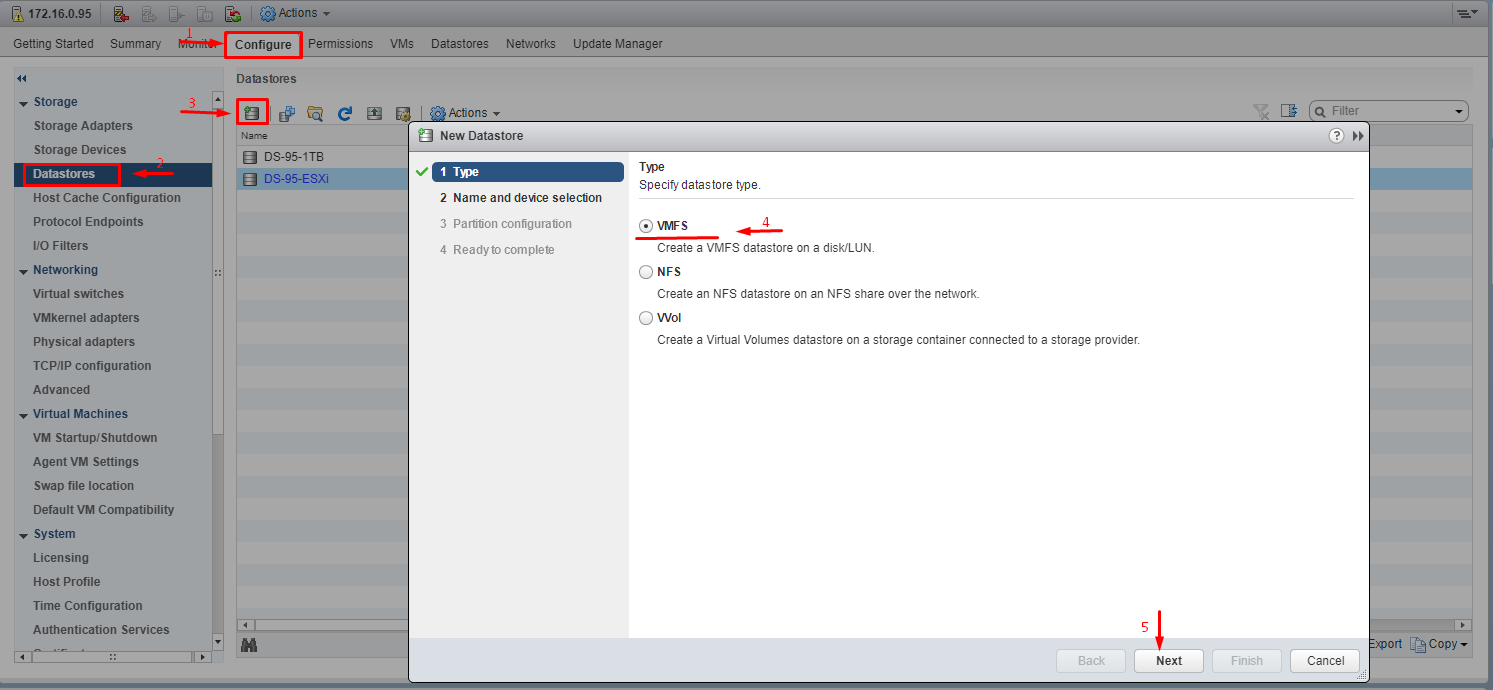
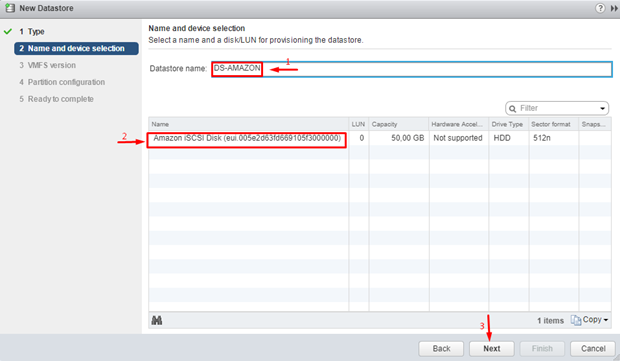
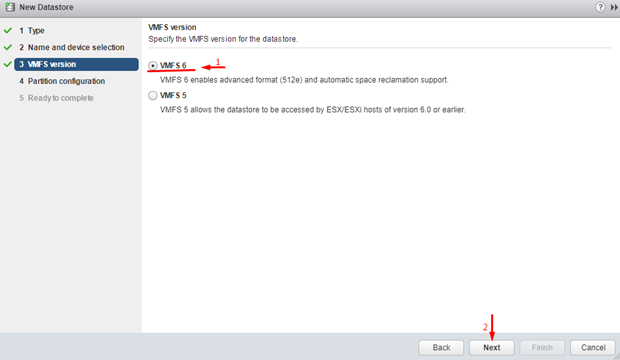
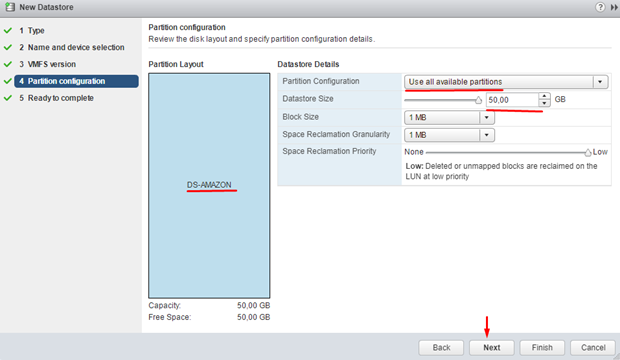
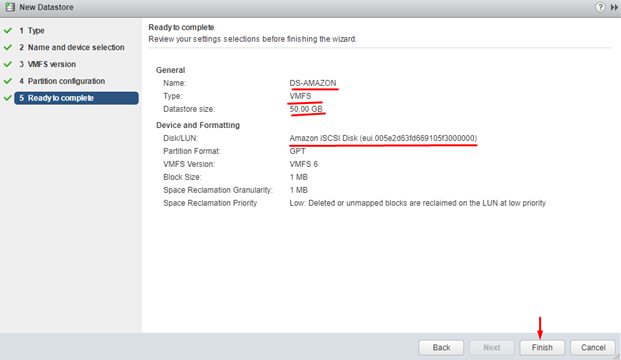
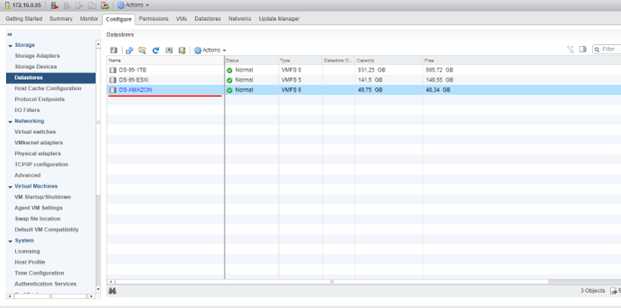
If you fail to proceed with a rescan on any server, your volume won’t be available from this server. Create a datastore on the connected target.
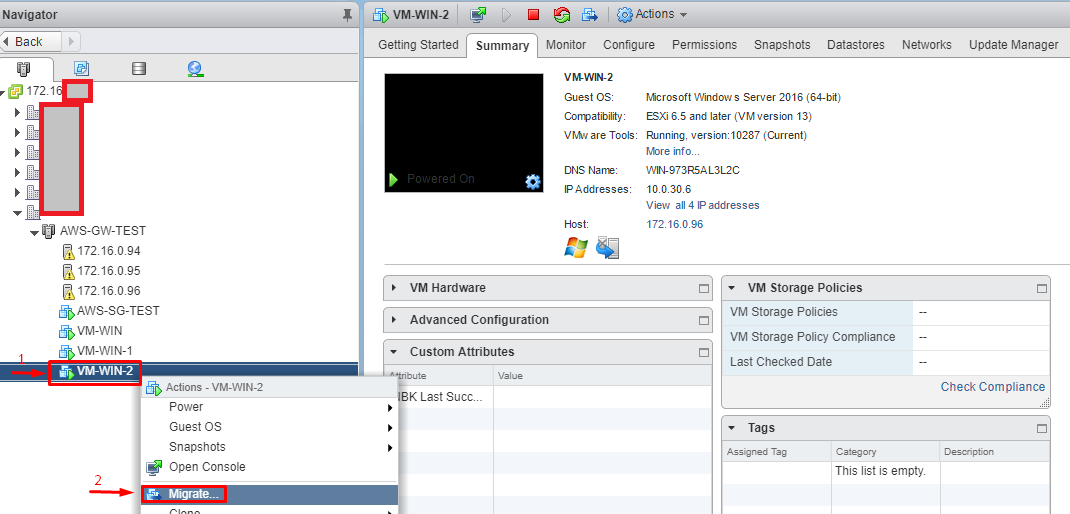
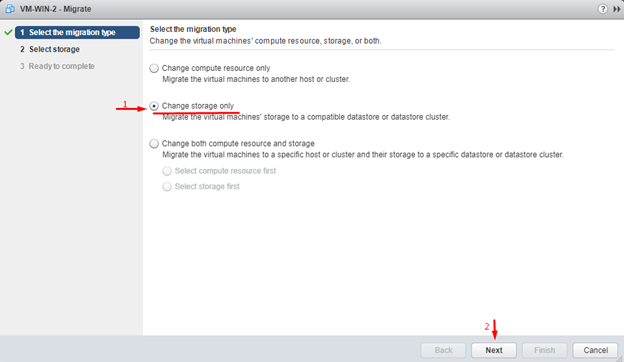
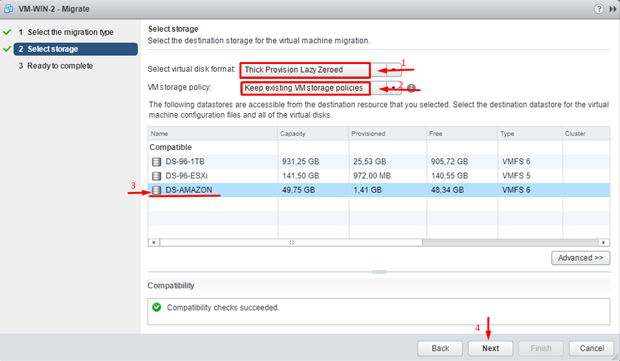
Let’s see how well our results went with a VM migration!
All you are left to do now is a shift to console and making sure everything is working after some time.
That’s it for now. I do sincerely hope this was a piece of useful information. If you still have some questions, don’t wait to check out the AWS SG manual: https://docs.aws.amazon.com/storagegateway/latest/userguide/storagegateway-ug.pdf


