Introduction
Some time ago, there was a post about new cool features brought to VMware vSphere 6.7 with Update 1. I forgot to mention one thing that appeared in VMware vSphere even before the update – PMEM support for your VMs. Well, I think it won’t be enough to write something like “Wow, it is good to see PMEM support in vSphere… it is very fast”. This innovation needs own article shedding light on what PMEM is and how fast your VMs can actually run on it. Unfortunately, I have no NVDIMM devices in my lab yet… but I still can simulate one using some host RAM!
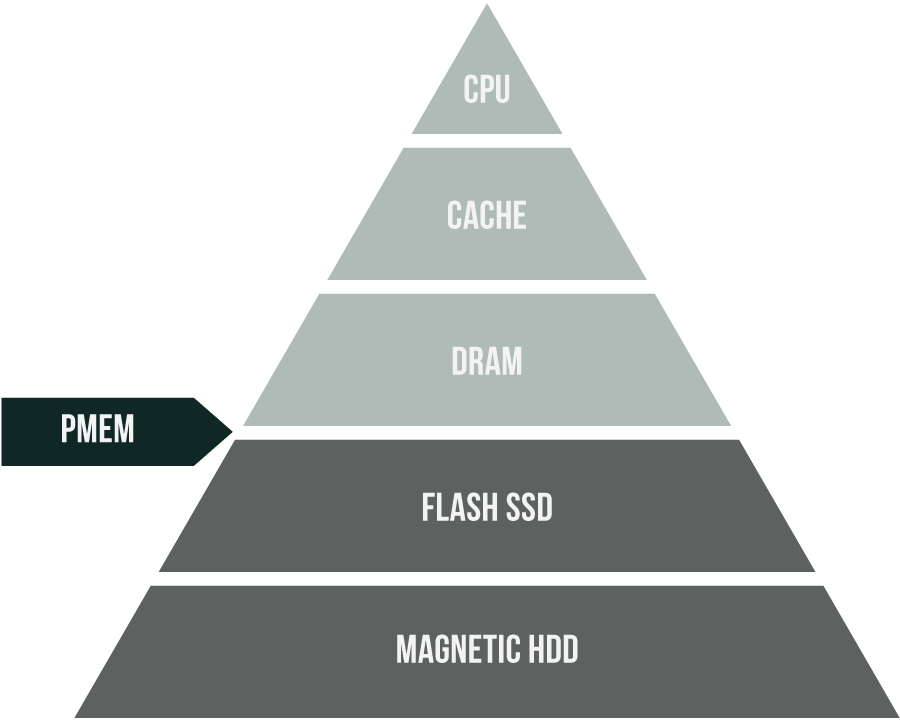
PMEM: Under the hood
Why am I happy to see PMEM support in vSphere VMs? Because this storage type delivers the performance unmatched by any other type of non-volatile memory. Just imagine the performance that you would achieve if your DDR4 RAM module became underlying storage for your VMs, but you won’t lose your data every time you reboot the server. How can non-volatile memory be that fast?
Back in 2015, one of Joint Electron Device Engineering Council Solid State Technology Association committees accepted specs for hybrid memory modules. According to those specs, these modules were carrying DRAM chips and some non-volatile memory like NAND. PMEM devices were compatible with DIMM slots and were presented to the system controller as DDR4 SDRAM. In this way, the proposed type of memory was common ground between RAM and SSD disks.
There are several types of NVDIMM. Listing and describing all of them here will make this article quite a long read, so I discuss here just one or two. If you need to know more about the tech, look through this article: https://software.intel.com/en-us/blogs/2018/10/30/new-software-development-opportunities-with-big-affordable-persistent-memory.
Interestingly, there were no NVDIMM devices available commercially until 2017, when Micron announced manufacturing of NVDIMM-N modules. Their NAND memory is used to save data in case of a blackout. Once the server runs smoothly again, data flow from NAND memory back to DRAM. The modules are comprised of DDR4-2933 and CL21 chips, allowing these modules to run even faster than DDR4 memory. Apart from 32GB devices, Micron also manufactures 8 and 16GB ones. Such devices seem cool for servers used for managing databases and file storage.
There is a remarkable thing about 32GB NVDIMM-N devices. They have Field-Programmable Gate Array processors on board. It does all data copying to SLC NAND in case of power outage. This processor is powered by AGIGA PowerGEM supercapacitor or by a 12V backup energy source. The image below shows how the entire thing works.
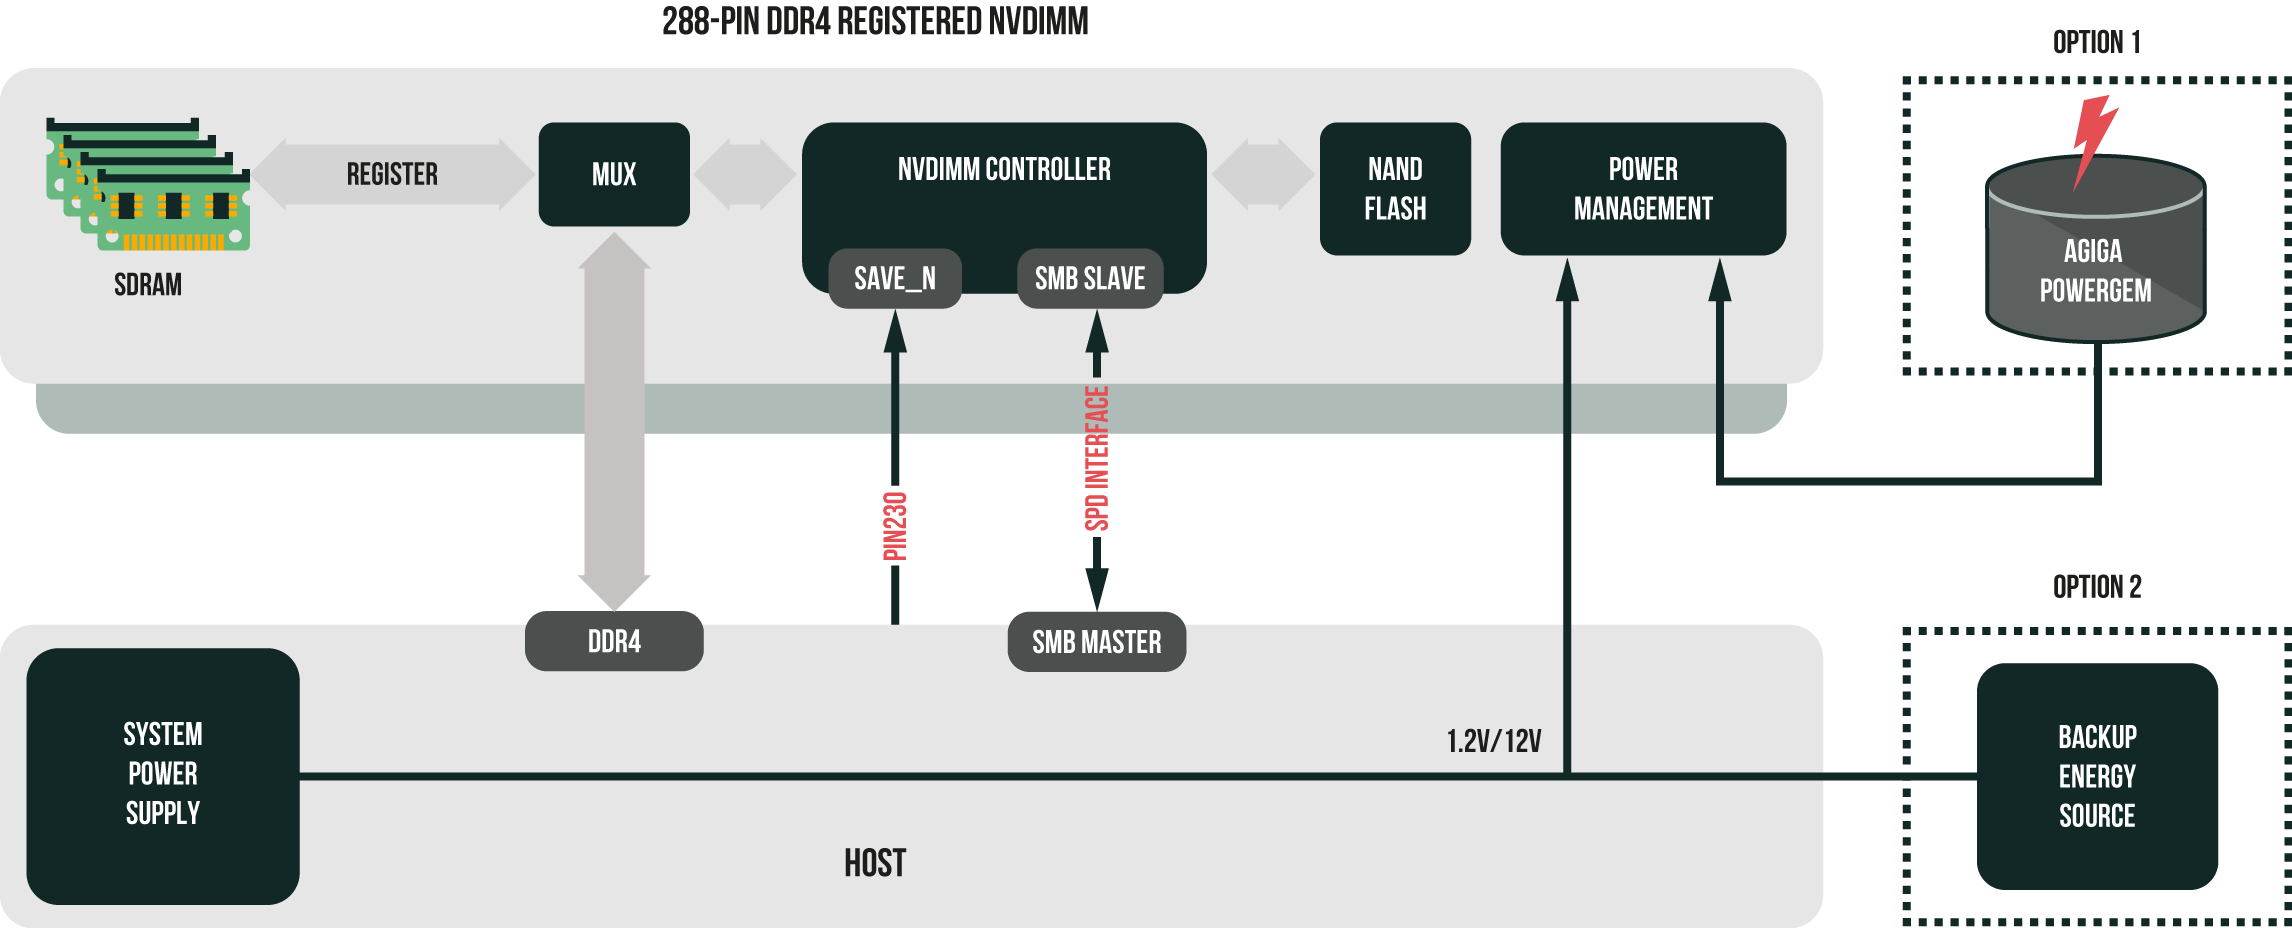
NVDIMM-F is another popular PMEM type. Unlike the NVDIMM-N, NVDIMM-F relies only on NAND. Such design makes these modules slower than NVDIMM-N ones. On the other hand, NVDIMM-F modules are simpler, and you won’t have your data wiped out in case of a blackout.
How does VMware use PMEM?
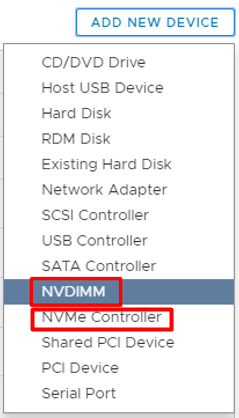
In vSphere 6.7, you can add NVDIMM and NVMe Controller devices to your VMs. Both are for PMEM, but what’s the diff? The former is used to present a PMEM device to a VM. The latter, in its turn, reduces the guest OS I/O overhead while using fast devices like SSD, NVMe, or PMEM.
Now, let’s discuss how PMEM can be presented to VMware vSphere 6.7 VMs.
- vPMEMDisk – ESXi presents a PMEM device to a VM as a virtual SCSI one. In this way, you do not need to make any additional settings or install extra drivers. This mode is intended mainly for PMEM-unaware guest OS, allowing you to add an NVDIMM device to a VM running on some old guest OS. In new guest OS, a vPMEMDisk device can be used for a booting disk.
- vPMEM – This mode allows guest OS to consume an NVDIMM disk device as byte-addressable memory. vPMEM is intended for PMEM-aware OS like Windows Server 2016, SUSE Linux Enterprise 12, Red Hat Enterprise Linux 7, and CentOS 7. These OS can talk to PMEM devices via DAX, or map a part of the device and gain direct access via byte-addressable commands. vPMEM requires VM Virtual Hardware version to be 14 or higher.
How to create a PMEM device for a VMware vSphere VM?
Select either NVDIMM or NVMe Controller from the Add new device dropdown menu.
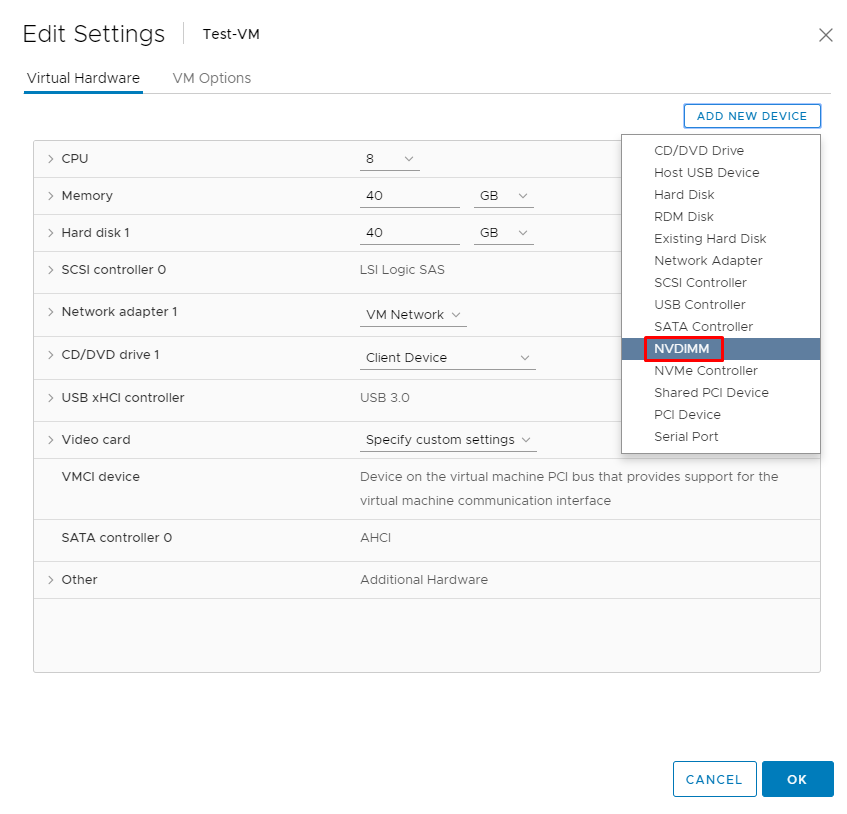
If you do not have a PMEM device in your host, you’ll end up with a device configuration like in the screenshot below. No PMEM, no fun…
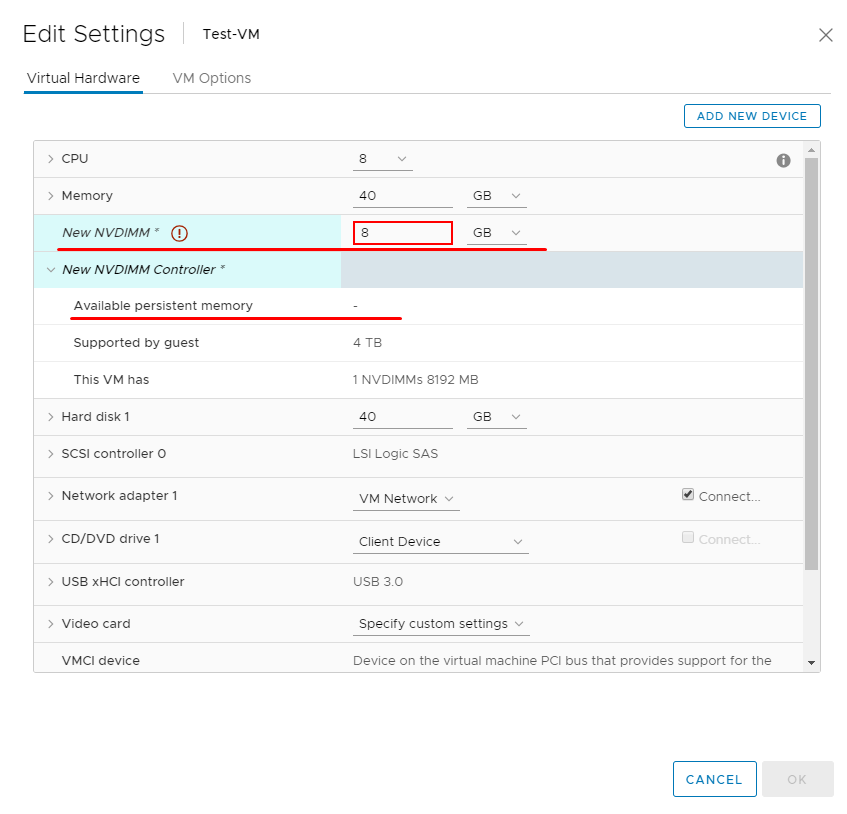
No worries, you can emulate PMEM by allocating some RAM to a PMEM datastore! This trick allows adding virtual NVDIMM devices to your VMs even without a physical one on board. I learned this workaround from William Lam’s article, but you should note that this scenario officially is not supported! Why? Unlike the real PMEM, its emulation won’t save your data in case of server reboot or power outage.
The toolkit
Hardware
- 2 х Intel® Xeon® CPU E5-2609 0 @ 2.40GHz;
- 6 x 8 GB (DDR3) – RAM;
- 2 x 1 TB WD1003FZEX – HDD;
- 1 x 800 GB Intel SSD DC P3700 – SSD;
- 4 x 1 Gb/s LAN.
VM configuration
- 2 х Intel® Xeon® CPU E5-2609 0 @ 2.40GHz – Virtual CPU;
- 20 GB (extra 20GB-for test this StarWind RAM Disk) – Virtual RAM;
- 1 x 40 GB – Virtual Disk;
- 1 x 20 GB (NVDIMM emulation, or StarWind RAM Disk) 1 x 800 GB for NVMe PCI Disk – Virtual Disk;
- 4 x 1 Gb/s – VirtualLAN.
Software
SOFTWARE FOR PERFORMANCE MEASUREMENTS
Today, I measure disk performance with Flexible I/O tester rev. 3.9. If you wanna try out this solution, look through its manual first. I use this utility pretty often, and it works awesome.
FINDING THE OPTIMAL PARAMETERS
Obviously, you cannot pick performance testing parameters (queue depth and the number of threads) from top of your head. You need a careful analysis of your environment performance under the varying number of threads (from 1 through 8) and queue depth (from 1 through 128). For this article, I used FIO – the utility allowing to find the best testing parameters for the specific VM configuration. I plotted performance values obtained with FIO under varying number of threads and queue depth. From those plots, I derived optimum test utility settings from the performance saturation point.
Here are the optimum test utility parameters for a RAM disk, NVDIMM device, and NVMe SSD: Number of threads =8, Queue depth = 16. Each test lasted for 3 minutes with the preceding 1-minute warmup. Below, find the listing from FIO configuration file.
|
1 2 3 4 5 6 7 8 9 10 11 12 13 14 15 16 17 18 19 20 21 22 23 24 25 26 27 28 29 30 31 32 33 34 35 36 37 38 39 40 41 42 43 44 45 46 47 |
[global] time_based ramp_time=60 runtime=180 direct=1 ioengine=windowsaio filename=\\.\physicaldrive1 numjobs=8 iodepth=16 [4k random read] rw=randread bs=4k stonewall [4k random write] rw=randwrite bs=4k stonewall [64k sequential read] rw=read bs=64k stonewall [64k sequential write] rw=write bs=64k |
DD
Before each test, I filled the disk with random data using DD utility. This procedure allowed to avoid having the measurement results altered with disk volume. You need to be careful with DD as you may mess up other disks content.
Here’s how you use the utility.
Learn the disk name by deploying the following command in VM CMD shell:
|
1 |
dd.exe --list |
Prepare the disk with the following cmdlet:
|
1 |
dd.exe if=/dev/random of=\\?\Device\Harddisk1\Partition0 bs=1M –progress |
SIMULATING PMEM
To simulate a PMEM device, I assigned some host RAM to the PMEM datastore through ssh session and used StarWind RAM Disk. Both methods provide you with PMEM simulation, but you should not rely on that memory because they both use only RAM. Therefore, both RAM Disk and a “fake NVDIMM” device keep your data only upon host reboot.
StarWind RAM Disk is a free software allowing to create a disk out of a portion of host RAM. I use it today to see how much performance you can get by turning a part of host RAM into “fake PMEM”. You can download StarWind RAM Disk from the official website once you complete the registration procedure.
How fast can virtual PMEM be?
Why one needs PMEM (in my case, its simulation) in the lab? You can keep a VM temporary disk on PMEM or use these devices for database management.
In this article, I just want to see how fast VMs can run on emulated PMEM storage. I compared its performance to Intel SSD DC P3700 – a fast NVMe disk from Intel. But, please, do not consider my today’s study an attempt to put one technology in front of other.
Measuring NVMe SSD performance
SETTING UP THE NVME DISK
For this test, I presented the NVMe disk as the 800GB virtual disk for a Windows Server 2016 VM. It is a passthrough disk that I connected via the PCI controller to get more performance.
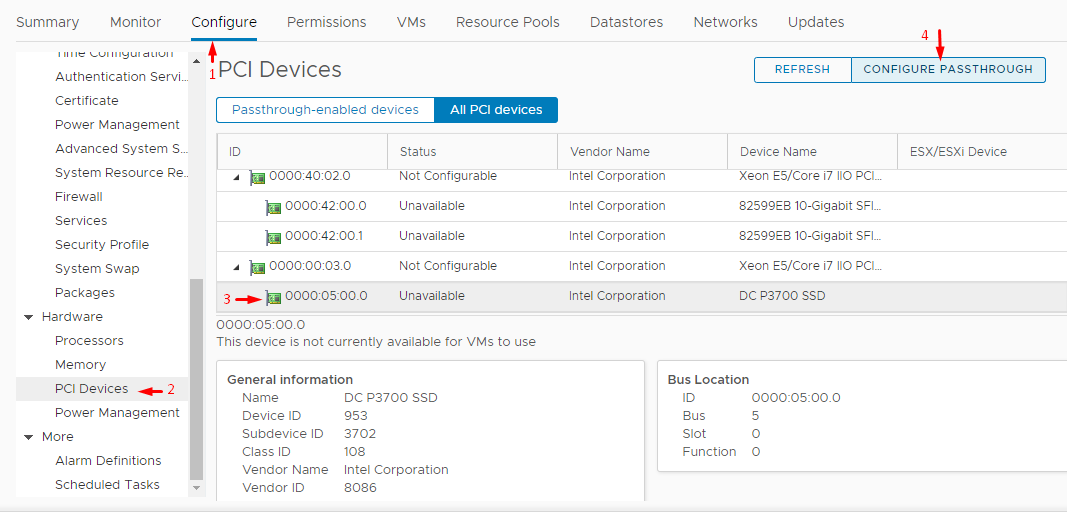
Once you add the device, reboot the host to apply the settings.
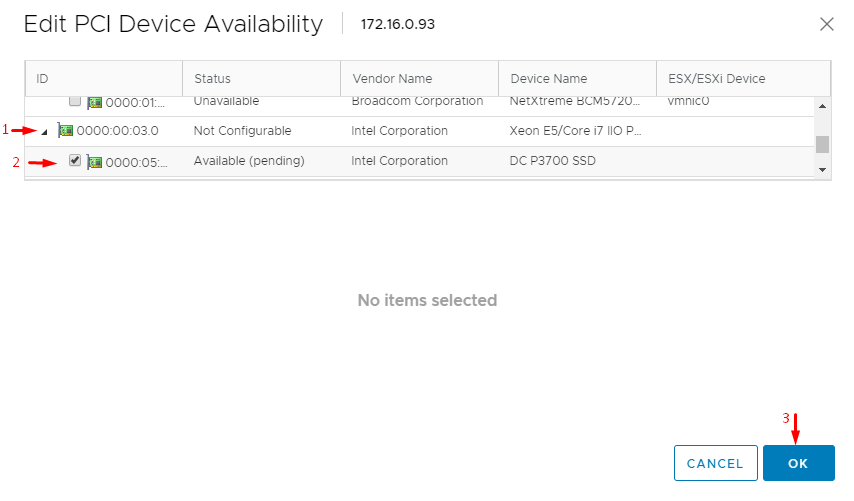
Next, just add a new PCI device, and you can start testing its performance.
SOME WORDS ABOUT TESTING
Today, I used the entire SSD disk without partitioning. This allowed me to avoid having disk performance altered by its volume.
Note that I could not reach the performance value for Intel SSD DC P3700 that is mentioned in the datasheet. First, Intel measured SSD performance in bare-metal Windows Server environment. THEY DID NOT MEASURE IT INSIDE A VM! And, they used another utility. So, yes, do not expect to see the performance value from Intel’s datasheet here. Second, while running the test patterns, 8 vCPU cores were fully utilized. With all that being said, NVMe SSD performance was lower than in datasheet due to different measurement technique and full vCPU utilization.
Once the tests were finished, I removed the device. Start with VM settings and follow the procedure for adding a new device other way around.
NVDIMM
I emulated PMEM by assigning almost half of host RAM to the virtual NVDIMM device connected to the Windows Server 2016 VM. That’s actually my interpretation of the workaround described by William Lam. One more time, do not consider this device a real PMEM! Your data are written to the volatile memory.
To create an NVDIMM device, connect to the ESXi host via ssh session. For this article, I use putty.
First, find out how much RAM is reserved with the following command:
|
1 |
esxcli system settings kernel list -o fakePmemPct |
Next, use the following cmdlet to specify the portion of RAM (%) that you want to allocate for the NVDIMM device. Here I use 50% (24GB) of available RAM:
|
1 |
esxcli system settings kernel set -s fakePmemPct -v 50 |
Deploy this command to check whether RAM was assigned to the PMEM datastore successfully:
|
1 |
esxcli system settings kernel list -o fakePmemPct |
To have the changes applied, you need to reboot the host.
|
1 |
reboot |
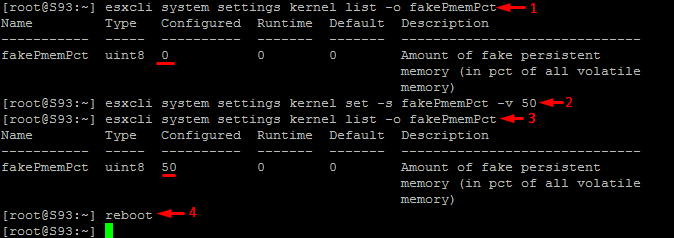
After the reboot, you check the current amount of RAM assigned. Deploy the following command to get the list of the existing datastores:
|
1 |
esxcli system settings kernel list -o fakePmemPct |
|
1 |
esxcli storage filesystem list |

Now, set the NVDIMM disk volume to 20GB and connect this PMEM device to the VM.
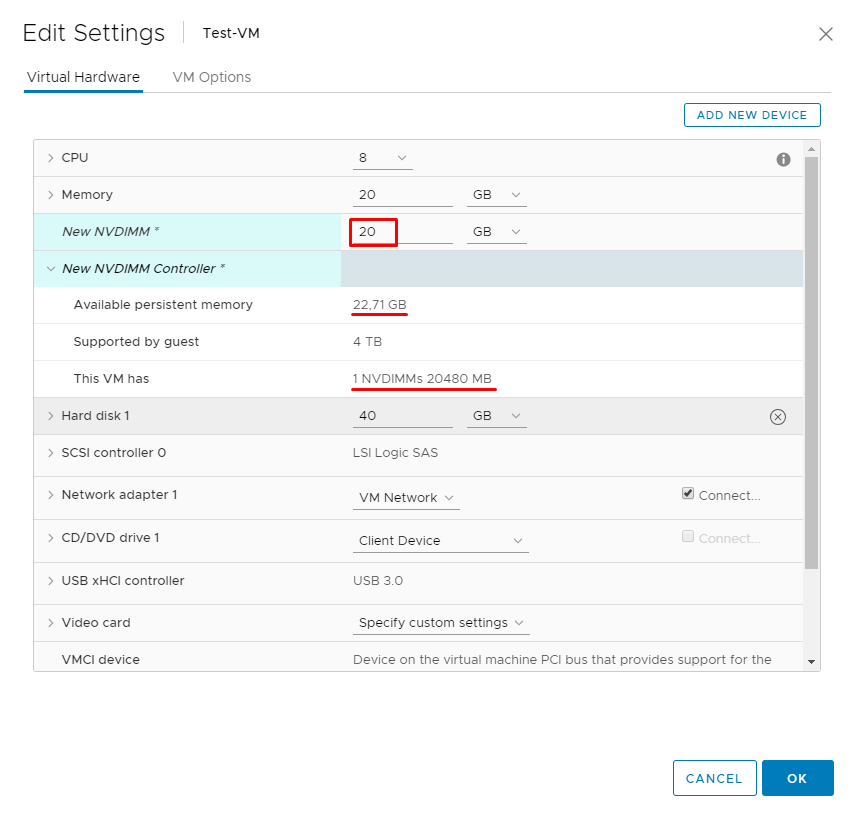
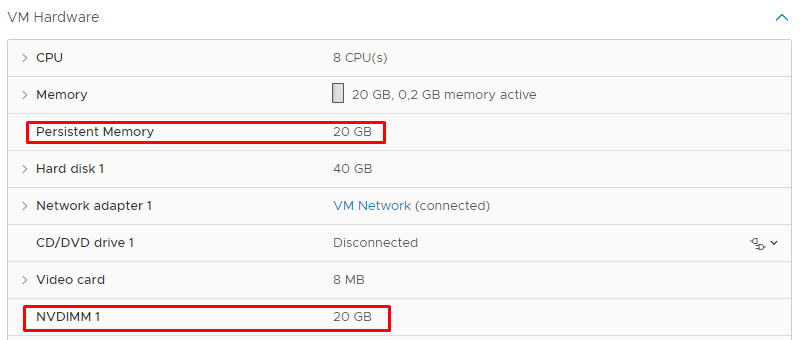
Note that this device requires own NVDIMM Controller. If you go to VM properties now, you can see the recently assigned 20GB of PMEM and the NVDIMM1 device of the same volume.
Once you are done with testing, disconnect the device from the VM. Then, remove the NVDIMM device with ssh. Note, if you don’t disconnect the device from the VM beforehand, that VM dies after rebooting the host! To remove the device, just set the amount of reserved RAM back to 0 with this cmdlet:
|
1 |
esxcli system settings kernel set -s fakePmemPct -v 0 |
StarWind RAM Disk
All you need to know about StarWind RAM Disk setup procedure is discussed in StarWind’s guide. These guys made it so detailed that I do not see any point in writing just the same stuff here.
Right after installation, I created a 20GB virtual disk that StarWind’s software automatically mounted to my test VM. The RAM disk was connected to the VM just as an HDD.
Measurement results
| NVMe | |||
|---|---|---|---|
| Pattern | Total IOPS | Total bandwidth (MB/s) | Average latency (ms) |
| 4k random read | 302775 | 1182,73 | 0,306 |
| 4k random write | 278353 | 1087,33 | 0,279 |
| 64k sequential read | 37510 | 2344,70 | 3,363 |
| 64k sequential write | 15985 | 999,28 | 7,978 |
| NVDIMM | |||
| Pattern | Total IOPS | Total bandwidth (MB/s) | Average latency (ms) |
| 4k random read | 668606 | 2611,75 | 0,120 |
| 4k random write | 601323 | 2348,93 | 0,137 |
| 64k sequential read | 136216 | 8513,73 | 0,514 |
| 64k sequential write | 72015 | 4501,10 | 1,527 |
| StarWind RAM Disk | |||
| Pattern | Total IOPS | Total bandwidth (MB/s) | Average latency (ms) |
| 4k random read | 650218 | 2539,93 | 0,127 |
| 4k random write | 577840 | 2257,20 | 0,171 |
| 64k sequential read | 167326 | 10458,17 | 0,418 |
| 64k sequential write | 125287 | 7830,71 | 0,659 |
Let’s plot the maximum number of IOPS at each pattern.

At 4k random read and 4k random write patterns, NVDIMM device is slightly faster than StarWind RAM Disk, but the RAM disk does better with bigger blocks.
Conclusion
I am really happy that VMware vSphere supports PMEM. Let’s just wait until this memory becomes cheaper.
But, till there won’t be enough money in my piggy-bank to buy an NVDIMM disk, I will be using a virtual NVDIMM device and StarWind RAM Disk in my home lab. Both demonstrated decent performance, even though they are just PMEM emulations. Note that according to the license agreement StarWind RAM Disk is available only for non-commercial use.
Of course, my measurements are not perfect since without a real PMEM device in the host I cannot judge on the true performance of this memory. The thing which one can learn from my tests is that you can get a DDR3-fast disk for whatever needs for free. However, you need to be careful: all data in RAM persist upon reboot!


