As the title is speaking for itself, it is quite clear that today, I am going to discuss various methods to open and close firewall ports on ESXi hosts. It is useless to consider whether configuring firewall rules is harmful or not since every admin once in a while meets the necessity of fine-tuning network to distribute access rights. So, you ought to know all the tools at your disposal one way or another.
Firewall Rules Configuration via vSphere Client
This way is very simple, and even a beginner will get it right. However, you’ll need VMware vCenter to pull this off, so it’s pretty much useless for the small infrastructures that don’t need vCenter in the first place.
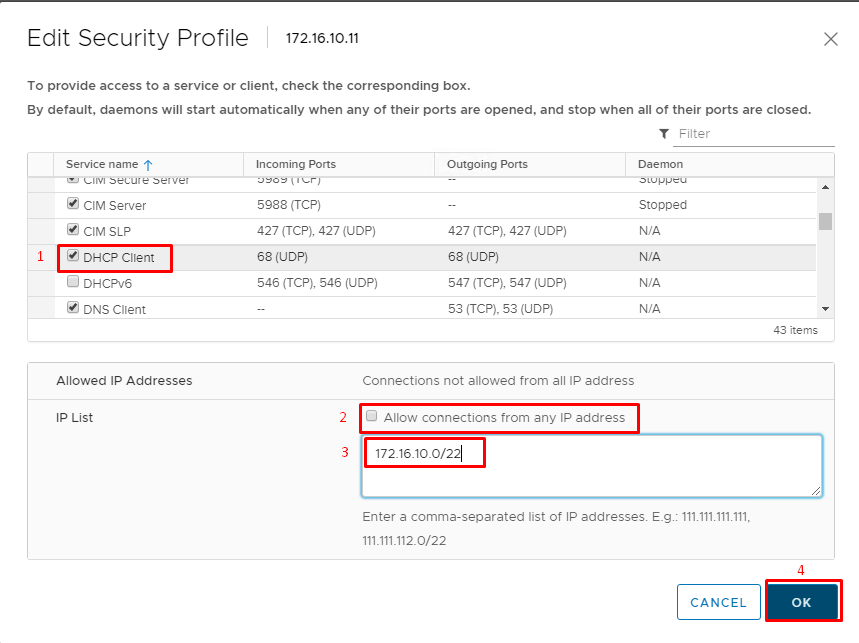
Thus, to configure a firewall, open the Web Console, and choose a host. Then, in the property bar, choose Monitor, wherein in section Firewall, you just have to find the required rule and check its current settings. To edit these settings, pick Edit. Furthermore, as an example, I’ll use a firewall rule configuration for the DHCP Client.
To turn on/off a rule, you simply have to put a mark. Using tips along the way, set the addresses and address ranges (subnet address with a network prefix) covered by this rule. With a respective mark, allow or deny access from all IP addresses. according to this rule.
Firewall Rules Configuration via vSphere Client via Web-GUI
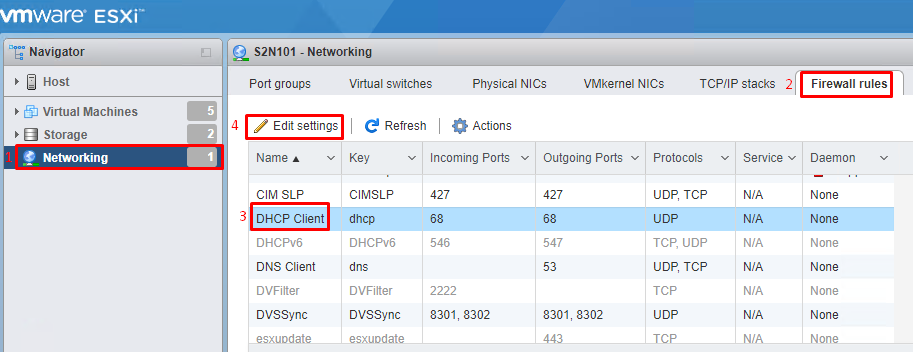
This method is just as simple and understandable as the previous one, but that time it is open for use in any infrastructure since it doesn’t need vCenter. The sequencing here is similar, with an exception that you’ll need to access ESXi host through the Web interface. So, the settings location will be a bit different.
To configure a firewall, сhoose Navigator. Then, in the tab Firewall rules, find the name of a required rule, and check its current settings. To edit these settings, pick Edit, and make necessary adjustments in order to configure settings of this specific rule.
Proceed with configuration following the previous example.
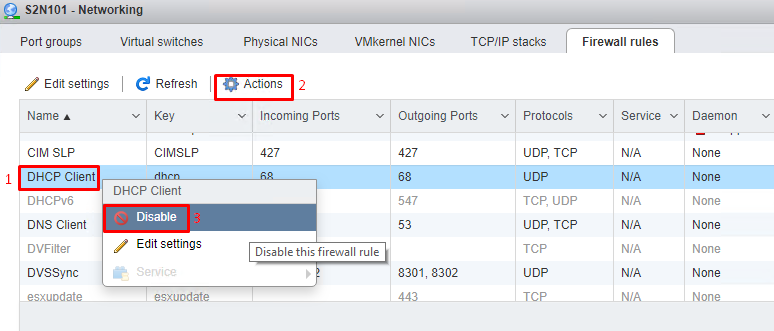
You can turn on/off a rule by clicking on Actions or RMB (right mouse button).
Firewall Rules Configuration via PowerCLI
Pay attention, because without knowing this approach, you won’t be able to automate the whole process with scripts. For the following actions, the PowerCLI module is necessary. It is a PowerShell extension for Windows. Of course, as the PowerShell extension, this module can be installed on Linux, but I’m not going to describe it in this article explicitly.
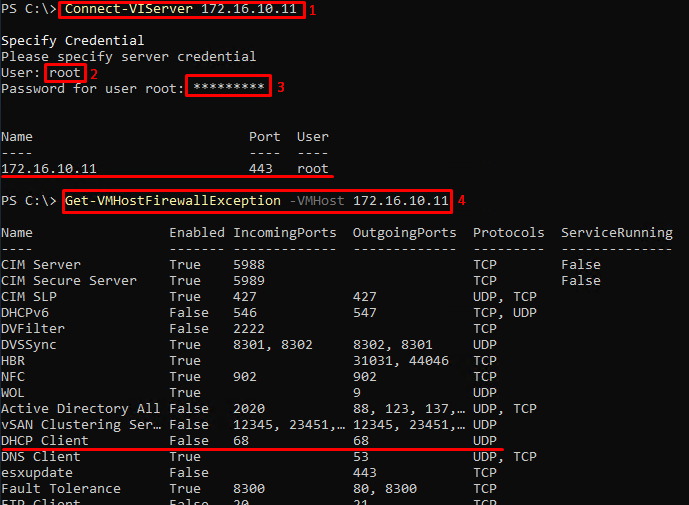
First of all, connect the ESXi host through PowerCLI via the host login credentials. After this, PowerShell will require the name of the local account and password to it.
Connect-VIServer <’ ESXi Host Name or IP’>Find the list of all the rules for the host. Then, find the name of the rule that you need and check its settings
Get-VMHostFirewallException -VMHost <’ ESXi Host Name or IP’>To turn on the rule, use the following command sequence:
Get-VMHostFirewallException -VMHost <’ ESXi Host Name or IP’> -Name 'DHCP Client' | Set-VMHostFirewallException -Enabled $trueAt this moment, the work with PowerCLI directly is over. Unfortunately, it doesn’t have its own commandlets required for further work. To continue, you’ll need to ingrate ESXCLI commands.
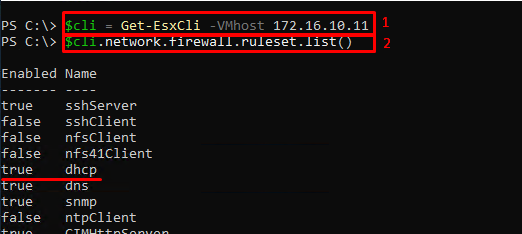
Get the cli object with the list with ESXCLI commands available for the use.
$cli = Get-Esxcli -VMhost <’ ESXi Host Name or IP’>Find the rule you look for in the list of the firewall rules. Be attentive, for its name is different from the one listed in the PowerCLI and Web Console!
$cli.network.firewall.ruleset.List()Check the firewall rules list for network addresses available for the rules.
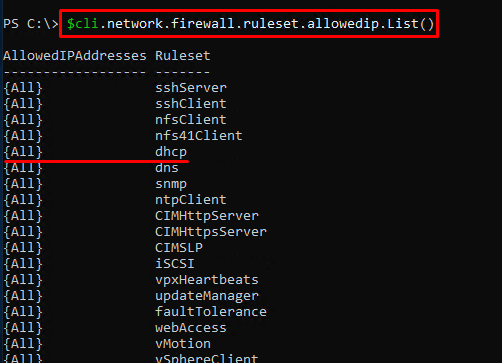
$cli.network.firewall.ruleset.allowedip.List Deny access from all IP addresses.
$cli.network.firewall.ruleset.set($false,$true,"dhcp")Add the IP addresses range allowed for the rule.
$cli.network.firewall.ruleset.allowedip.add("<’IP address or subnet IP address’>","dhcp")Firewall Rules Configuration via ESXCLI
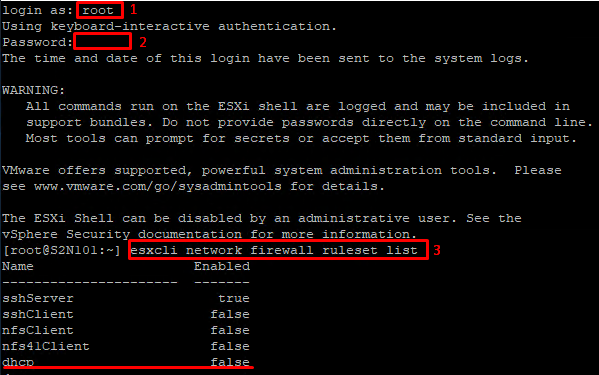
This approach is quite similar to the second part of the previous one, but there are differences. Primarily, you won’t go very far without a terminal manager. As one, I usually tend to use putty. Just like previously, connect to the host via IP address with login credentials.
Get the list of the firewall rules. Pay attention: you won’t need putting any other symbols between commands here.
esxcli network firewall ruleset listChoose the required rule.
esxcli network firewall ruleset set --ruleset-id "dhcp" --enabled "true"Check if the rule turned on.
esxcli network firewall ruleset list --ruleset-id "dhcp"Turn off All connections from all IP addresses option. Without disabling this option, ESXCLI won’t let you allow access for specified addresses or the group of addresses for this rule!
esxcli network firewall ruleset set --allowed-all false --ruleset-id "dhcp"Add the required subnet with the subnet mask.
esxcli network firewall ruleset allowedip add --ip-address "<’IP address, subnet IP address’>" --ruleset-id "dhcp"Check the results.
esxcli network firewall ruleset allowedip listThat’s all for now. I’m sure hoping this material will be of use!


