StarWind Virtual SAN® 2-node Hyperconverged Scenario
with VMware vSphere 6.5/6.7
- July 27, 2022
- 23 min read
- Download as PDF
Introduction to StarWind Virtual SAN for Hyper-V
StarWind Virtual SAN is a native Windows hypervisor-centric hardware-less VM storage solution. It creates a fully fault-tolerant and high performing storage pool built for the virtualization workloads by mirroring the existing server’s storage and RAM between the participating storage cluster nodes. The mirrored storage resources are then connected to all cluster nodes and treated just as a local storage by all hypervisors and clustered applications. High Availability (HA) is achieved by providing multipath access to all storage nodes. StarWind Virtual SAN delivers supreme performance compared to any dedicated SAN solution since it runs locally on the hypervisor and all I/O is processed by local RAM, SSD cache, and disks. This way it never gets bottlenecked by storage fabric.
StarWind VSAN System Requirements
Prior to installing StarWind Virtual SAN, please make sure that the system meets the requirements, which are available via the following link:
https://www.starwindsoftware.com/system-requirements
Recommended RAID settings for HDD and SSD disks:
https://knowledgebase.starwindsoftware.com/guidance/recommended-raid-settings-for-hdd-and-ssd-disks/
Please read StarWind Virtual SAN Best Practices document for additional information:
https://www.starwindsoftware.com/resource-library/starwind-virtual-san-best-practices
Pre-Configuring the Servers
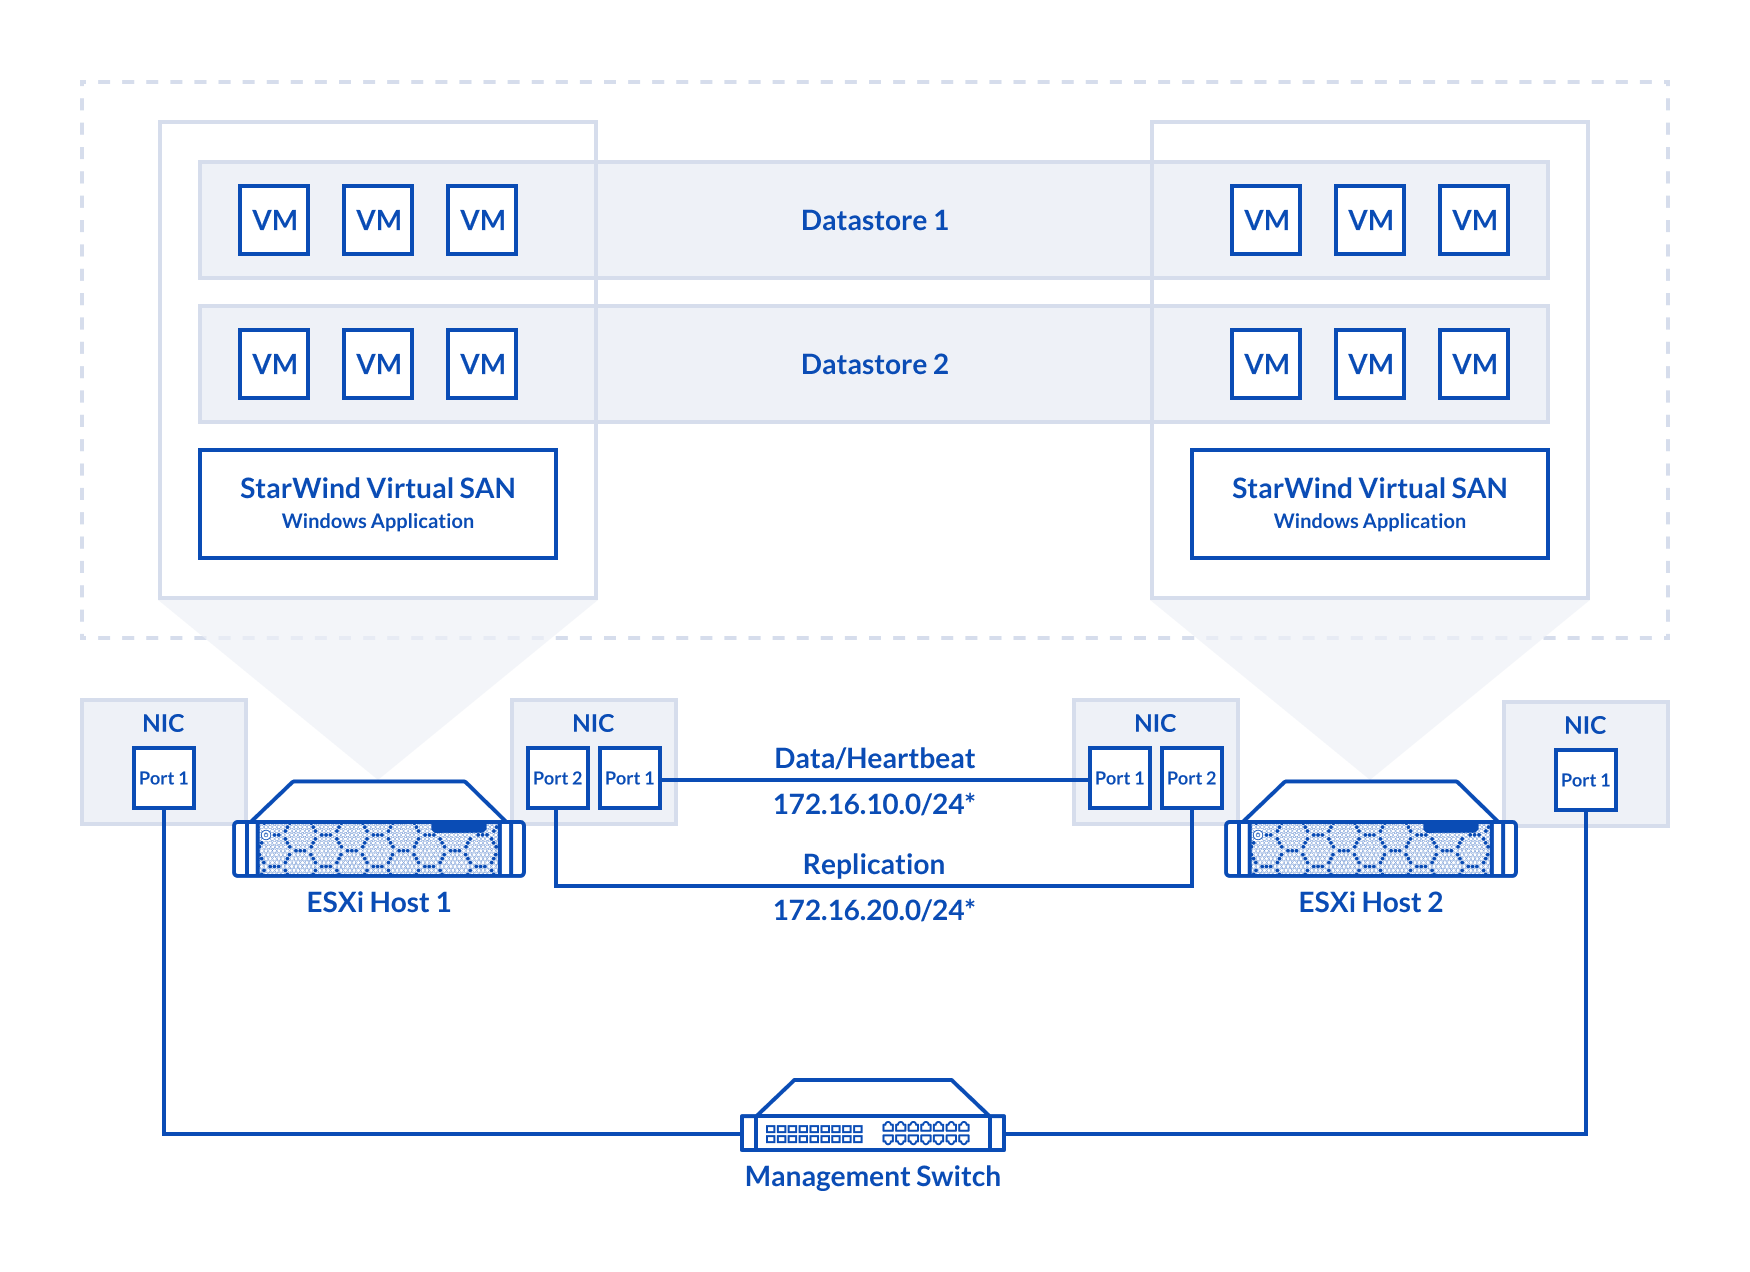
The diagram below illustrates the network and storage configuration of the solution.
1. ESXi hypervisor should be installed on each host.
2. StarWind VSAN should be installed on the Windows Server operating system deployed as VM on each host.
3. The network interfaces on each node for Synchronization and iSCSI/StarWind heartbeat interfaces should be in different subnets and connected directly according to the network diagram above. Here, the 172.16.10.x subnet is used for the iSCSI/StarWind heartbeat traffic, while the 172.16.20.x subnet is used for the Synchronization traffic.
NOTE: Do not use ISCSI/Heartbeat and Synchronization channels over the same physical link. Synchronization and iSCSI/Heartbeat links and can be connected either via redundant switches or directly between the nodes.
Preparing Environment for StarWind VSAN Deployment
Configuring Networks
Configure network interfaces on each node to make sure that Synchronization and iSCSI/StarWind heartbeat interfaces are in different subnets and connected physically according to the network diagram above. All actions below should be applied to each ESXi server.
NOTE: Virtual Machine Port Group should be created for both iSCSI/ StarWind Heartbeat and the Synchronization vSwitches. VMKernel port should be created only for iSCSI traffic. Static IP addresses should be assigned to VMKernel ports.
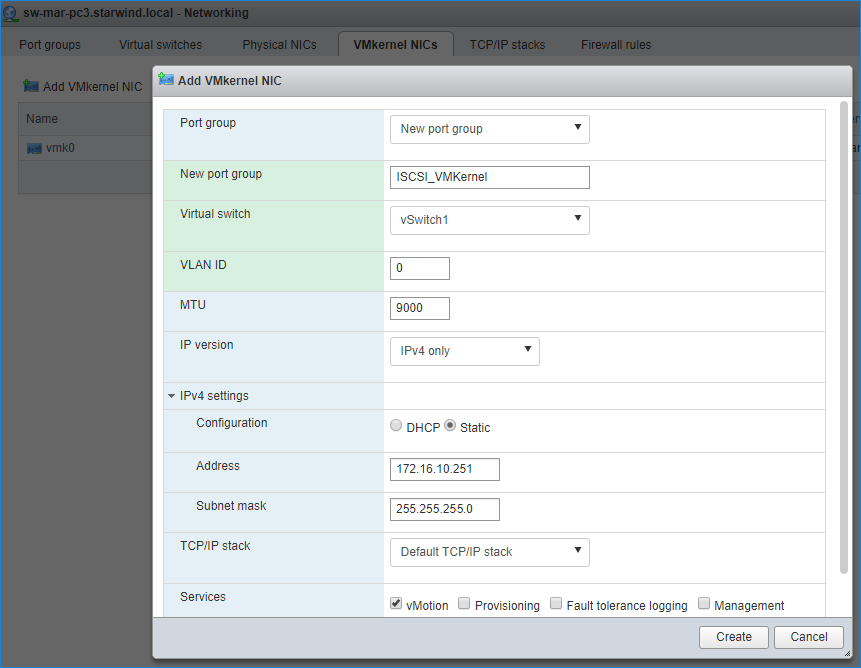
NOTE: It is recommended to set MTU to 9000 on vSwitches and VMKernel ports for iSCSI and Synchronization traffic. Additionally, vMotion can be enabled on VMKernel ports.
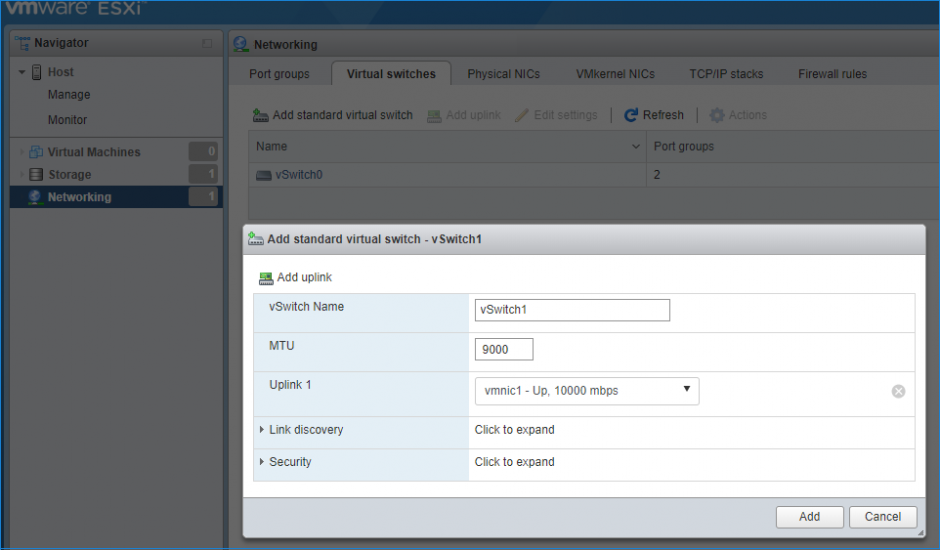
1. Using the VMware ESXi web console, create two standard vSwitches: one for the iSCSI/ StarWind Heartbeat channel (vSwitch1) and the other one for the Synchronization channel (vSwitch2).
2. Create a VMKernel port for the iSCSI/ StarWind Heartbeat channel.
3. Add a Virtual Machine Port Groups on the vSwitch for iSCSI traffic (vSwtich1) and on the vSwitch for Synchronization traffic (vSwitch2).

4. Repeat steps 1-3 for any other links intended for Synchronization and iSCSI/Heartbeat traffic on ESXi hosts.
Preparing StarWind Virtual Machines
Create Virtual Machines (VMs) on each ESXi host with supported Windows Server OS for StarWind VSAN (see system requirements: https://www.starwindsoftware.com/system-requirements) and further StarWind VSAN installation.
StarWind VMs on ESXi hosts should be configured with the following settings:
RAM: at least 4 GB (plus the size of the RAM cache if it is planned to be used) reserved for the VM;
CPUs: at least 4 virtual processors with 2 GHz reserved;
Network adapter 1: Management
Network adapter 2: iSCSI
Network adapter 3: Sync
NOTE: Network adapters for iSCSI and Sync should be of the VMXNET3 type. Network adapter for Management should be of the E1000 type.
Hard disk 1: 100 GB for OS (recommended) – Thick Provisioned Eager Zeroed.
Hard disk 2: Depends on the storage volume to be used as shared storage – Thick Provisioned Eager Zeroed.
NOTE: Alternatively, the disk can be added to StarWind VSAN VM as RDM. The link to VMware documentation is below:
https://docs.vmware.com/en/VMware-vSphere/7.0/com.vmware.vsphere.vm_admin.doc/GUID-4236E44E-E11F-4EDD-8CC0-12BA664BB811.html
Also, if a separate RAID controller is available, it can be used as dedicated storage for StarWind VM, and RAID controller can be added to StarWind VM as a PCI device. In this case RAID volume will be available as a virtual disk in the Drives section in the Web console. Follow the instructions in the section below on how to add RAID controller as PCI device to StarWind VM.
NOTE: The Active Directory Domain Services role can be added on StarWind Virtual Machine (VM) if necessary, thus it can serve as a domain controller.
NOTE: When using StarWind with the synchronous replication feature inside of a Virtual Machine, it is recommended not to make backups and/or snapshots of the Virtual Machine with the StarWind VSAN service installed, as this could pause the StarWind Virtual Machine. Pausing the Virtual Machines while the StarWind VSAN service in under load may lead to split-brain issues in synchronous replication devices, thus to data corruption.
Configuring StarWind VMs Startup/Shutdown
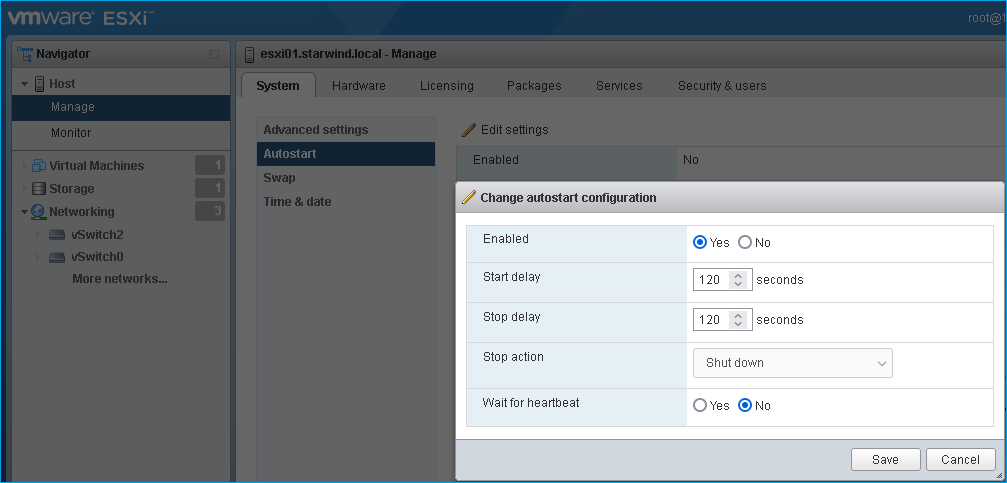
1. Setup the VMs startup policy on ESXi hosts from the Manage -> System tab in the ESXi web console. In the popup window, select Yes to enable the option and set the stop action to Shut down. Click on Save to proceed.
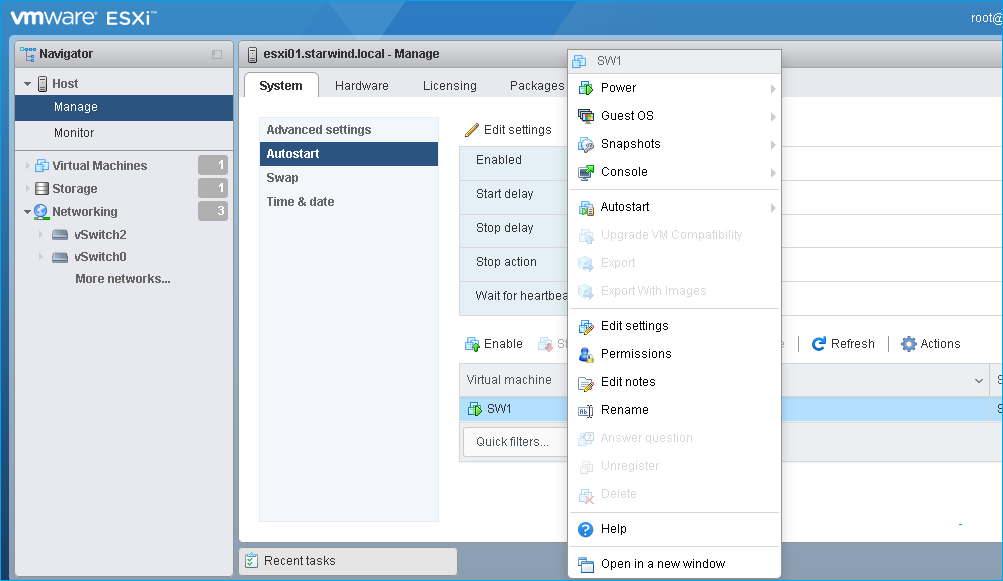
2. To configure VM autostart, right-click on it, navigate to Autostart and click on Enable.
3. Complete the actions above on the StarWind VM located on another host.
4. Start virtual machines, install Windows Server OS and StarWind Virtual SAN.
Installing StarWind VSAN for Hyper-V
1. Download the StarWind setup executable file from the StarWind website:
https://www.starwind.com/registration-starwind-virtual-san
2. Launch the downloaded setup file on the server to install StarWind Virtual SAN or one of its components. The Setup wizard will appear. Read and accept the License Agreement.
3. Carefully read the information about the new features and improvements. Red text indicates warnings for users that are updating the existing software installations.
4. Select Browse to modify the installation path if necessary. Click on Next to continue.

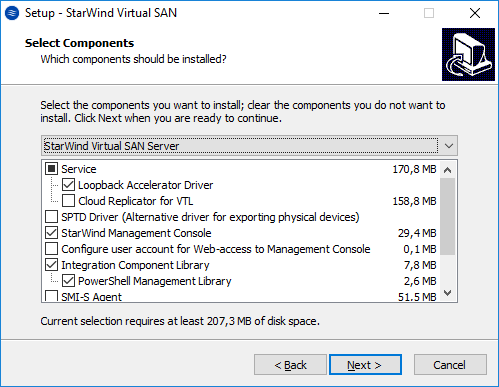
5. Select the following components for the minimum setup:
- StarWind Virtual SAN Service. The StarWind Virtual SAN service is the “core” of the software. It can create iSCSI targets as well as share virtual and physical devices. The service can be managed from StarWind Management Console on any Windows computer that is on the same network. Alternatively, the service can be managed from StarWind Web Console deployed separately.
- StarWind Management Console. Management Console is the Graphic User Interface (GUI) part of the software that controls and monitors all storage-related operations (e.g., allows users to create targets and devices on StarWind Virtual SAN servers connected to the network).
NOTE: To manage StarWind Virtual SAN installed on a Windows Server Core edition with no GUI, StarWind Management Console should be installed on a different computer running the GUI-enabled Windows edition.

7. Enable the checkbox if a desktop icon needs to be created. Click on Next to continue.
8. When the license key prompt appears, choose the appropriate option:
- request time-limited fully functional evaluation key.
- request FREE version key.
- relect the previously purchased commercial license key.
9. Click on the Browse button to locate the license file.
10. Review the licensing information.
11. Verify the installation settings. Click on Back to make any changes or Install to proceed with installation.
12. Enable the appropriate checkbox to launch StarWind Management Console right after the setup wizard is closed and click on Finish.
13. Repeat the installation steps on the partner node.
Provisioning Storage with StarWind VSAN
Perform the steps below to create StarWind VSAN HA devices (DS1, DS2).
1. Open StarWind Management Console and click on the Add Device (advanced) button.
2. Select Hard disk device as the type of device to be created. Click on Next to continue.
3. Select Virtual disk. Click on Next to continue.
4. Specify virtual disk name, location, and size and click on Next.
5. Specify virtual disk options. Click on Next to continue.
NOTE: Sector size should be 512 bytes in case ESXi is used.
6. Define the RAM caching policy and specify the cache size (in corresponding units). Click on Next to continue.
7. Define the Flash caching policy and the cache size. Click on Next to continue.

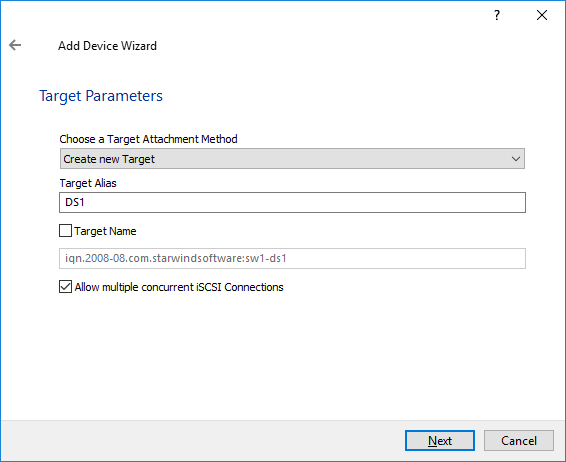
8. Specify target parameters. Select the Target Name checkbox to enter a custom name of a target if required. Otherwise, the name will be generated automatically in accordance with the specified target alias.
Click on Next to continue.
9. Click on Create to add a new device and attach it to the target.
10. Click on Finish to close the wizard.
11. Right-click on the recently created device and select Replication Manager from the shortcut menu.
12. Then, click on Add replica.
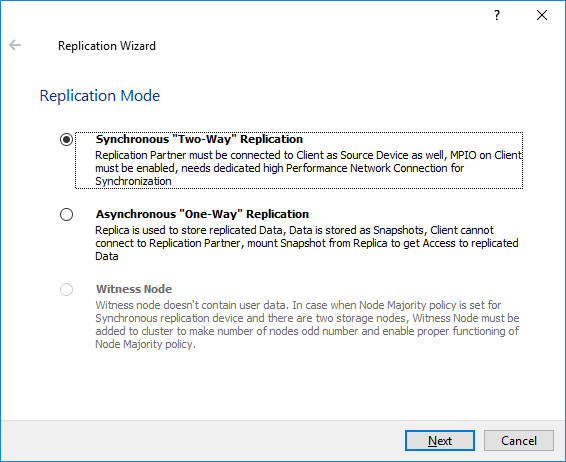
13. Select Synchronous “Two-Way” Replication as a replication mode.
Click on Next to proceed.
14. Specify a partner hostname, IP address, and port number.
Click on Next.
15. Choose Create new Partner Device and click on Next.
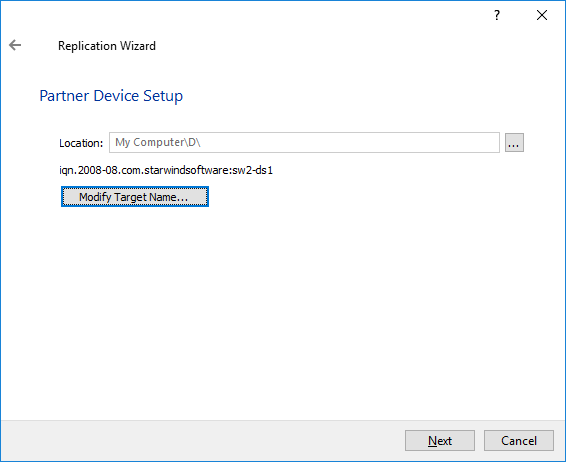
16. Choose a device location and specify target name if required. Otherwise, the name is generated automatically in accordance with the specified target alias.
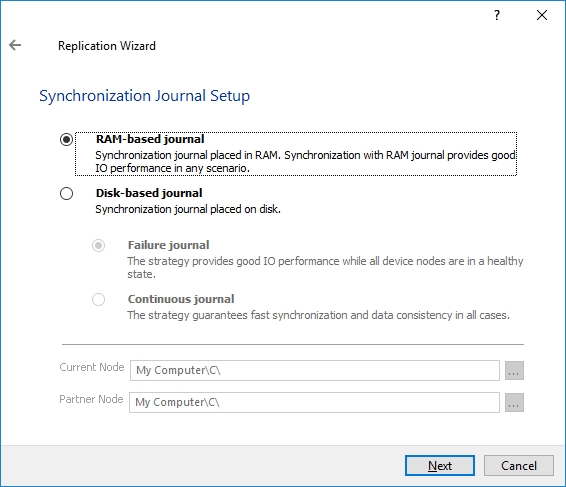
17. Select Synchronization Journal Strategy and click Next.
NOTE: There are several options – RAM-based journal (default) and Disk-based journal with failure and continuous strategy, that allow to avoid full synchronization cases.
RAM-based (default) synchronization journal is placed in RAM. Synchronization with RAM journal provides good I/O performance in any scenario. Full synchronization could occur in the cases described in this KB: https://knowledgebase.starwindsoftware.com/explanation/reasons-why-full-synchronization-may-start/
Disk-based journal placed on a separate disk from StarWind devices. It allows to avoid full synchronization for the devices where it’s configured even when StarWind service is being stopped on all nodes. Disk-based synchronization journal should be placed on a separate, preferably faster disk from StarWind devices. SSDs and NVMe disks are recommended as the device performance is defined by the disk speed, where the journal is located. For example, it can be placed on the OS boot volume.
It is required to allocate 2 MB of disk space for the synchronization journal per 1 TB of HA device size with a disk-based journal configured with 2-way replication and 4MB per 1 TB of HA device size for 3-way replication.
Failure journal
The strategy provides good I/O performance, as a RAM-based journal, while all device nodes are in a healthy synchronized state. If a device on one node went into a not synchronized state, the disk-based journal activates and a performance drop could occur as the device performance is defined by the disk speed, where the journal is located. Fast synchronization is not guaranteed in all cases. For example, if a simultaneous hard reset of all nodes occurs, full synchronization will occur.
Continuous journal
The strategy guarantees fast synchronization and data consistency in all cases. Although, this strategy has the worst I/O performance, because of frequent write operations to the journal, located on the disk, where the journal is located.
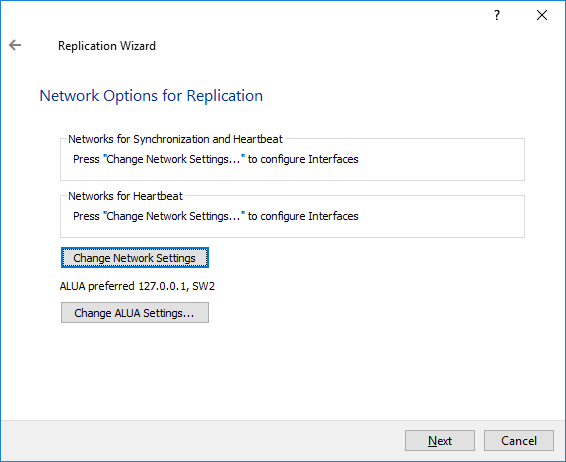
18. Click on Change Network Settings.
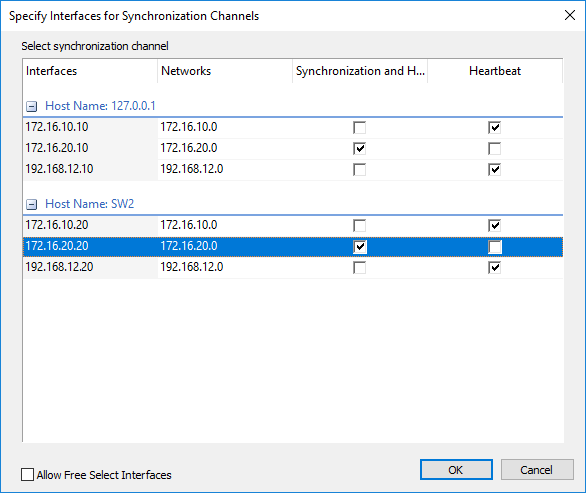
19. Specify interfaces for Synchronization and Heartbeat channels.
Confirm selection by pressing OK. Then click on Next.
20. Choose Synchronize from existing Device
21. Click on Create Replica.
Click on Finish to close the wizard.
NOTE: To extend an Image File or a StarWind HA device to the required size, please check the article below:
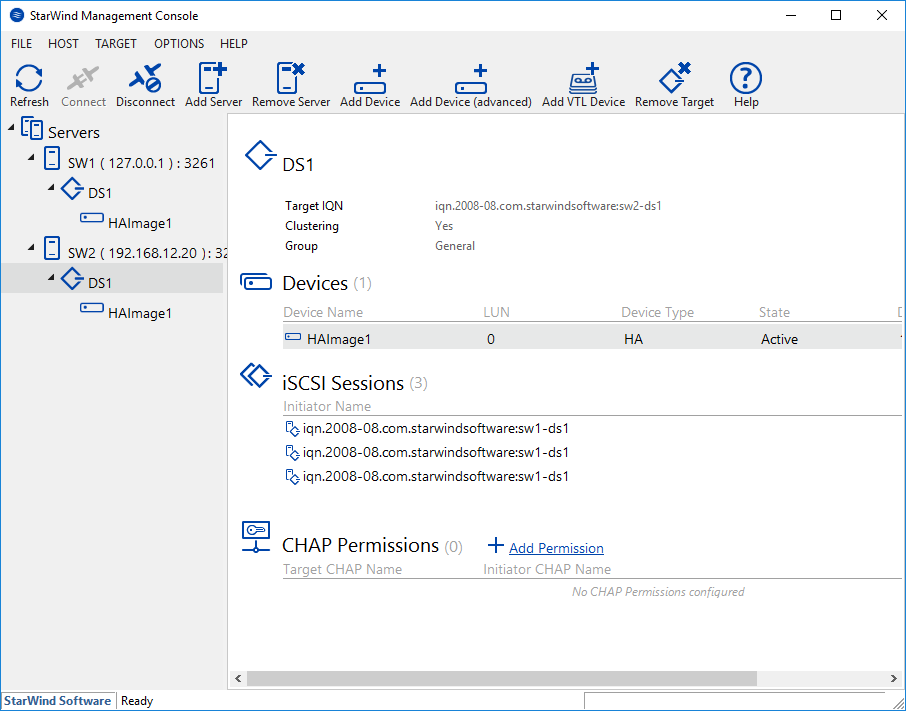
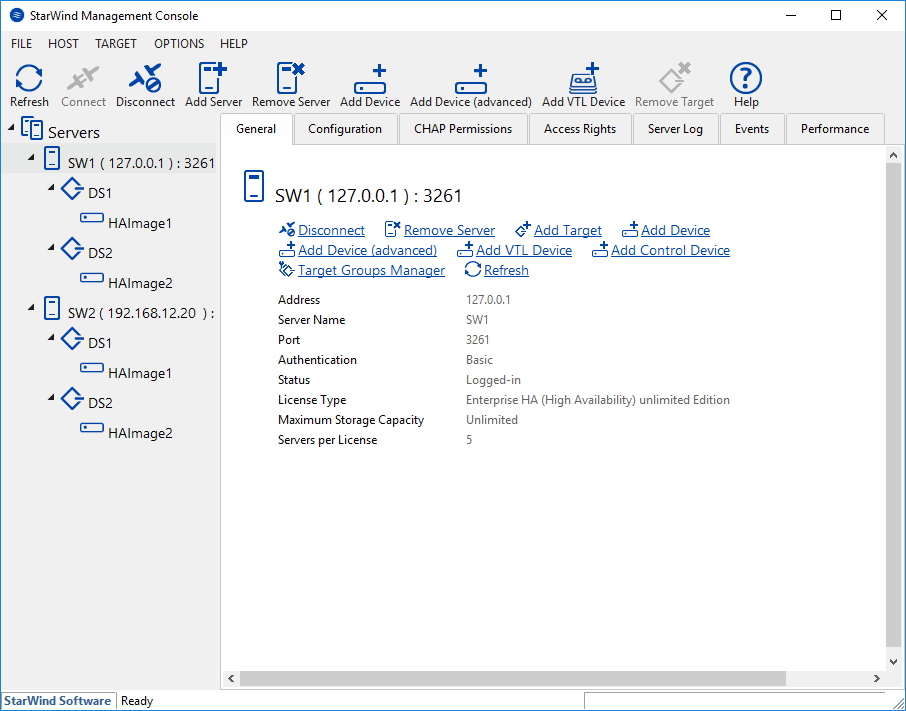
22. The successfully added devices appear in the StarWind Management Console.
23. Follow the similar procedure to create other virtual disks that will be used as datastores.
Configuring Automatic Storage Rescan
For faster paths recovery, for example, after StarWind HA device synchronization, configuring automatic storage rescan is required for each ESXi host.
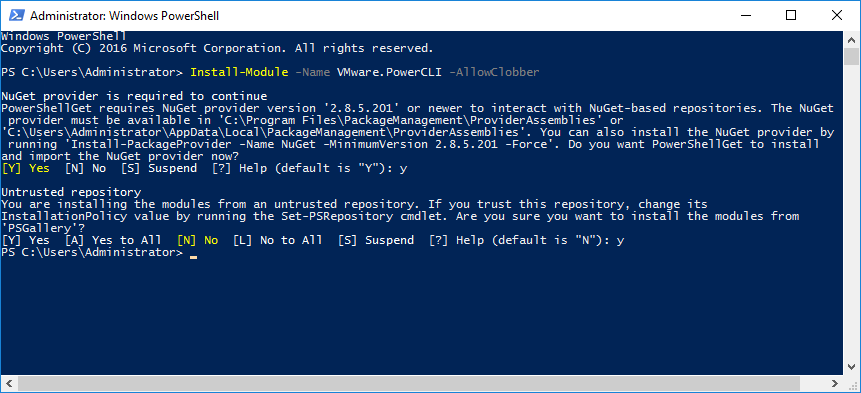
1. Log in to StarWind VM and install VMware PowerCLI on each StarWind virtual machine by adding the PowerShell module (Internet connectivity is required). To do so, run the following command in PowerShell:
Install-Module -Name VMware.PowerCLI -AllowClobber
NOTE: In case of using Windows Server 2012 R2, online installation of PowerCLI requires Windows Management Framework 5.1 or upper version available on VMs. Windows Management Framework 5.1 can be downloaded from https://go.microsoft.com/fwlink/?linkid=839516
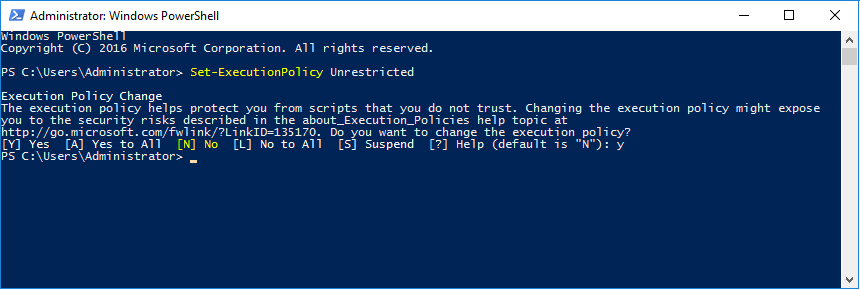
2. Open PowerShell and change the Execution Policy to Unrestricted by running the following command:
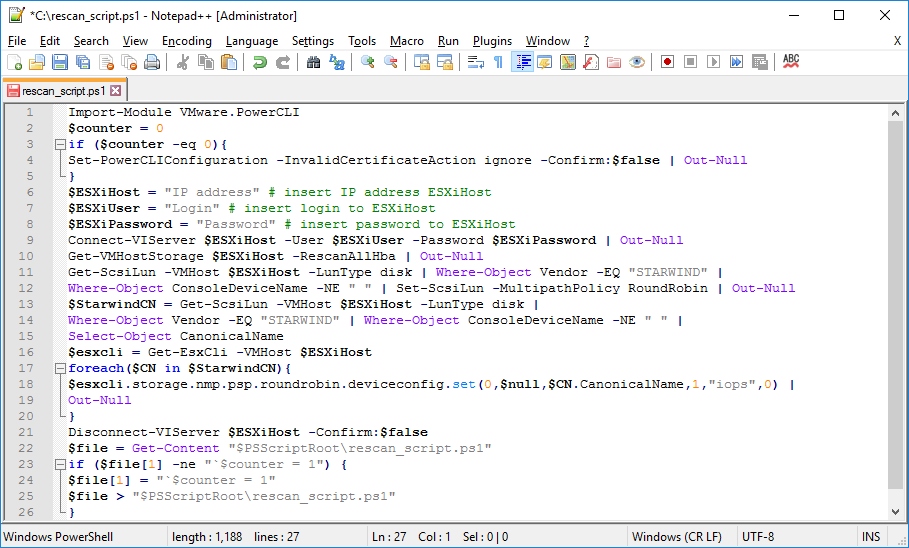
Set-ExecutionPolicy Unrestricted3. Create a PowerShell script which will perform an HBA rescan on the hypervisor host.
Import-Module VMware.PowerCLI
$counter = 0
if ($counter -eq 0){
        Set-PowerCLIConfiguration -InvalidCertificateAction ignore -Confirm:$false | Out-Null
}
$ESXiHost = "IP address" # insert IP address ESXiHost
$ESXiUser = "Login" # insert login to ESXiHost
$ESXiPassword = "Password" # insert password ESXiHost
Connect-VIServer $ESXiHost -User $ESXiUser -Password $ESXiPassword | Out-Null
Get-VMHostStorage $ESXiHost -RescanAllHba | Out-Null
Get-ScsiLun -VMHost $ESXiHost -LunType disk | Where-Object Vendor -EQ "STARWIND"|
Where-Object ConsoleDeviceName -NE " " | Set-ScsiLun -MultipathPolicy RoundRobin -CommandsToSwitchPath 1 |
Out-Null
Disconnect-VIServer $ESXiHost -Confirm:$false
$file = Get-Content "$PSScriptRoot\rescan_script.ps1"
if ($file[1] -ne "`$counter = 1") {
       $file[1] = "`$counter = 1"
       $file > "$PSScriptRoot\rescan_script.ps1"
}
In the appropriate lines, specify the IP address and login credentials of the ESXi host on which the current StarWind VM is stored and running:
$ESXiHost = “IP address”
$ESXiUser = “Login”
$ESXiPassword = “Password”
Save the script as rescan_script.ps1 to the root of the C:\ drive of the Virtual Machine.
NOTE: In some cases the rescan script can be changed and storage rescan added for another ESXi host. Appropriate lines should be duplicated and changed with properly edited variables if required.
NOTE: In some cases, it makes sense to create a separate ESXi user for storage rescans. To create the user, please follow the steps below:
Log in to ESXi with the VMware Host Client. Click Manage, and under Security & users tab, in the Users section click Add user button. In the appeared window, enter a user name, and a password.
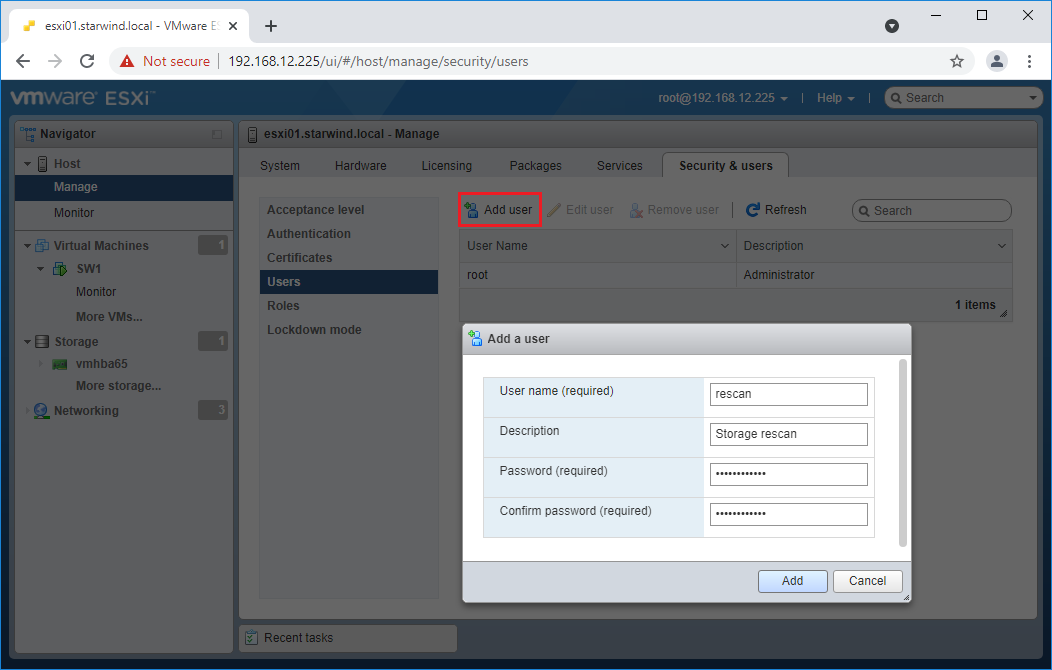
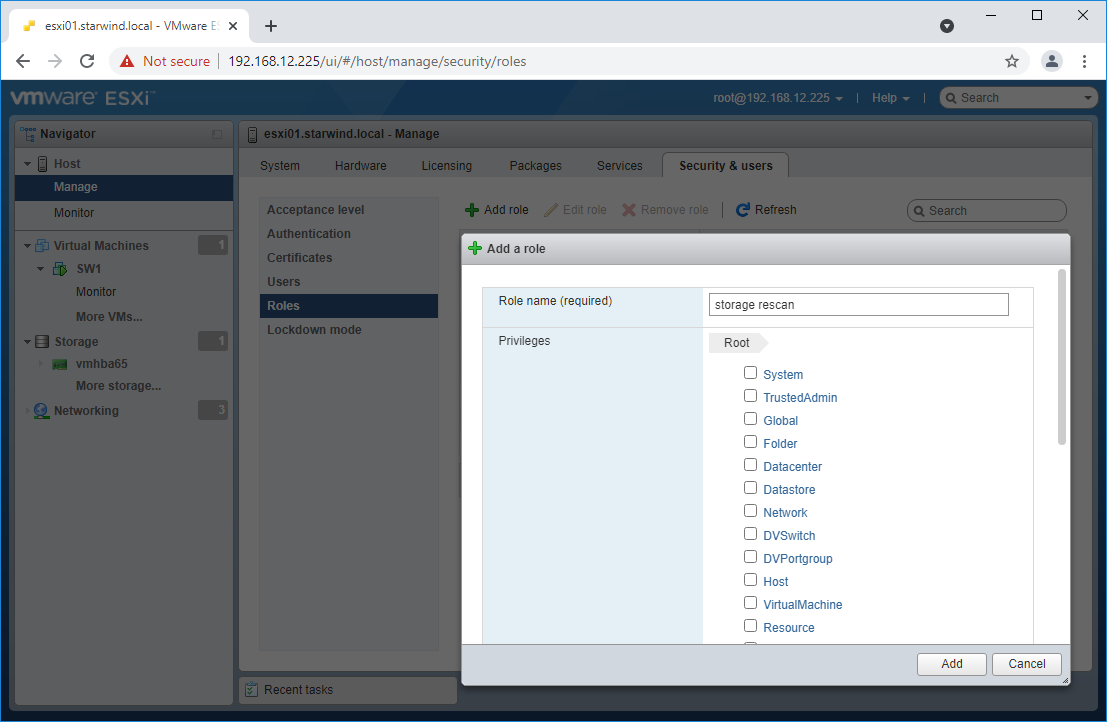
Create a new Role, under Roles section, and click New Role button. Type a name for the new role. Select privileges for the role and click OK.
The following privileges might be assigned: Host – Inventory, Config, Local Cim, and Global – Settings.
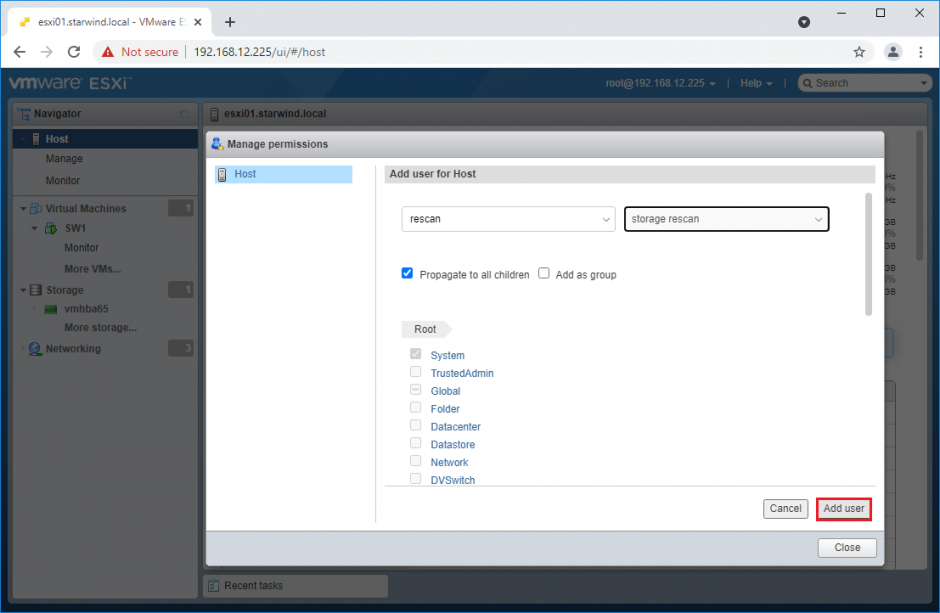
Assign permission to the storage rescan user for an ESXi host – right-click Host in the VMware Host Client inventory and click Permissions. In the appeared window click Add user.
Click the arrow next to the Select a user text box and select the user that you want to assign a role to. Click the arrow next to the Select a role text box and select a role from the list.
(Optional) Select Propagate to all children or Add as group. Click Add user and click Close.
3. Repeat all steps from this section on the other ESXi hosts.
4. Perform the configuration steps above on the partner node.
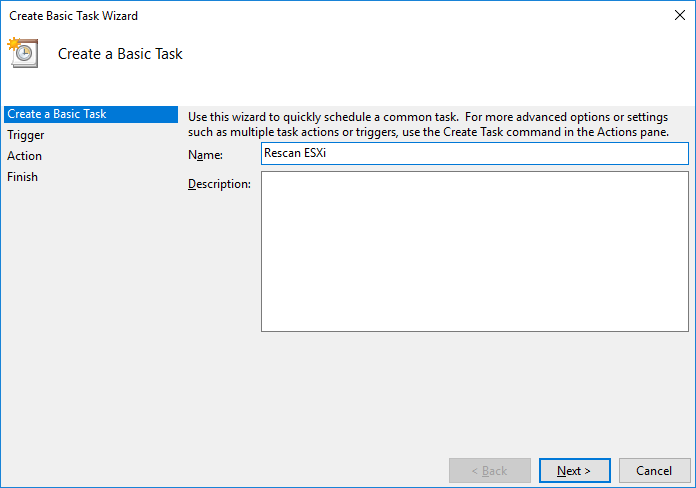
5. Go to Control Panel -> Administrative Tools -> Task Scheduler -> Create Basic Task and follow the wizard steps:
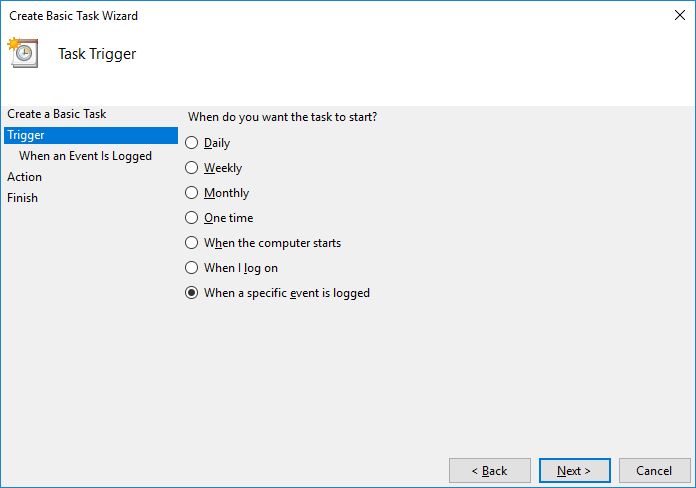
6. Specify the task name, select When a specific event is logged, and click on Next.
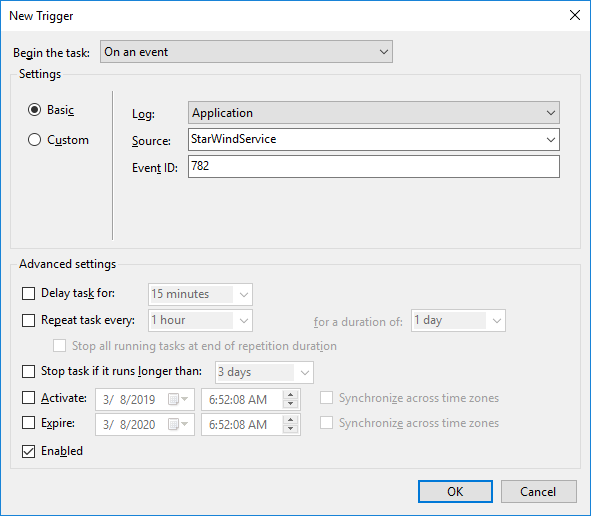
7. Select Application in the Log dropdown, type StarWindService for the event source and 788 as the event ID. Click the Next button.
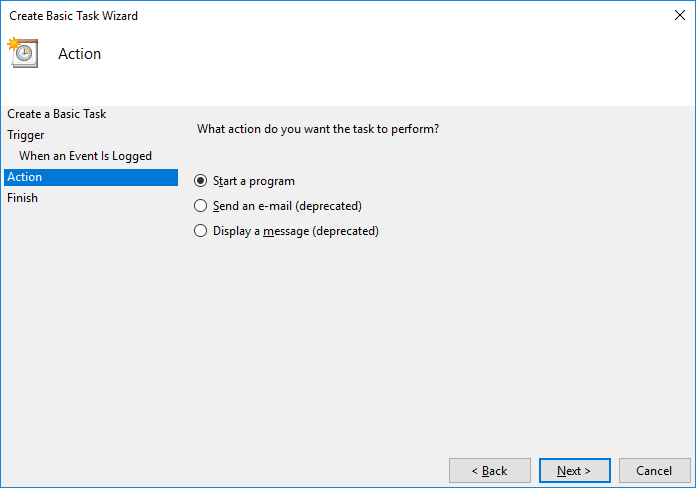
8. Choose Start a Program as the action that the task will perform and click on Next.
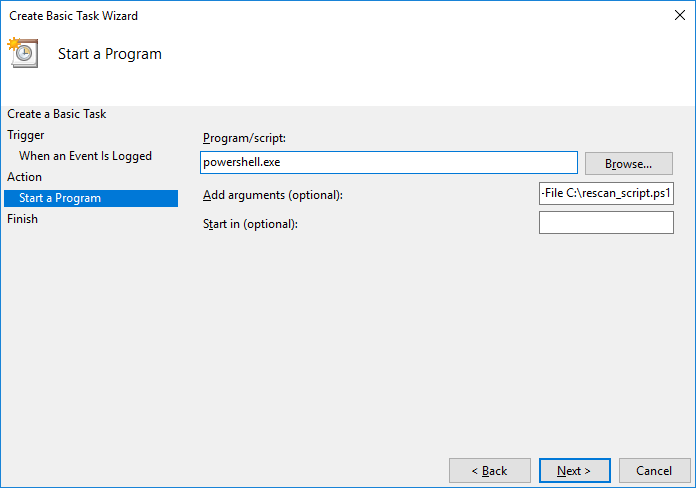
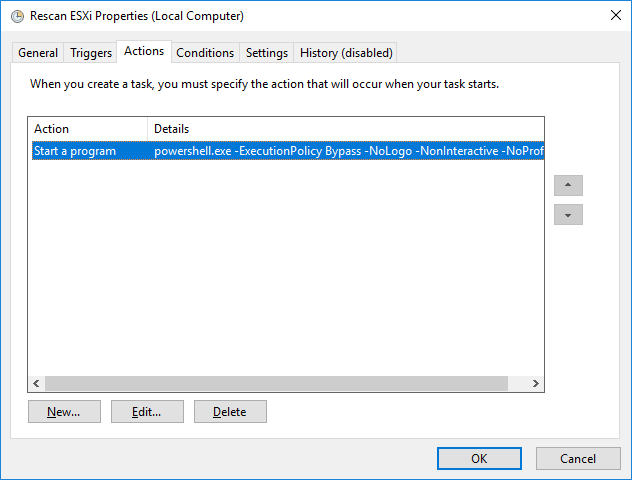
9. Type powershell.exe in the Program/script field. In the Add arguments field, type:
“ -ExecutionPolicy Bypass -NoLogo -NonInteractive -NoProfile -WindowStyle Hidden -File C:\rescan_script.ps1 ”
Click the Next button to continue.
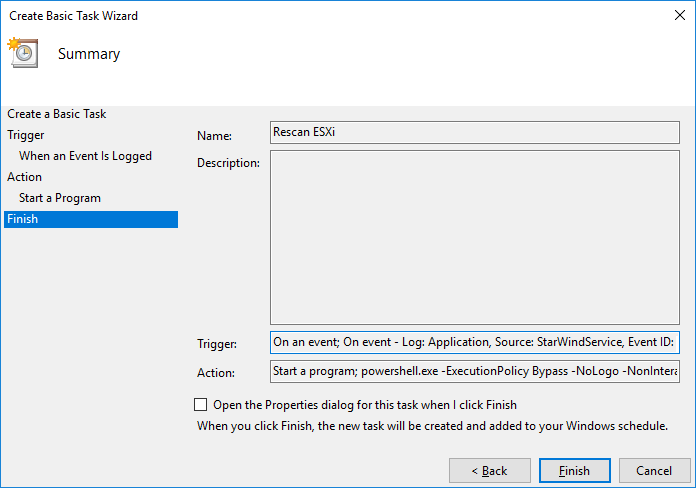
10. Click Finish to exit the Wizard.
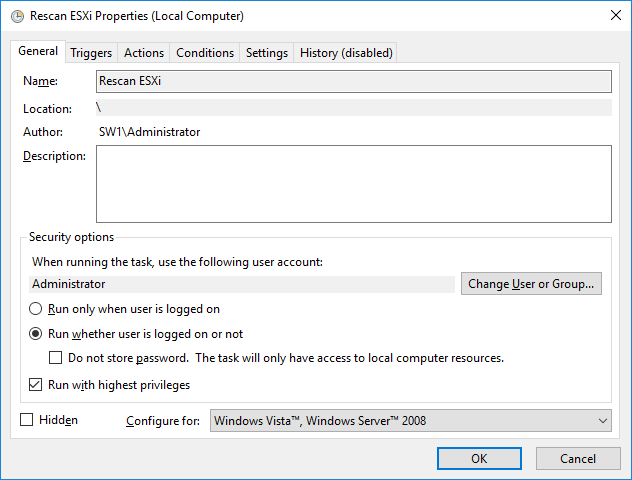
11. Configure the task to run with highest privileges by enabling the checkbox at the bottom of the window. Also, make sure that the “Run whether user is logged on or not” option is selected.
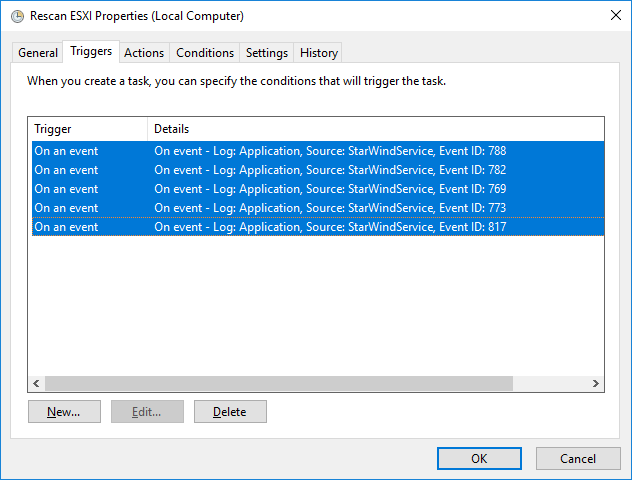
12. Switch to the Triggers tab. Verify that the trigger on event 788 is set up correctly.
13. Click New and add other triggers by Event ID 782, 769, 773, and 817.
14. All added triggers should look like in the picture below.
15. Switch to the Actions tab and verify the parameters for the task.
Press OK and type in the credentials for the user whose rights will be used to execute the command.
16. Perform the same steps on another StarWind VM, specifying the corresponding settings.
Datacenter and Cluster creation
Creating Datacenter
NOTE: Creating Datacenter requires deployment of vCenter prior to this step. In case of deploying vCenter as a virtual machine (vCenter Server Appliance) located on the local storage it is recommended to move vCenter to a StarWind HA datastore after its creation.
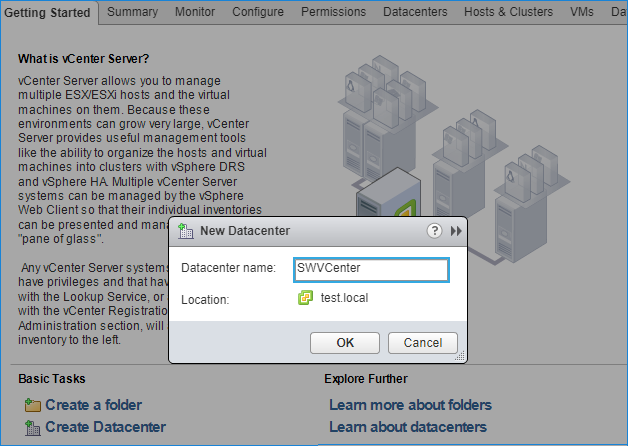
1. Connect to vCenter, select the Getting Started tab, click on Create Datacenter, and enter the Datacenter name.
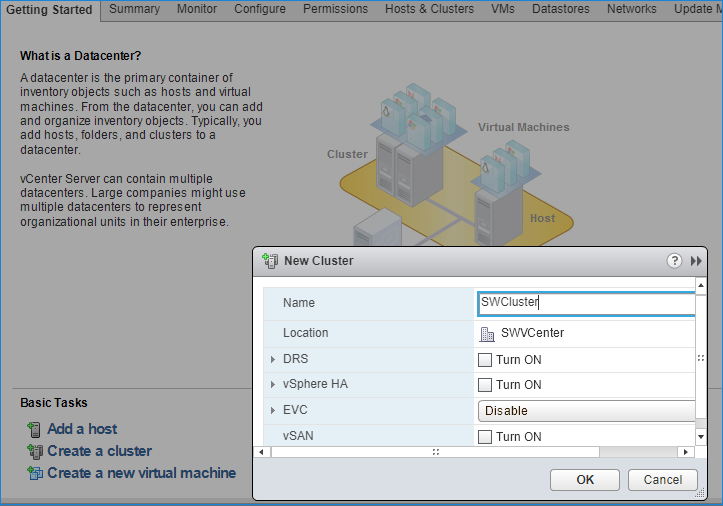
Creating Cluster
2. Click the Datacenter’s Getting Started tab and click Create a cluster. Enter the name of the cluster and click Next.
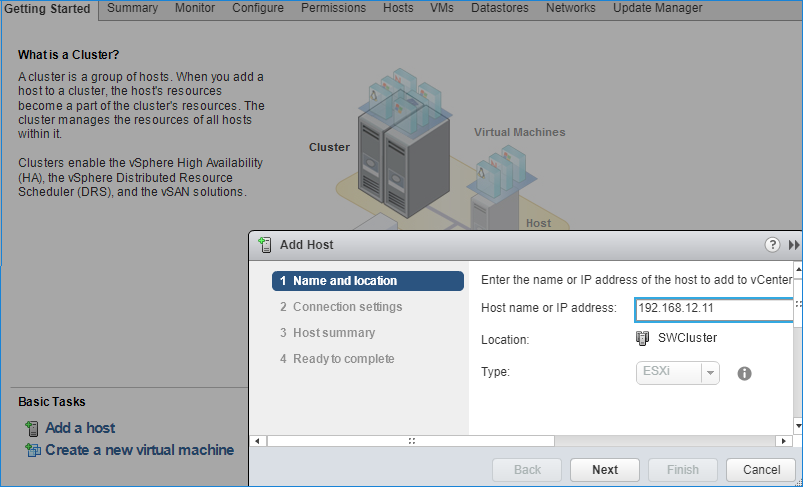
3. Open the Cluster tab and click on Add a host.
4. Enter the name or IP address of the ESXi host and its administrative account.
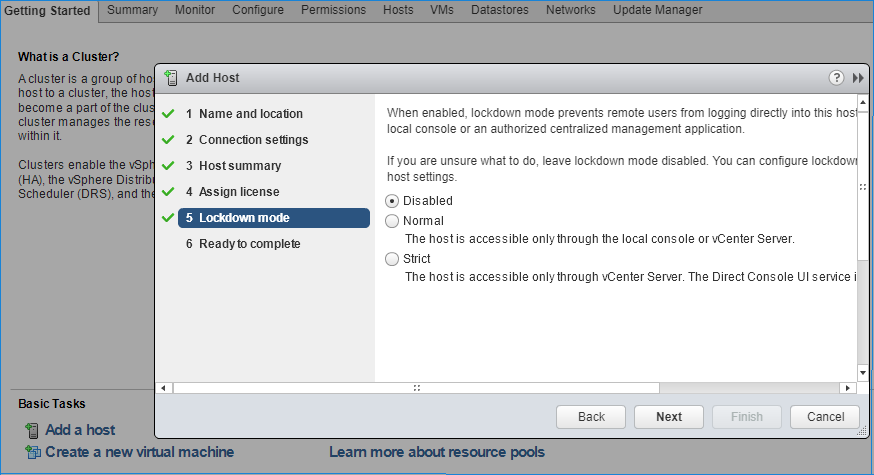
5. Lockdown mode is not enabled by default.
6. Assign the License from the Licensing tab.
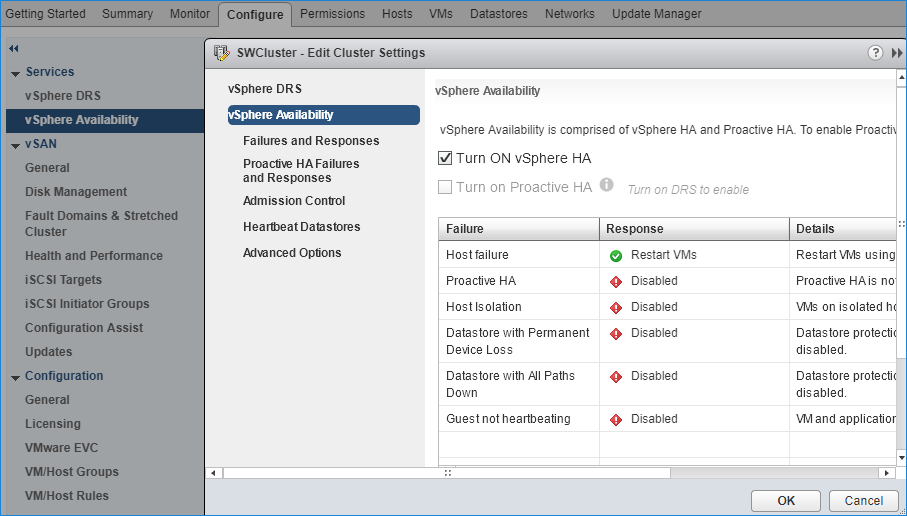
7. Turn on vSphere HA by clicking on Cluster -> Configure -> Edit
Preparing Datastores
Adding Discover Portals
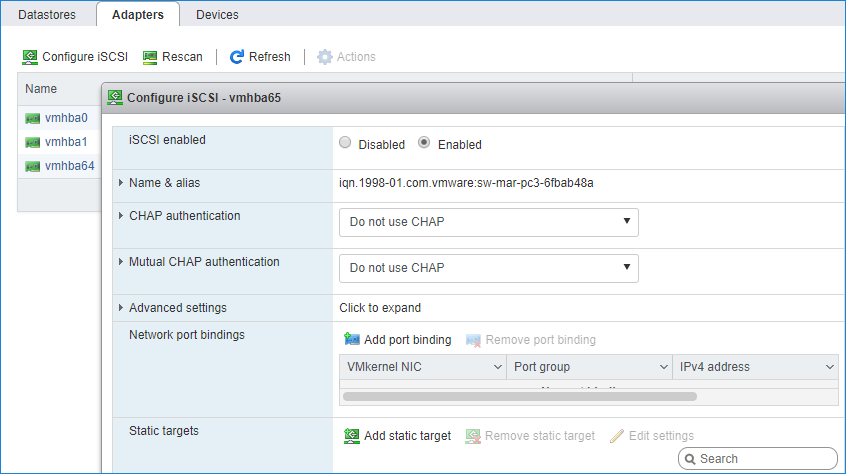
1. To connect the previously created devices to the ESXi host, click on the Storage -> Adapters -> Configure iSCSI and choose the Enabled option to enable Software iSCSI storage adapter.
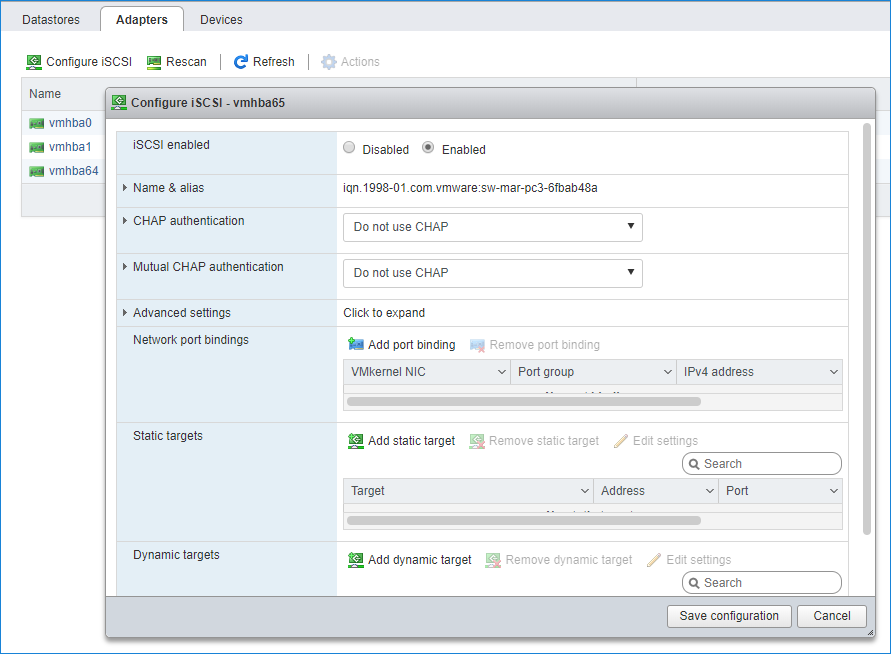
2. In the Configure iSCSI window, under Dynamic Targets, click on the Add dynamic target button to specify iSCSI interfaces.
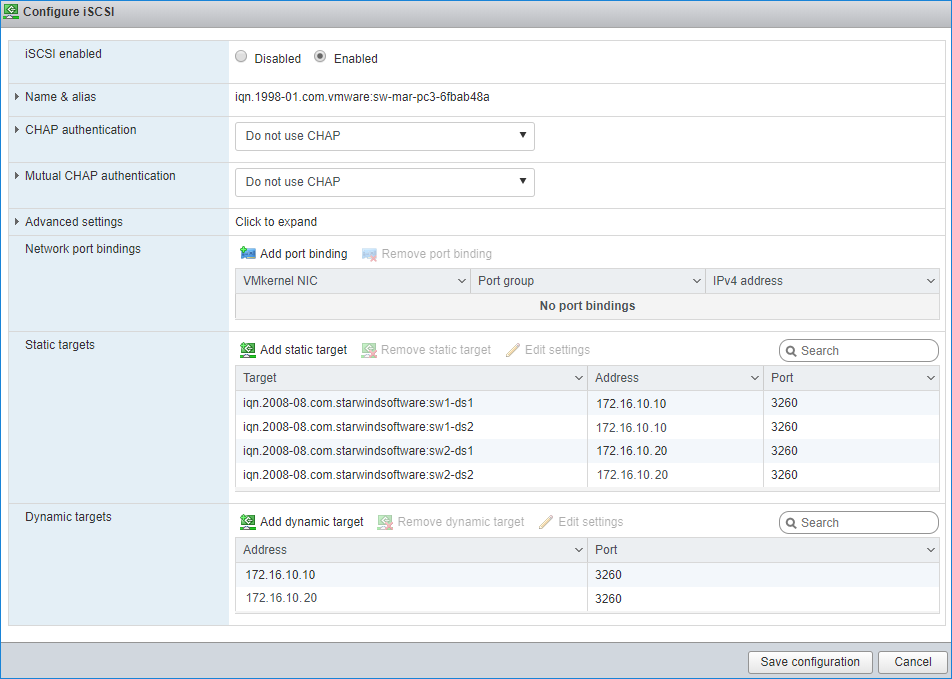
3. Enter the iSCSI IP addresses of all StarWind nodes for the iSCSI traffic.
Confirm the actions by pressing Save configuration.
4. The result should look like in the image below:
5. Click on the Rescan button to rescan storage.
6. Now, the previously created StarWind devices are visible to the system.
7. Repeat all the steps from this section on the other ESXi host, specifying corresponding IP addresses for the iSCSI subnet.
Creating Datastores
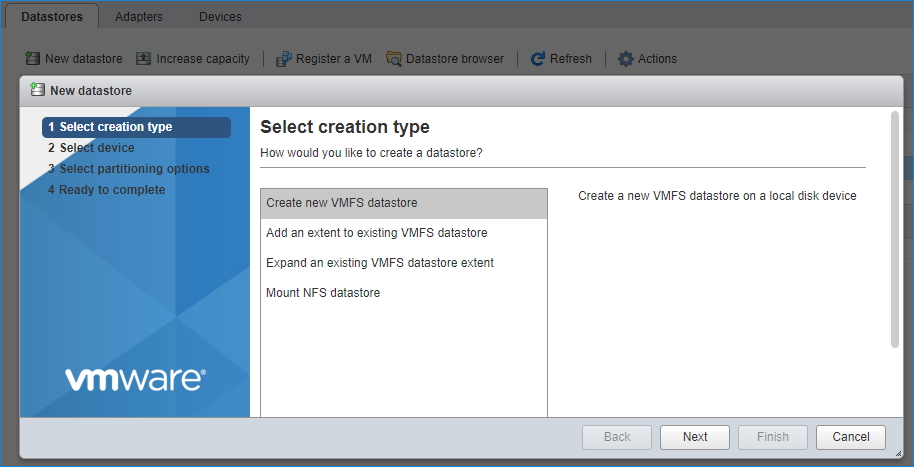
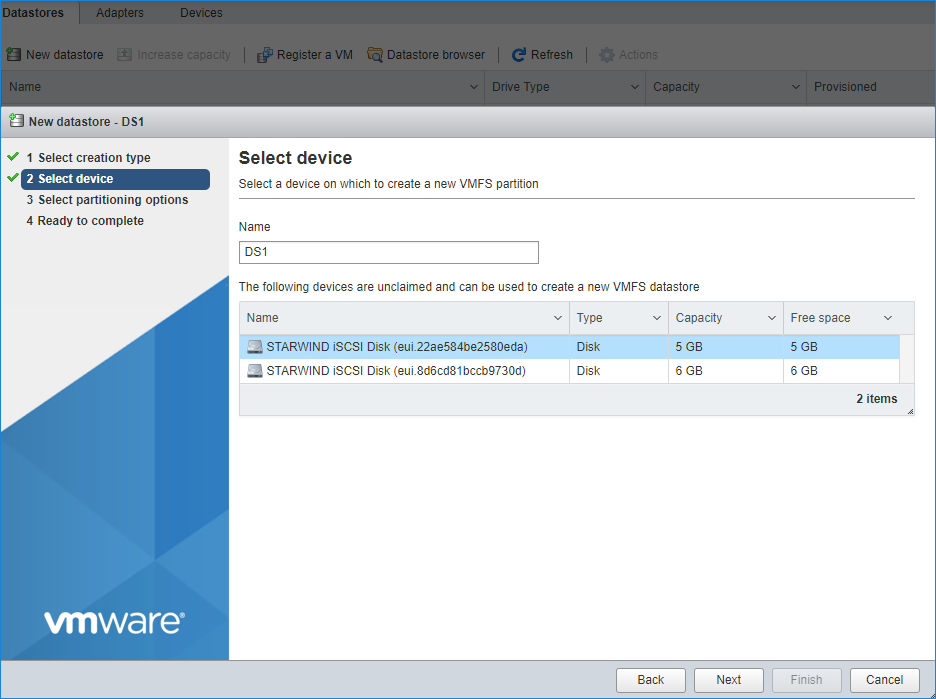
1. Open the Storage tab on one of the hosts and click on New Datastore.
2. Specify the datastore name, select the previously discovered StarWind device, and click on Next.
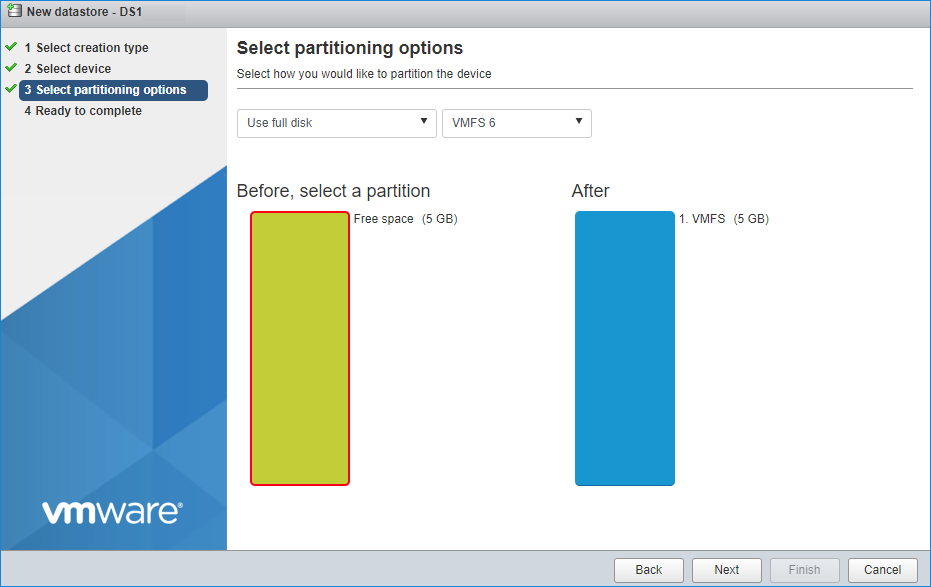
3. Enter datastore size. Click on Next.
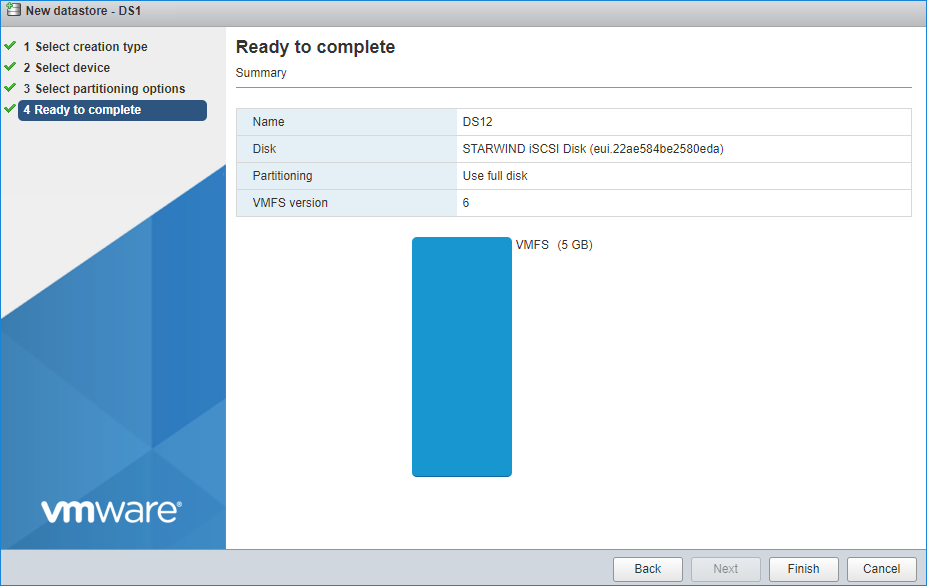
4. Verify the settings. Click on Finish.
5. Add another datastore (DS2) in the same way but select the second device for it.
6. Verify that storage (DS1, DS2) is connected to both hosts. Otherwise, rescan the storage adapter.
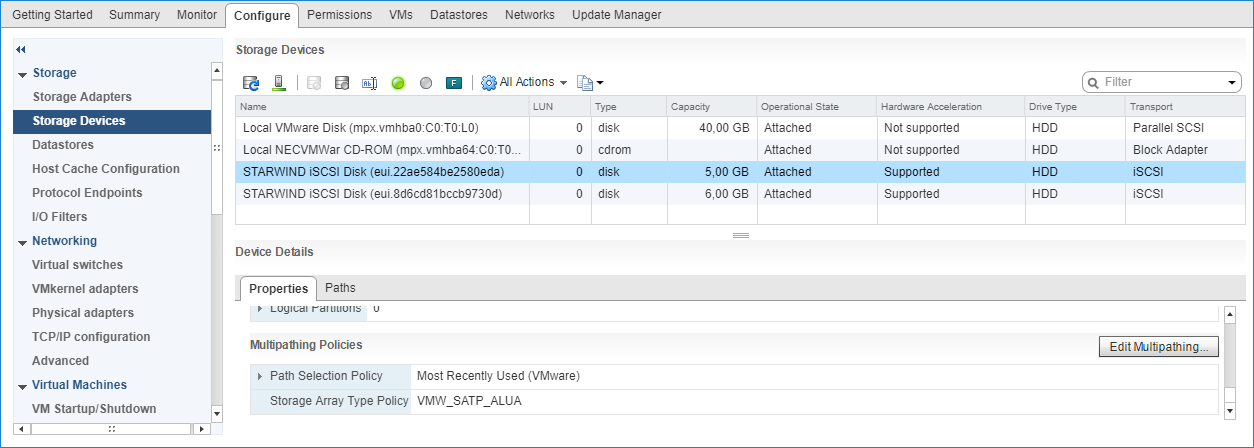
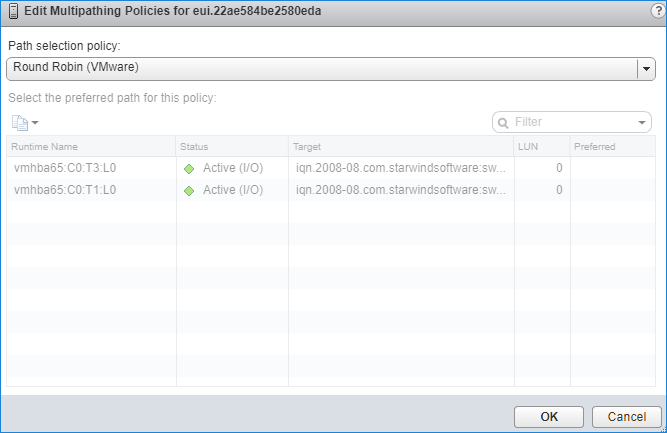
7. Path Selection Policy changing for Datastores from Most Recently Used (VMware) to Round Robin (VMware) has been already added into the Rescan Script, and this action is performed automatically. For checking and changing this parameter manually, the hosts should be connected to vCenter.
8. Multipathing configuration can be checked only from vCenter. To check it, click the Configure button, choose the Storage Devices tab, select the device, and click on the Edit Multipathing button.
Performance Tweaks
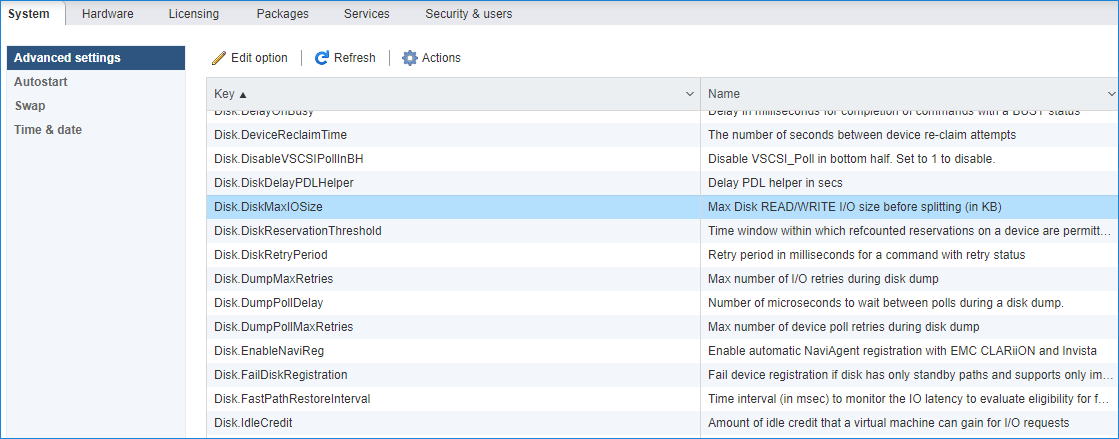
1. Click on the Configuration tab on all of the ESXi hosts and choose Advanced Settings.
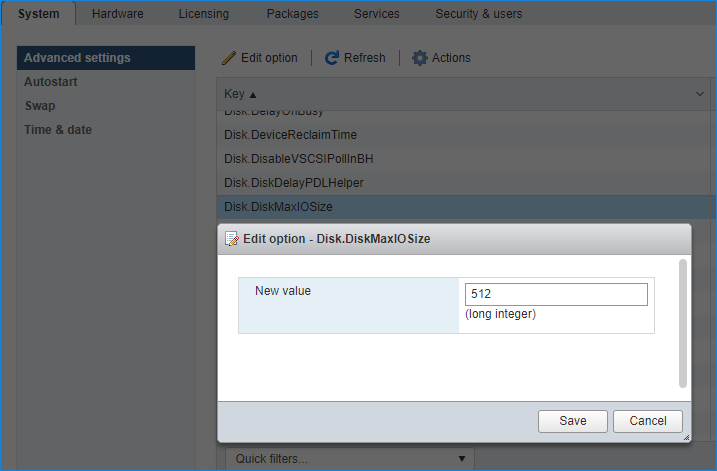
2. Select Disk and change the Disk.DiskMaxIOSize parameter to 512.
NOTE: Changing Disk.DiskMaxIOSize to 512 might cause startup issues with Windows-based VMs, located on the datastore where specific ESX builds are installed. If the issue with VMs start appears, leave this parameter as default or update the ESXi host to the next available build.
NOTE: In certain cases, in Virtual Machine, Windows event log may report an error similar to “Reset to device, \Device\RaidPort0, was issued”. Check this KB acticle for a possible solution.

