StarWind VSAN supports 3-way storage replica, so in case of 3-node Microsoft Failover Cluster the shared storage can be replicated on each of the nodes ensuring extra redundancy at the storage level.
To deploy a 3-node setup, all nodes must have identical hardware and meet the minimum StarWind VSAN system requirements, including supported OS, memory size, dedicated network interfaces, latency specifications, and minimum connection speed.
In a StarWind VSAN-based hyperconverged infrastructure, compute, storage, and networking are combined into a unified solution. Shared storage, managed by StarWind VSAN running as a Controller Virtual Machine (CVM), is replicated between the nodes hosting the StarWind CVM, the cluster, and the clustered VMs. StarWind VSAN CVMs, which can be installed on the local storage where the OS is installed, must be deployed on each Windows Server to configure the cluster. Local storage, such as physical disks, NVMe drives, or RAID arrays used for data, should be assigned to the StarWind Controller Virtual Machine (CVM).The StarWind CVM manages virtual disks that are replicated with CVMs on other nodes, creating a shared storage pool. This highly available (HA) storage is connected to each server and utilized as cluster storage. Data replication in active-active mode is performed at the block level over dedicated links between the servers. Production VMs managed by the cluster should reside on Cluster Shared Volumes based on StarWind HA devices. A 3-node failover cluster inherently achieves quorum without additional witnesses, as the three nodes provide sufficient votes to determine a majority, however, Witness disk can be created if it’s required.
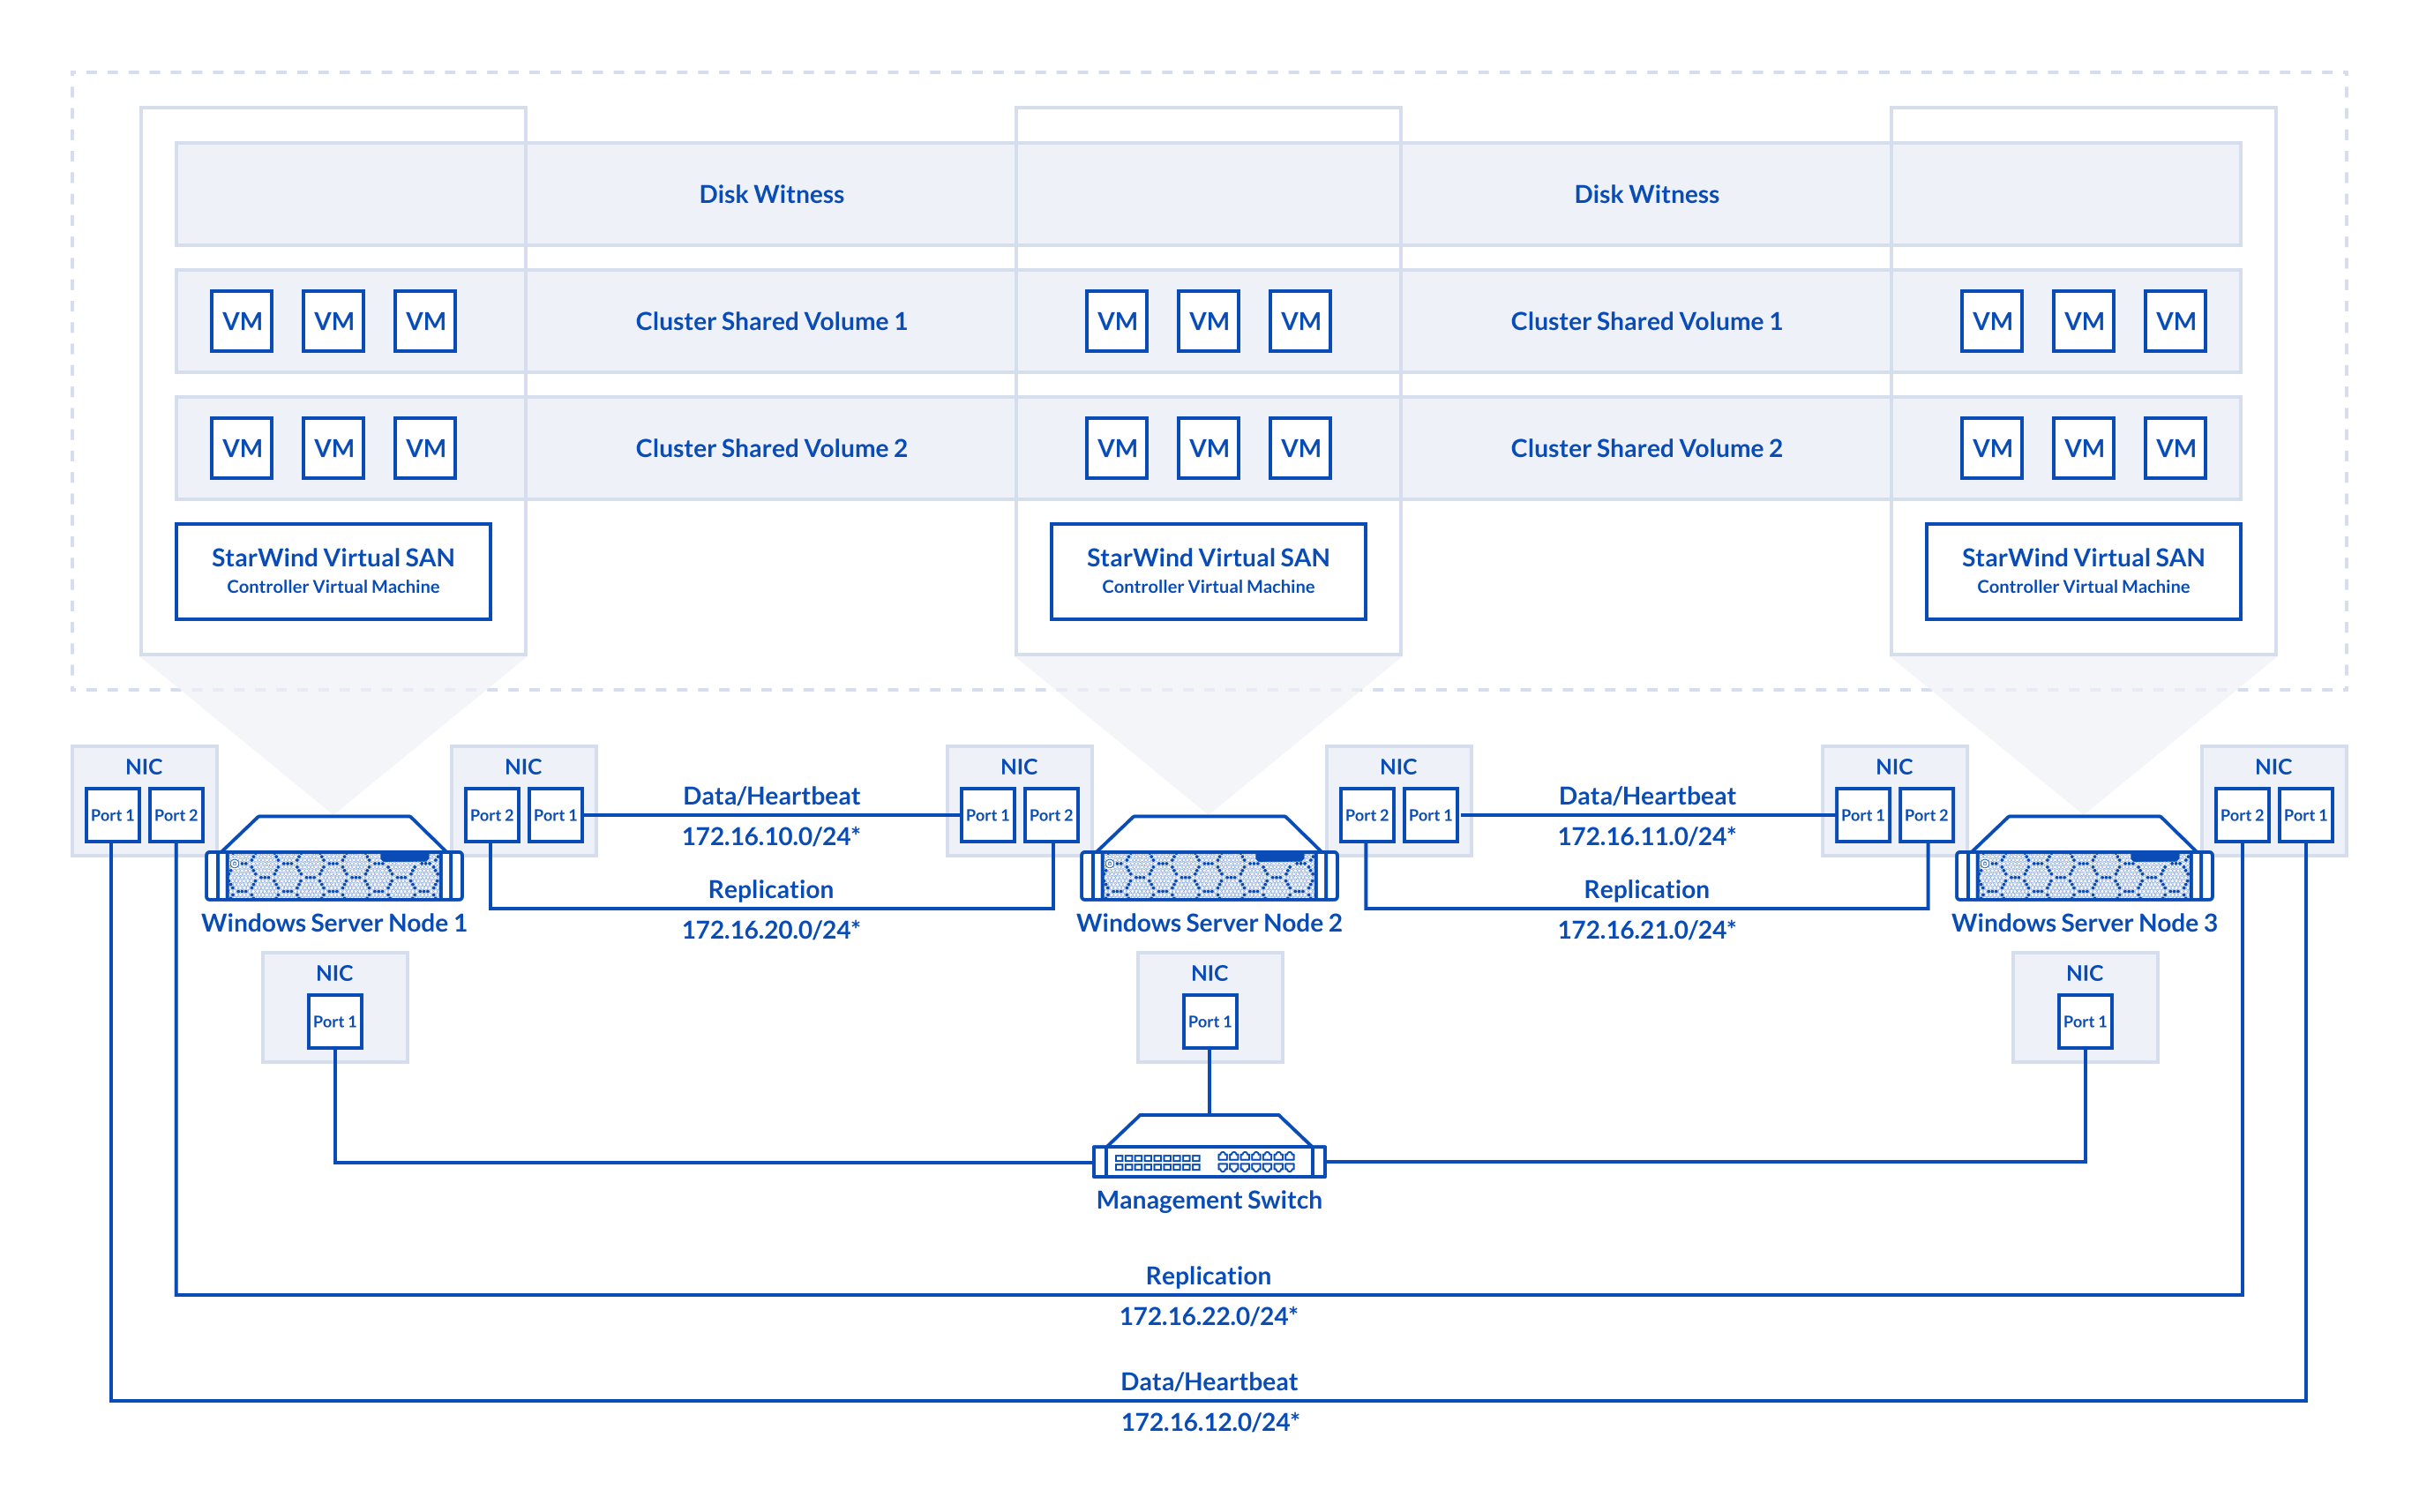
The diagram below illustrates the network and storage configuration of the 3-node hyperconverged setup.

Figure 3. 3-node cluster configuration
In this diagram, 172.16.10.0/24, 172.16.11.0/24,172.16.12.0/24 subnets are used to discover and connect the iSCSI targets (Data) and for StarWind heartbeat traffic, while 172.16.20.0/24,172.16.21.0/24, 172.16.22.0/24 subnets are used for the Replication traffic. The Data/Heartbeat and Replication links could be connected either through redundant switches or directly between nodes. The Data/Heartbeat and Replication networks should not share the same physical link to avoid potential performance issues. The management links should also be used for the redundant StarWind heartbeat connections.
Synchronous (active-active) replication ensures real-time synchronization and load balancing between cluster nodes. Each write operation requires confirmation from both storage nodes, guaranteeing reliable data transfers, which demands low-latency, high-bandwidth networks, as mirroring could fail on high-latency connections. In case when the node gets all the replication connections broken to the partner nodes (got isolated) and there is no way to get the partner state, the node may “assume” that the partner nodes are offline and could continue operations on a single-node mode, able to accept write commands from the initiators and use data written to it. A scenario when the data is written independently to each node during the replication connection failure is called a “split-brain,” which can result in data corruption or inconsistency. To minimize or prevent split-brain scenarios, StarWind VSAN provides two failover strategies:
Heartbeat Failover Strategy
This strategy uses an alternate network connection, known as a heartbeat link, to monitor partner node availability. If replication links fail but the heartbeat remains online, StarWind services communicate via the heartbeat link to identify the partner node state or send the commands to each other. The HA device with the lowest priority is marked as unsynchronized and blocked for further read/write operations until the replication channel resumption. At the same time, the partner device on the synchronized node flushes data from the cache to the disk to preserve data integrity in case the node goes down unexpectedly.
Since heartbeat links are critical for data consistency, it is recommended to assign multiple independent heartbeat channels during replica creation for improved stability and minimize the risk of the “split-brain” issue.
With the heartbeat failover strategy, the storage cluster will continue working with only one StarWind node available.
Node Majority Failover Strategy
This strategy ensures that the system continues operating only when more than half of the nodes are active. Nodes that fall into the minority automatically stop accepting read and write requests, and their HA devices are marked as unsynchronized. Node Majority does not require heartbeat links; instead, it calculates the majority based on “votes.” The failure-handling process occurs when the node has detected the absence of the replication connection with the partner. The main requirement for keeping the node operational is an active connection with more than half of the HA device’s nodes.
In a three-node HA setup (which has 3 “votes”), the system can tolerate the failure of one node while maintaining quorum. However, if two nodes fail, the remaining node will lose the majority and cease operations. Unlike in two-node configurations, a Witness node is not necessary in a three-node setup, as the majority is naturally achieved. More details about the Node Majority failover strategy are available here: https://www.starwindsoftware.com/blog/whats-split-brain-and-how-to-avoid-it/

