Hyper-V and High Availability Shared Storage by Microsoft MVP Russ Kaufmann
- June 19, 2009
- 32 min read
- Download as PDF
Basic Questions
To learn about clustering, it is a good idea to start with some basic questions and answers. Setting up clusters really is not as difficult as most administrators believe, and the benefits of clustering are significant.
What is High Availability?
Companies leverage information technology (IT) to increase the productivity of the people in the company and to automate many processes that would have to be done by people if computers and programs could not perform the tasks. The cost of using IT is very visible in the hard costs of hardware, software, and support staff. In most cases, the costs of IT are far outweighed by the costs saved through computing systems.
Managers often forget that IT is a critical component of business as companies use more and more technology to get the most out of the talents of their staff. Managers remember, very clearly, how important IT is when something fails and nobody is able to work at all, and customers are not being served. In many cases, failure of technology can cause a business to come to a complete halt.
High availability is the implementation of technology so that if a component fails, another can take over for it. By using highly available platforms, the downtime for a system can be reduced, and, in many cases, it can be reduced to a short enough time that the users of the system do not see the failure.
Using the example of a hard disk, which has a certain mean time before failure (MTBF) associated with it, we can also define availability. In most organizations, nobody cares much about failed hardware devices. Users of information technology care only that they can access the service or application that they need to perform their jobs. However, since we know that hardware devices will fail, administrators need to protect against the loss of services and applications needed to keep the business running.
When it comes to hard drives, administrators are able to build redundant disk sets, or redundant arrays of independent (sometimes described as inexpensive) disks (RAID), that will tolerate the failure of an individual component, but still provide the storage needed by the computer to provide access to the files or applications. Failed disks are not an issue if users and applications can still access the data stored on the disks. Again, it is all about access to the application or service availability, and the key to highly available platforms is minimizing downtime and maximizing availability.
What is Clustering?
A cluster is a group of independent computers working together as a single system to ensure that mission-critical applications and resources are as highly-available as possible. The group of computers is managed as a single system, it shares a common namespace, and it is specifically designed to minimize downtime caused by software and hardware failures.
The general concept in clustering is that there are nodes, which are computers that are members of the cluster that are either active or passive. Active nodes are running an application or service while passive nodes are in a standby state communicating with the active nodes so they can identify when there is a failure. In the event of a failure, the passive node then becomes active and starts running the service or application.
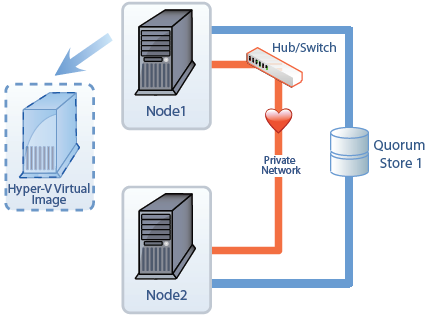
In the figure, there are two computers that are also known as nodes. The nodes, combined, make up the cluster. Each of the nodes has at least two network adapters. One of the network adapters is used to connect each node to the network. The second network adapter is used to connect the nodes to each other via a private network, also called a heartbeat network. The private network is used by the cluster service so the nodes can talk to each other and verify that each other are up and running. The process of verification uses two processes called the looksalive resource check and the isalive resource check. If the resources in the cluster fail to respond to the resource checks after the appropriate amount of time, the passive node will assume that the active node has failed and will start up the service or application that is running on the cluster in the virtual server. Some nodes will also have a third network adapter dedicated to the iSCSI network to access the iSCSI SAN. If an iSCSI SAN is used, each node will connect to the SAN through a dedicated network adapter to a private network that the iSCSI SAN also uses.
Each of the nodes is also connected to the shared storage media. In fact, the storage is not shared, but it is accessible to each of the nodes. Only the active node accesses the storage, and the passive node is locked out of the storage by the cluster service. In the figure here, there are three Logical Unit Numbers, or LUNs, that are being provided by the SAN. The nodes will connect to the SAN using fiber channel or iSCSI.
What is a Virtual Machine?
A Virtual Machine (VM) is an image of a computer that runs in a virtualized platform such as Hyper-V. With Microsoft’s Hyper-V, it is possible for administrators to combine several VMs on a single server that runs the Hyper-V role. The number of VMs that can be run on a single server varies according to the resources required and the hardware of the physical server that hosts the VMs.
What is a Cluster Shared Volume (CSV)?
Normally, when using failover clustering, each clustered application or service requires its own IP Address, Network Name, and Physical Disk resource. If a Hyper-V server were to host several Hyper-V virtual machines, it would exhaust the available disk letters, plus, there would be a very inefficient use of the disk space in the SAN. This problem became very apparent in Windows Server 2008. One of the changes in Windows Server 2008 R2 is the creation of the CSV which is used only for the Hyper-V role. The CSV is a normal physical disk resource; however, it provides the ability to be shared with several virtual machines so they can all use the same drive letter as well as the same shared disk space. CSVs allow administrators to host multiple virtual machines and all of the virtual machines can access the shared volume for read and write operations without worrying about conflicts. Not only can the virtual machines share the disk volume, they can also failover back and forth between nodes without impacting other virtual machines running on the cluster.
Disk devices provided by StarWind’s SAN software can be configured as CSVs.
Why Would I Cluster Hyper-V Images?
Server consolidation has been very important to companies in the last few years as companies continue to invest more in technology. While it is a great idea to use VMs to reduce the number of servers in a datacenter, putting multiple VMs on the same server exposes the company to increased risks associated with a server failure. Protecting the VMs becomes more of a priority as we increase the use of virtualization.
Hyper-V VMs can be protected by using failover clustering in Windows Server 2008 and in Windows Server 2008 R2. However, Windows Server 2008 R2 is the preferred platform because it supports CSVs.
Combining the high availability in failover clustering with Hyper-V virtual machines is an incredible benefit to the company. Not only do we save money on physical hardware by fully leveraging the hardware in the company, we also are able to failover to another server in the event of hardware failures and keep the virtual machine running.
Hyper-V and Live Migrations
Hyper-V was new with the Windows Server 2008 R2, and is a key technology for Microsoft moving forward. There are several competitors in the server virtualization market, but Hyper-V offers several advantages when it comes to licensing and available support staff in the market. The biggest advantage of Hyper-V when combined with failover clustering is live migration.
Live migration is the process of moving a virtual machine from one cluster node to another cluster node. Moving an application or service from one node to another in a failover cluster normally requires a short amount of downtime. In live migration, users are able to access the server the entire time while the virtual machine moves to another node. In other words, there is no downtime for accessing the virtual machine during the move from one node to another.
Live Migration vs. Quick Migration
In Quick Migration, moving the virtual machine is like moving other applications from one node to another. Downtime is required while the virtual machine is saved on one node and is started on another node in the cluster. Windows Server 2008 uses quick migration only. Live migration uses a different process for moving a running virtual machine to another node in a cluster. In live migration, the following steps are taken:
1. A TCP connection is made from the Hyper-V node that is running the virtual machine to another Hyper-V node. The TCP connection copies the virtual machine configuration data to the other cluster node. A skeleton virtual machine is configured on the other cluster node and memory is allocated on the other cluster node. All the memory pages are copied from the running Hyper-V cluster node to another Hyper-V cluster node. During the copy process, any changes to the virtual machine memory pages are tracked.
2. Any Memory pages changed during the first copy step are then copied to the other Hyper-V cluster node. Each memory page is 4 kilobytes. For example, if the virtual machine were configured to use 512MB of RAM, then the used memory pages in the 512MB of memory are copied to the other node. During the copy process, the Hyper-V node running the virtual machine monitors the memory pages and tracks any that have changed during the first copy process. During this step, the virtual machine continues to run and users are able to access it. Hyper-V then copies the changed memory pages to the other node and monitors for any more changes while it completes the copy and repeats the process as needed.
3. Once the memory pages are copied, then Hyper-V moves the register and device state of the virtual machine to the other node. After the changed memory pages are copied completely to the other node, then the other node will have the same memory as the previous location of the virtual machine.
4. The storage handles for the disk device are moved to the other node and control of the disk device is also passed to the other node.
5. The Hyper-V virtual machine then comes online on the other Hyper-V cluster node.
6. The new node that now has full control of the virtual machine then sends a gratuitous ARP to the switch to ensure that the new MAC address of the new node is now the owner of the virtual machine and its associated TCP/IP address.
The overall process takes less time than the TCP timeout for the virtual machine moving to the other node, so users do not
experience and downtime and their access continues as normal.
Only Windows Server 2008 R2 supports live migration.
The live migration process moves a running VM from the source physical host to a destination physical host as quickly as possible. A live migration is initiated by an administrator through one of the methods listed below. The speed of the process is partially dependent on the hardware used for the source and destination physical computers, as well as the network capacity.
Live migrations can be started three different ways:
1. Administrators can start the migration by using the Failover Cluster Management console.
2. Administrators can start the migration by using the Virtual Machine Manager administration console.
3. An administrator can start the migration by using a WMI or PowerShell script.
CSVs are not required for live migrations, but they are more efficient.
Highly Available Storage
High availability is implemented to meet business requirements. One of the most important components that needs to be highly available is disk storage. In recent years, companies are becoming very aware that despite all of their investment in server clustering, they need to do more to protect the information, applications, and services that use disk storage. The need for high availability storage is extremely important when it comes to Hyper-V virtual machines and making sure they are available in the event of a SAN failure. Clustering the virtual machines is the first step in protecting them. Adding highly available storage is the next step is fully protecting the virtual machines hosted on Hyper-V nodes.
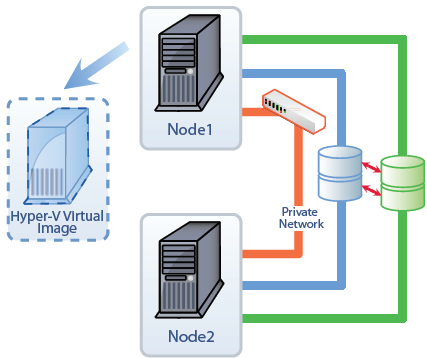
A Storage Area Network (SAN) is often used to provide a common storage platform for the many servers in the company. While a SAN provides redundancy for the disks inside the array, SANs usually require very expensive software to provide replication across multiple arrays. A single SAN array failure can cause many server failures and server clustering just is not enough to provide protection against this kind of failure. To provide protection against a SAN array failure, copies of the content must be replicated to another SAN as shown in the figure.
Prerequisites
For a cluster to be properly supported, and functional, there are several prerequisites that are required as well as a few prerequisites that are recommended to improve performance and stability. For more information, please see the Clustering 101 White Paper and the Clustering 101 Web Cast at
http://www.starwindsoftware.com/experts.
Servers
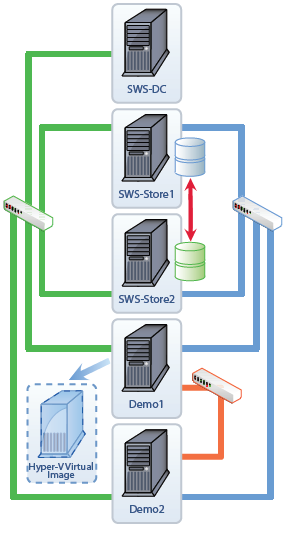
To meet the needs of this White Paper, we need to have five servers.
• SWS-DC is the domain controller for the SWS.com domain name.
• SWS-Store1 is a member server that runs StarWind Software. StarWind 5.0 Enterprise is Storage Area Network (SAN) software used to support the High Availability storage capability. SWS-Store1 is the primary storage server.
• SWS-Store2 is a member server that runs StarWind Software iSCSI SAN software. StarWind 5.0 Enterprise is Storage Area Network (SAN) software used to support the High Availability storage capability. SWS-Store2 is the secondary storage server that replicates the storage from SWS-Store1.
• Demo1 is a failover cluster nodes. It also runs the Hyper-V role.
• Demo2 is a failover cluster node. It also runs the Hyper-V role.
Software
All servers run Windows Server 2008 R2. The two storage servers run StarWind 5.0 Enterprise.
Networks
The environment requires three different networks.
• Public Network – This network is used by client computers to connect to the servers. In this case, 192.168.100.0/24 is used.
• Private Network – This network is used by the failover cluster nodes for intracluster (heartbeat) traffic. In this case, 10.10.10.0/24 is used.
• iSCSI Network – This network is used for all iSCSI traffic between the storage servers and between the failover cluster nodes and the storage servers. In this case, 172.30.100.0/24 is used.
Other network address ranges can be used; however, all the networks must be separated. The Private network must not be accessible from any of the other networks. It is a best practice to have the iSCSI network separated from the other networks as well. The iSCSI network performance will directly impact the access to the disks hosted by the storage servers.
Setup StarWind SAN Software
One of the first steps after installing and updating the servers is to configure the High Availability device for the SAN software. This step is pretty easy when using StarWind Software. The basics steps are shown here; however, remember to go to http://www.starwindsoftware.com for more information about the configuration options available.
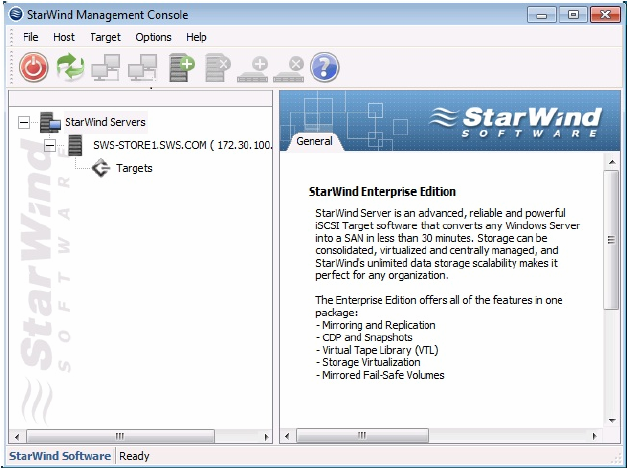
1. Open the StarWind Management Console by using the short cut on the desktop or by using the menu.
2. At this point, add StarWind servers by clicking on the Add Server icon and entering the server name. Repeat the process for each storage server.
One of the first steps after installing and updating the servers is to configure the High Availability device for the SAN software. This step is pretty easy when using StarWind Software. The basics steps are shown here; however, remember to go to http://www.starwindsoftware.com for more information about the configuration options available.
3. After connecting to each server, expand the server to see the available devices by double-clicking on the server name. A prompt will appear asking for an account and password. The default account and password are root and starwind. In this case, we have not created any storage devices so the list will remain empty.
4. Once both servers are listed and have been connected to the management console, the next step is to create the High Availability device. Click on the Add Target icon, or use the menu. The icon to add a target appears on the menu.
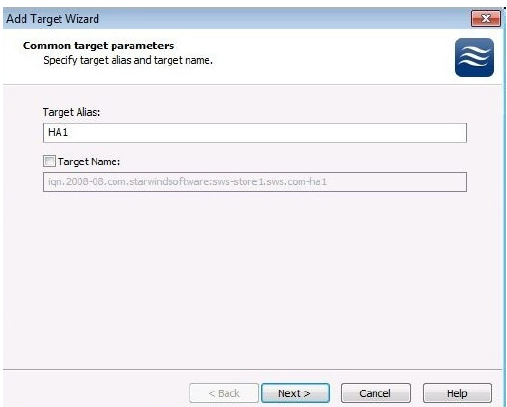
5. In the Add Target Wizard, enter an alias for the target name. In this case, HA1 is used. The name should be one that is easy to remember and describes its purpose. The Target Name will automatically be entered, but it can be manually changed.
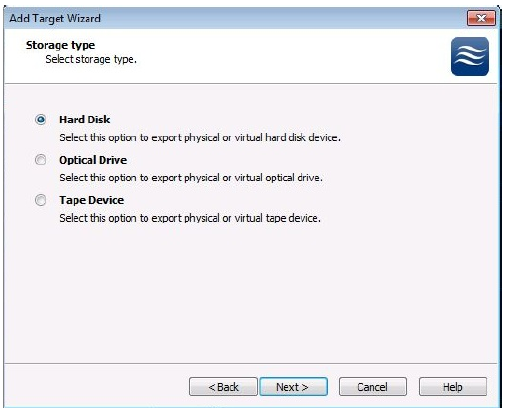
6. The next step of the Add Target Wizard is to specify the type of the target. For the High Availability device, we need to use the Hard Disk type.
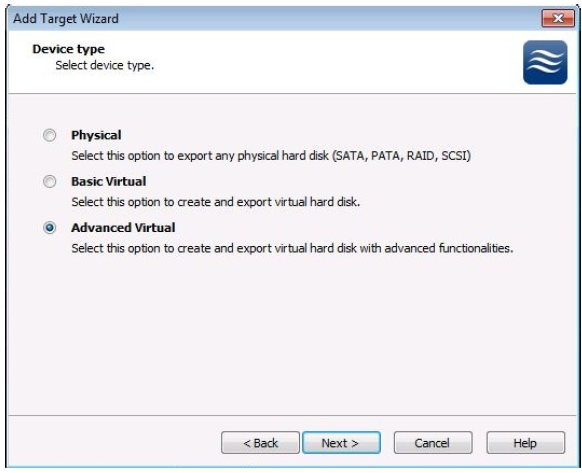
7. The Advanced Virtual option is required. This option is used for Mirror devices, Snapshot and CDP devices, and for High Availability devices.
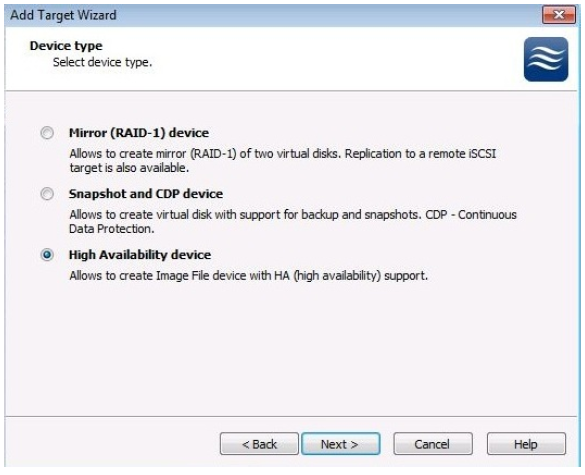
8. Select the High Availability device option.
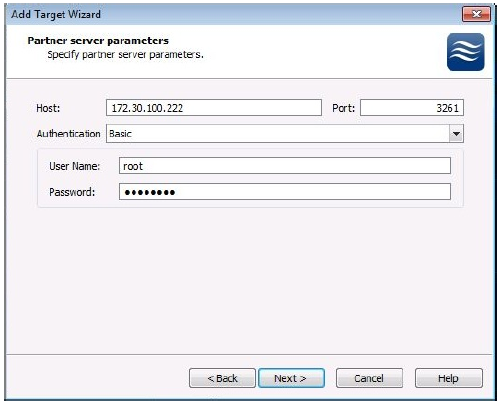
9. Since we performed these steps from the console while SWS-Store1 was selected in the interface, we need to specify the information for the other storage server. The user name and password information is for the remote server. If you have different user names and passwords, it is important to note that this set of credentials is for the other server in the pair for the High Availability device.
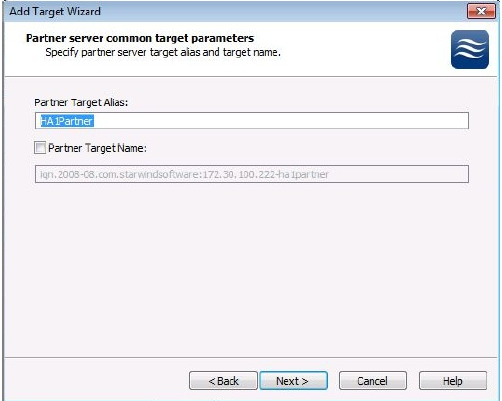
10. Once the connection is made to the partner storage server, the next step is to provide a name for the storage instance on the partner server. A name will be automatically created. It is a very good practice to provide the same name as used on the initial server appended with some convention that clearly identifies that the two names go together. In this case, the initial name was HA1, so the partner target name is HA1Partner.
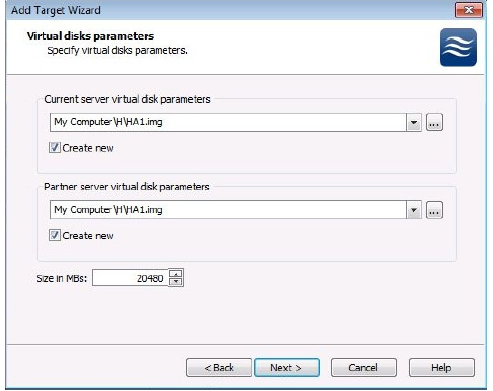
11.Using the browse button, select the drive and folder for the High Availability device for both servers and enable the Create new check box. In this case, both images use the same name and location which will make it easier to manage the device over time. Using identical names it not an issue as this name is just the file name of the image file used on both storage servers. Since this image will be used to contain a VM image file, it needs to be fairly large. The size will vary according to your needs for your individual or multiple VMs.
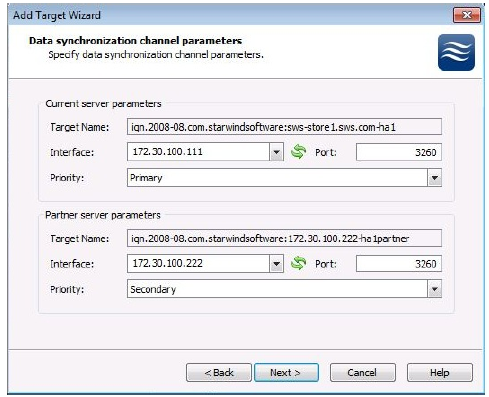
12.The target names and ports are provided automatically. The interface needs to be manually set to the network interface and its TCP/IP address that will be used by the other storage server to connect to each other and to synchronize the High Availability device image file. The names can be clearly seen where the first name is HA1 and the second name is HA1Partner. The priority is set so that one server is the primary and the other is the secondary.
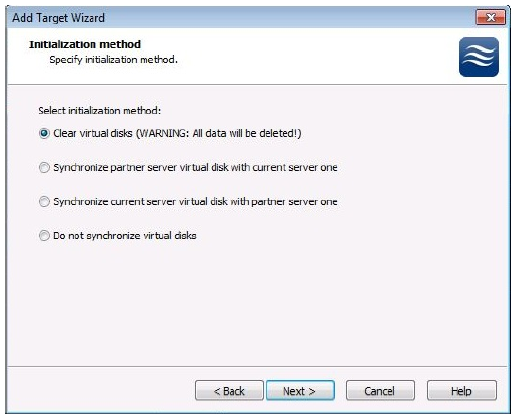
13.The two disk devices need to be synched after they have been configured for the primary and the secondary and their interfaces have been set. The options are to clear them both and then synch them, synch one from the other, or to not synch them at all. Once the initial method is selected, the devices will synch changes between them.
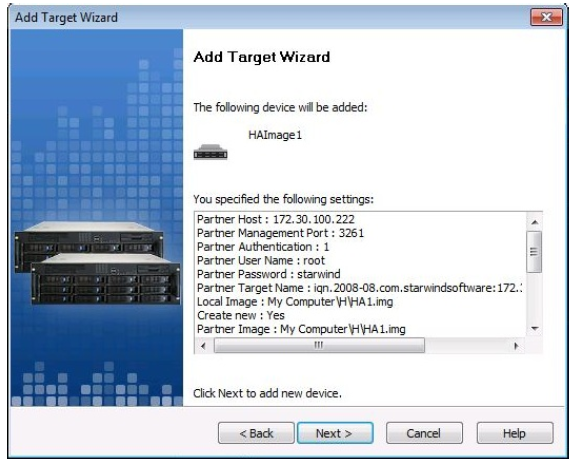
14.The next screen provides a summary of the previous steps. There is nothing to do on this screen except to cancel the setup or click on next. This is a screen, though, that should be captured and saved for documentation.
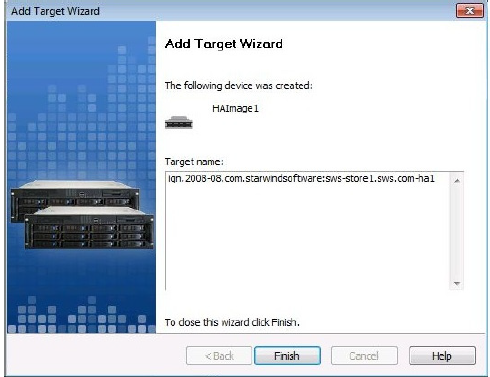
15.Once the Finish button is selected, then the setup is finished.
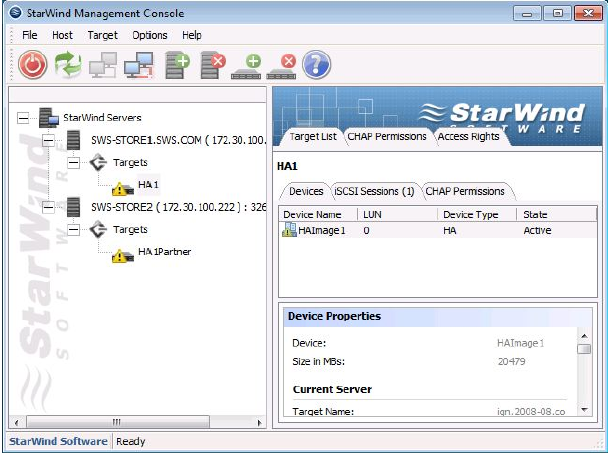
16.After the setup is complete, the StarWind Management Console will be updated to show the new High Availability device and the two target files. The yellow warning triangle will continue to show up while the devices synchronize. Once the synchronization process is complete, the yellow warning triangles will disappear and the High Availability device will be ready for use.
Please note, the minimum configuration includes the creation of both a device to serve as the quorum drive (generally only 1024 MB are needed for this) and a device for VM Storage.
Setup the Failover Cluster Nodes
The details for configuring Failover Clustering for Windows Server 2008 are the same as for configuring Windows Server 2008 R2. Please review the Clustering 101 White Paper and the Clustering 101 Web Cast at http://www.starwindsoftware.com/experts.
The Hyper-V Role needs to be added to each node in the failover cluster along with the Failover Clustering and the Multipath I/O Features.
Once the nodes are ready, the next step is to connect the nodes to the storage devices and to configure the Multipath I/O.
Setup iSCSI Initiator
Windows Server 2008 R2 has an iSCSI initiator built-in and it only requires being configured to connect to the SAN software.
The steps for configuring the iSCSI initiator need to be performed on all servers that will be nodes in the cluster.
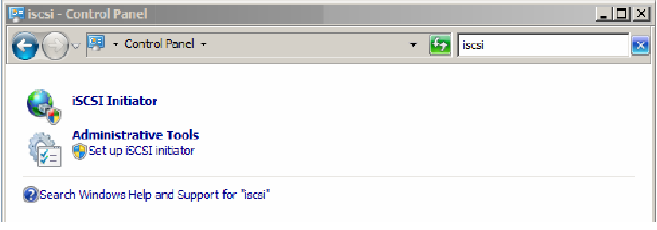
1. Open the iSCSI Initiator in the Control Panel. An easy way to open it is to use the search field in the upper right hand corner and entering iSCSI.
Click Yes if prompted to start the iSCSI service. Click Yes if prompted to unblock the Microsoft iSCSI service for Windows Firewall.
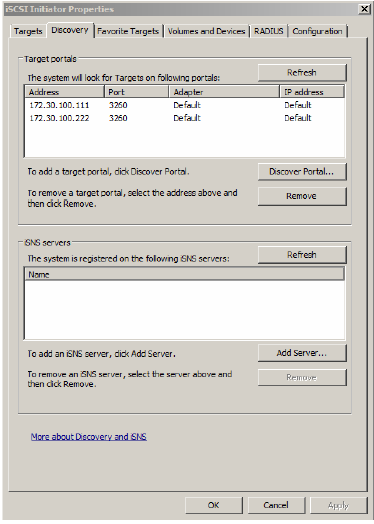
2. Click on the Discovery Tab and then add the dedicated iSCSI TCP/IP address for the first storage server. Repeat for the second storage server’s TCP/IP address.
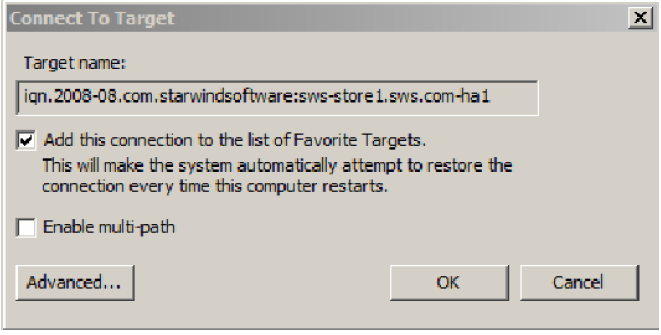
3. On the Target tab, select the device and click Connect to establish the connection.
The procedure should be done for both targets on both nodes.
Enable Multipath I/O
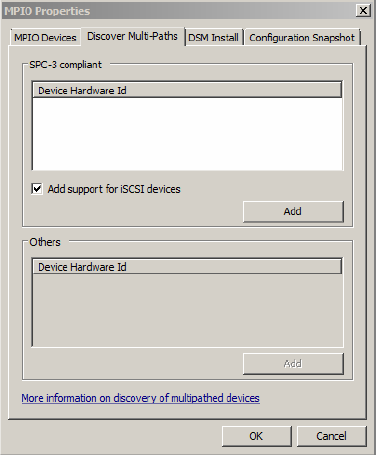
In the Administrative Tools, select MPIO.
In the MPIO Properties, select the Discover Multi-Paths and enable the check box for Add support for iSCSI devices. This option will allow the use of iSCSI drives with MPIO for redundancy.
The server will reboot.
Initialize the disk
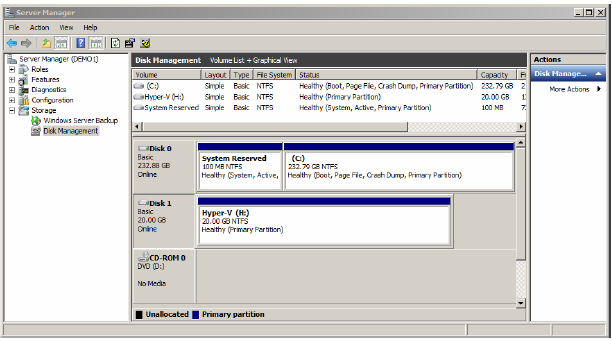
1. After reboot the Disk Management node in the Server Manager console will clearly show a single disk and not two different disks even though there are two separate connections. The disk may need to be brought online and initiated first.
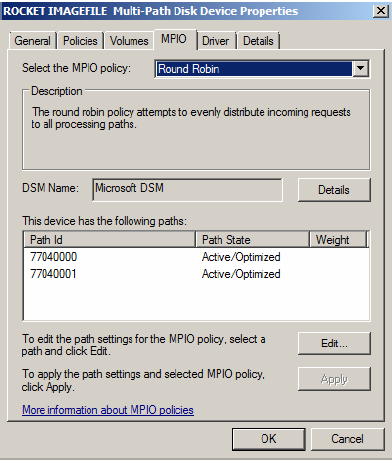
2. To further verify that the MPIO is properly configured, right click on Disk 1 in the Disk Management console and click on Properties. In this case, the policy is configured for Round Robin so that both device files are used on the storage servers. It is possible to configure the connections multiple ways, but the most common will be Round Robin.
Creating the Failover Cluster
The next steps are to create a Failover Cluster and to configure it to support a Hyper-V image. Since the Failover Cluster feature and the Hyper-V role have both already been enabled, the next steps are pretty straight forward.
To create the failover cluster, follow these steps.
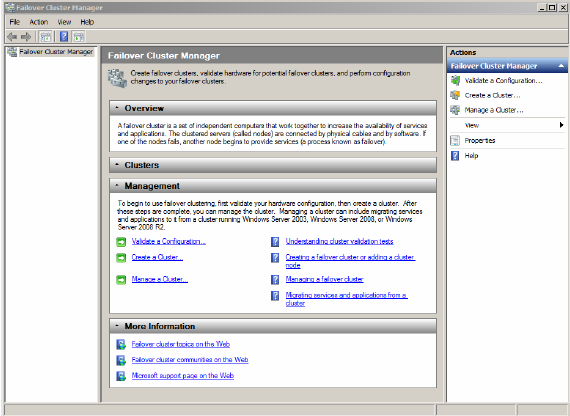
1. Open the Failover Cluster Management console
2. In the Failover Cluster Management console, click on Create a Cluster.
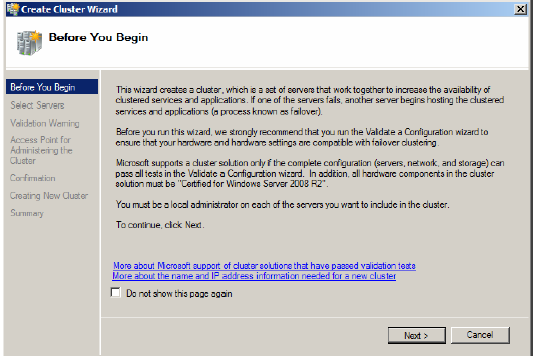
3. Click Next in the Before You Begin page of the Create Cluster Wizard.
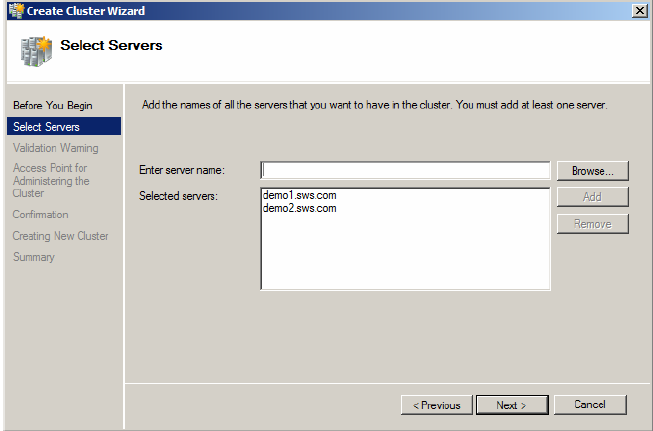
4. Click Browse in the Select Servers page, and then enter the names of the servers that will be nodes in the cluster in the Enter the server name, and click the Check Names button. Repeat as needed to enter all the server names in the field, and click Next.
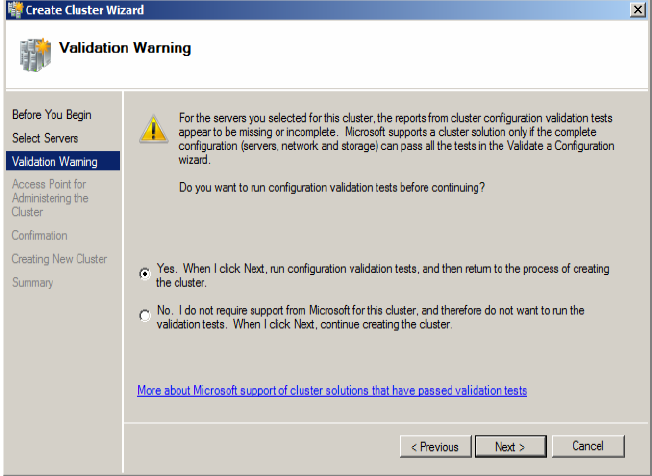
5. Select the radio button to perform the validation tests and click Next.
6. Click Next on the Before You Begin page for the Validate a Configuration Wizard.
7. Select the radio button to run all of the validation test and click Next.
8. Click Next on the Confirmation page.
9. Correct any errors and re-run the validation process as needed. Click Finish when the wizard runs without errors.
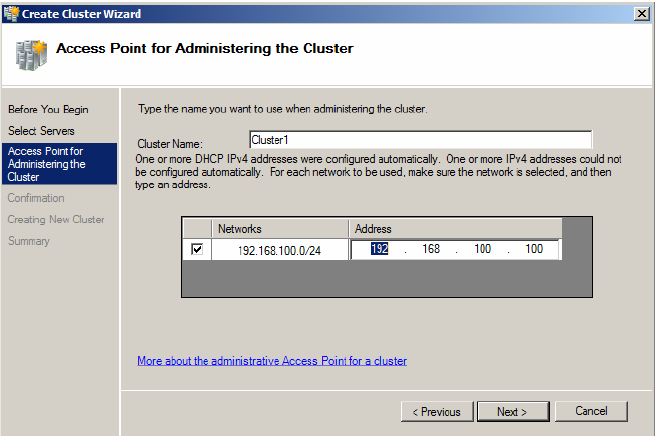
10.Enter the cluster name in the Cluster Name field and then enter the IP address for the Access Point for Administering the Cluster page. Click Next.
11.Click Next on the Confirmation page.
12.After the wizard completes, click on View Report in the Summary page. Click Finish and close any open windows.
13.Check the System Event Log for any errors and correct them as needed.
14.After creating the cluster enable the CSV in Failover cluster manager window. After this you can create the virtual machine and place it’s virtual disk on the CSV you have created.
Configuring a Hyper-V Image in a Failover Cluster
The first step is to create a Hyper-V image on one of the nodes of the cluster. All of the Hyper-V configuration and image files need to be stored on the shared storage of the failover cluster.
Once the VM files are all completed and the image is stored, the next step is to configure the VM as a clustered resource by following these steps:
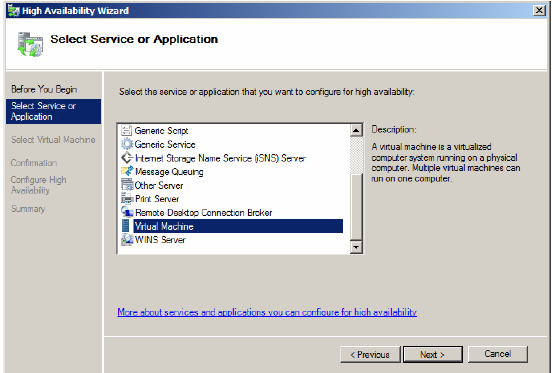
1. In the Failover Cluster Manager, click on the Services and applications node under the cluster name and then click on the Configure a Service or Application link in the Actions pane.
2. Click Next on the Before You Begin window.
3. Select Virtual Machine from the list of services and applications.
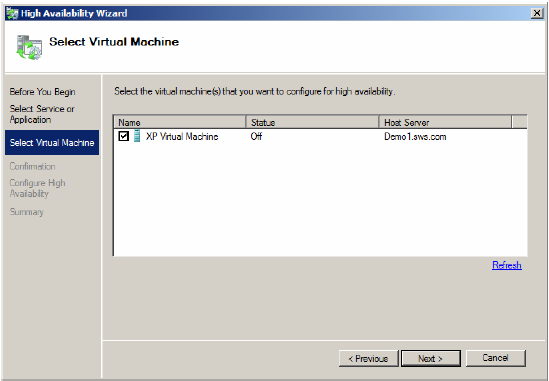
4. Select the Virtual Machine by enabling the check box.
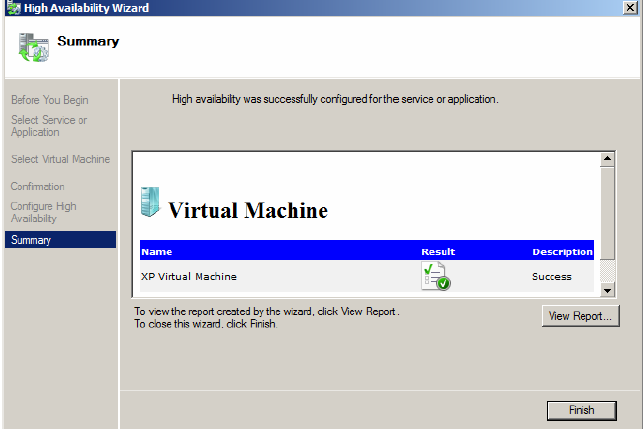
5. The next screen is the confirmation screen. Clicking Next on this screen starts the process of configuring the VM for the failover cluster. The following Summary screen provides feedback on the configuration steps. In this case, it confirms that the process was successful.
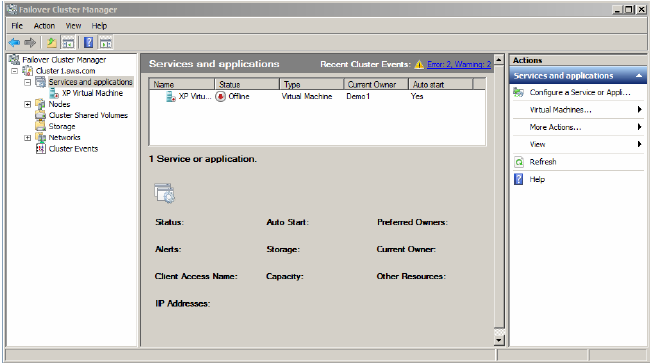
6. In the Failover Cluster Manager, the new resource will be shown as offline and needs to be started.
SUMMARY
Microsoft Windows Server 2008 R2 is a very powerful platform. Combining Failover Clustering with High Availability storage devices and Hyper-V provides a very powerful solution with a great deal of redundancy that ensures the availability of vital applications.
The steps covered in this white paper include:
• Configuration of High Availability devices in StarWind 5.0.
• Configuration of Multipath I/O to provide automatic load balancing and failover for storage.
• Configuration of Failover Clustering.
• Configuration of Hyper-V images in Failover Clustering.

