StarWind Virtual SAN® 2-node Hyperconverged Scenario with VMware vSphere 6.0
- April 27, 2018
- 17 min read
INTRODUCTION
Traditionally, VMware vSphere requires a shared storage to ensure data safety, allow virtual machine migration, enable continuous application availability, and eliminate any single point of failure within an IT environment. VMware vSphere users need to choose between two options when selecting the shared storage:
- Hyperconverged solutions, which allow sharing the same hardware resources for the application (i.e., hypervisor, database) and the shared storage, thus decreasing the TCO and achieving the outstanding performance results.
- Compute and Storage separated solutions, which keep the compute and storage layers separate from each other, thus making the maintenance easier, increasing the hardware utilization efficiency, and allowing building the system for the specific purpose.
This guide is intended for experienced VMware and Windows system administrators and IT professionals who need to configure StarWind Virtual SAN® hyperconverged solution for vSphere deployments. It provides step-by-step guidance on configuring a 2-node vSphere cluster using StarWind Virtual SAN® to convert the local storage of the ESXi hosts into a fault-tolerant shared storage resource for ESXi.
A full set of the up-to-date technical documentation can always be found here, or by pressing the Help button in the StarWind Management Console.
For any technical inquiries, please, visit our online community, Frequently Asked Questions page, or use the support form to contact our technical support department.
Pre-Configuring Servers
The diagram below illustrates the network and storage configuration of the solution described in this guide.
Preparing Hypervisor for StarWind Deployment
Configuring Networks
Configure network interfaces on each node to make sure that Synchronization and iSCSI/StarWind heartbeat interfaces are in different subnets and connected physically according to the network diagram above. In this document, 172.16.10.x subnet is used for iSCSI/StarWind heartbeat traffic, while 172.16.20.x one is used for the Synchronization traffic. All actions below should be applied to each ESXi server.
1. Create a vSwitch to use for Management traffic if it is not presented.
2. Create a vSwitch for the iSCSI/ StarWind Heartbeat channel.
NOTE: A Virtual Machine Port Group should be created for iSCSI/ StarWind Heartbeat and Synchronization vSwitches, while a VMKernel port should be created only for iSCSI traffic. Static IP address should be assigned to VMKernel ports.
3. Create a vSwitch for the Synchronization channel.
NOTE: It is recommended to set jumbo frames to 9000 on vSwitches and VMKernel ports for iSCSI and Synchronization traffic. Additionally, vMotion can be enabled on VMKernel ports.
4. Repeat the steps above for any other links intended for Synchronization and iSCSI/Heartbeat traffic on both ESXi nodes.
Preparing StarWind VMs
5. Create Virtual Machines (VMs) on each Windows Server 2016/2012R2 ESXi host () and install StarWind VSAN.
StarWind VMs on ESXi hosts should be configured with the following settings:
RAM: at least 4 GB (plus the size of the RAM cache if it is going to be used);
CPUs: at least 4 virtual processors with 2 GHz reserved;
Hard disk 1: 100 GB for OS (recommended);
Hard disk 2: Depends on the storage volume intended for the shared storage.
NOTE: Each hard disk should be Thick Provisioned Eager Zeroed.
Network adapter 1: Management
Network adapter 2: iSCSI
Network adapter 3: Sync
NOTE: All network adapters should be VMXNET3.
NOTE: Active Directory Domain Services role can be added on StarWind Virtual Machine (VM) if necessary so that it could serve as a domain controller.
NOTE: When using StarWind with synchronous replication feature inside of a Virtual Machine, it is recommended not to make backups and snapshots of the Virtual Machine with StarWind Service which could pause the StarWind Virtual Machine.
Pausing the Virtual Machines while StarWind service under load may lead to split-brain issues in devices with synchronous replication and data corruption.
Configuring StarWind VMs startup/shutdown
6. Set up the VMs startup policy on both ESXi hosts in Configuration -> Virtual Machine Startup and Shutdown -> Properties menu. In the window that pops up, check Allow virtual machines to start and stop automatically with the system to enable the option, choose the stop-action as Guest Shutdown, and move up the StarWind VMs. Click Ok to proceed.
7. Start both StarWind virtual machines, install OS and StarWind Virtual SAN.
Downloading, Installing and Registering the Software
8. Download the StarWind setup executable file from the official website by following the link:
https://www.starwind.com/registration-starwind-virtual-san
9. Launch the downloaded setup file on the server where StarWind Virtual SAN or one of its components is to be installed. The setup wizard appears.
10. Read and accept the License Agreement.
Click Next to continue.
11. Read the information about the new features and improvements carefully. Red text indicates warnings for users who are updating their existing software installations.
Click Next to continue.
12. Select the following components for the minimum setup:
- StarWind Virtual SAN Service
StarWind VSAN service is the “core” of the software. It allows creating iSCSI targets and sharing virtual and physical devices. The service can be managed via StarWind Management Console on any Windows computer or VSA connected to the network. Alternatively, the service can be managed from StarWind Web Console which is deployed separately. - StarWind Management Console
StarWind Management Console is the Graphic User Interface (GUI) part of the software that controls and monitors all storage-related operations (e.g., allows users to create targets and devices on StarWind Virtual SAN servers connected to the network).
13. Specify Start Menu Folder.
Click Next to continue.
14. Tick the checkbox if a desktop icon is needed.
15. The prompt that appears allows requesting a time-limited fully functional evaluation key or a FREE version key. Alternatively, use the already purchased StarWind Virtual SAN commercial license key. Select the corresponding option.
16. Click Browse to choose the license file.
17. Verify the licensing information.

Click Next to apply the license key.
18. Verify the installation settings. Click Back to make any changes or Install to continue.
19. Click Finish to complete the installation process. Optionally, StarWind Management Console can be launched by ticking the corresponding checkbox.
20. Repeat the steps above on the second virtual machine.
Configuring Automatic storage rescan
For each ESXi host, configure the automatic storage rescan.
Log in to StarWind VM and install vSphere PowerCLI on each StarWind virtual machine by adding the PowerShell module (Internet connectivity is required). To do so, run the following PowerShell command:
Install-Module -Name VMware.PowerCLI -AllowClobberNOTE: In case of using Windows Server 2012 R2, online PowerCLI installation requires Windows Management Framework 5.1 or later installed on VMs. Windows Management Framework 5.1 can be downloaded by following the link:
https://go.microsoft.com/fwlink/?linkid=839516
21. Open PowerShell and change the Execution Policy to Unrestricted by running the following command:
Set-ExecutionPolicy Unrestricted22. Create PowerShell script which will perform an HBA rescan on the hypervisor host.
Import-Module VMware.PowerCLI
$counter = 0
if ($counter -eq 0){
Set-PowerCLIConfiguration -InvalidCertificateAction ignore -Confirm:$false | Out-Null
}
$ESXiHost = "IP address"
$ESXiUser = "Login"
$ESXiPassword = "Password"
Connect-VIServer $ESXiHost -User $ESXiUser -Password $ESXiPassword | Out-Null
Get-VMHostStorage $ESXiHost -RescanAllHba | Out-Null
Get-ScsiLun -VMHost $ESXiHost -LunType disk | Where-Object Vendor -EQ "STARWIND" |
Where-Object ConsoleDeviceName -NE " " | Set-ScsiLun -MultipathPolicy RoundRobin | Out-Null
$StarwindCN = Get-ScsiLun -VMHost $ESXiHost -LunType disk |
Where-Object Vendor -EQ "STARWIND" | Where-Object ConsoleDeviceName -NE " " |
Select-Object CanonicalName
$esxcli = Get-EsxCli -VMHost $ESXiHost
foreach($CN in $StarwindCN){
$esxcli.storage.nmp.psp.roundrobin.deviceconfig.set(0,$null,$CN.CanonicalName,1,"iops",0) |
Out-Null
}
Disconnect-VIServer $ESXiHost -Confirm:$false
$file = Get-Content "$PSScriptRoot\rescan_script.ps1"
if ($file[1] -ne "`$counter = 1") {
$file[1] = "`$counter = 1"
$file > "$PSScriptRoot\rescan_script.ps1"
}
In the corresponding lines, specify the IP address and login credentials of the ESXi host on which the current StarWind VM is stored and running:
$ESXiHost1 = “IP address”
$ESXiUser = “Login”
$ESXiPassword = “Password”
Save the script as rescan_script.ps1 to the root of the C:\ drive of the VM.
23. Perform the configuration steps above on the partner node.
24. Go to Control Panel -> Administrative Tools -> Task Scheduler -> Create Basic Task and follow the wizard steps:
25. Specify the task name, select When a specific event is logged, and click Next.
26. Select Application in the Log dropdown menu, type StarWindService as the event source and 788 as the event ID. Click the Next button.
27. Choose Start a Program as an action the task should perform and click Next.
28. Type powershell.exe in the Program/script field. In the Add arguments field, type:
“ -ExecutionPolicy Bypass -NoLogo -NonInteractive -NoProfile -WindowStyle Hidden -File C:\rescan_script.ps1 ”
Click the Next button to continue.
29. Click Finish to exit the wizard.
30. Configure the task to run with the highest privileges by ticking the corresponding checkbox in the window. Make sure that the “Run whether user is logged on or not” option is selected.
31. Switch to the Triggers tab. Verify that the trigger on event 788 is set up correctly.
32. Click New and add other triggers by Event ID 782, 257, 773, and 817.
33. All added triggers should look like in the screenshot below.
34. Switch to the Actions tab and verify the parameters for the task.
Press OK and type the credentials for the user whose rights are used to execute the command in the prompt.
35. Perform the same steps on the second StarWind VM, specifying the corresponding settings.
Provisioning Storage with StarWind VSAN
Creating StarWind HA devices (DS1, DS2)
36.Open StarWind Management Console and click the Add Device (advanced) button.
37. Select Hard disk device as the type of the created device. Click Next to continue.
38. Select Virtual disk. Click Next to continue.
39. Specify Virtual Disk Location and Size.
Click Next.
40. Specify Virtual Disk Options and click Next to continue.
NOTE: For ESXi, use 512 bytes Block Size
41. Define the RAM caching policy and specify the cache size (in corresponding units) and click Next to continue.
NOTE: The recommended RAM cache size is 1 GB per 1 TB of storage.
42. Define the flash caching policy and the cache size. Click Next to continue.
NOTE: The recommended flash cache size is 10% of the created device size.
43. Specify the target parameters. Select the Target Name checkbox to enter a custom target name if required. Otherwise, the name will be generated automatically in accordance with the specified target alias.
Click Next to continue.
44. Click Create to add a new device and attach it to the target.
45. Click Finish to close the wizard.
46. Right-click the recently created device and select Replication Manager from the shortcut menu.
47. Click Add replica.
48. Select Synchronous two-way replication as a replication mode and click Next to proceed.
49. Specify Partner Host Name, IP Address, and Port Number.
Click Next.
50. Choose Create new Partner Device and click Next.
51. Choose the device Location and specify Target Name if required. Otherwise, the name will be generated automatically according to the specified target alias.
52. Click Change Network Settings.
53. Specify Interfaces for Synchronization and Heartbeat channels.
Click OK. Then click Next.
54. Choose Synchronize from existing Device.
55. Click Create Replica.
Click Finish to close the wizard.
56. The successfully added devices appear in StarWind Management Console.
57. Repeat the steps described above to create other virtual disks that will be used as datastores.
Preparing Datastores
Adding Discovery portals
58. To connect the previously created devices to ESX host, navigate to the Configuration tab, then click on Storage Adapters and choose (or add) the ISCSI storage adapter. In the Details section, click the Properties tab.
59. In Dynamic Discovery click the Add… button to specify iSCSI interfaces.
60. Enter the iSCSI IP address of the first StarWind node from the virtual local network 172.16.10.*
Click OK.
61. Add the IP address of the second StarWind node – 172.16.10.*
Click OK.
62. Everything should look like the image below.
63. Rescan the storage.
64. Now, the previously created StarWind devices are visible.
65. Repeat all the steps from this section for the other ESXi node, specifying the corresponding IP addresses for the iSCSI subnet.
Creating Datastores
66. Open Configuration tab of any host and click Storage.
67. Click Add Storage.
68. Select Disk/LUN.
69. Select the previously discovered StarWind device and click Next.
70. Check Current Disk Layout and click Next.
71. Specify the datastore name and click Next.
72. Enter the datastore size and click Next.
73. Verify the settings and click Finish.
74. Add another Datastore (DS2) as it is described above but select the second device for that purpose.
75. Verify that the storages (DS1, DS2) are connected to both hosts. Otherwise, rescan the storage adapter.
76. Right-click on a datastore and select Properties.
77. Click Manage Paths.
78. Change the Path Selection policy to the Round Robin one and click Change.
79. Repeat the same steps for each Datastore for each host.
Additional tweaks
80. Click on the configuration tab of any host and choose Security Profile.
81. Choose SSH and click Options.
82. Select Start and Stop with host and press Start.
83. Connect to the host using an SSH client (e.g., Putty).
84. Check the device list using the following command:
esxcli storage nmp device list85. For all devices, reduce Round Robin size from 1000 to 1 using the following command:
esxcli storage nmp psp roundrobin deviceconfig set --type=iops --iops=1 --device=NOTE. Paste StarWind device UID at the end of the cmdlet.
86. Repeat the same steps for each host and datastore.
87. Click the configuration tab on any host and choose Advanced Settings.
88. Select Disk and change the Disk.DiskMaxIOSize parameter to 512.
Creating a Datacenter
89. Connect to vCenter, click Getting Started, then Create Datacenter, and enter the Datacenter name.
Creating a Cluster
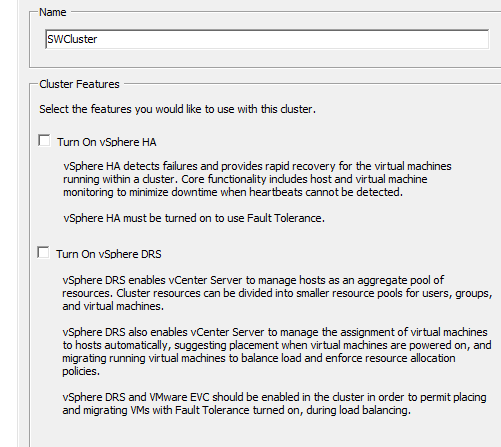
90. Navigate to the Datacenter Getting Started tab and press Create a cluster.
91. Enter the cluster name and click Next.
Adding Hosts to the Cluster
92. Open the Cluster tab and click Add a host.
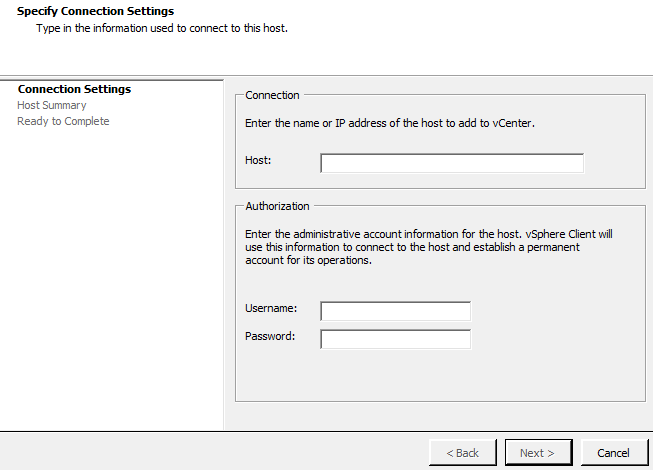
93. Enter the name or IP address of the ESXi host and specify the administrative account. Click Next.
94. Verify settings and click Next.
95. Assign the License and click Next.
96. NOTE: Lockdown mode is not enabled by default. Click Next.
97. Verify the settings and click Finish.
98. Add the second host to the cluster.
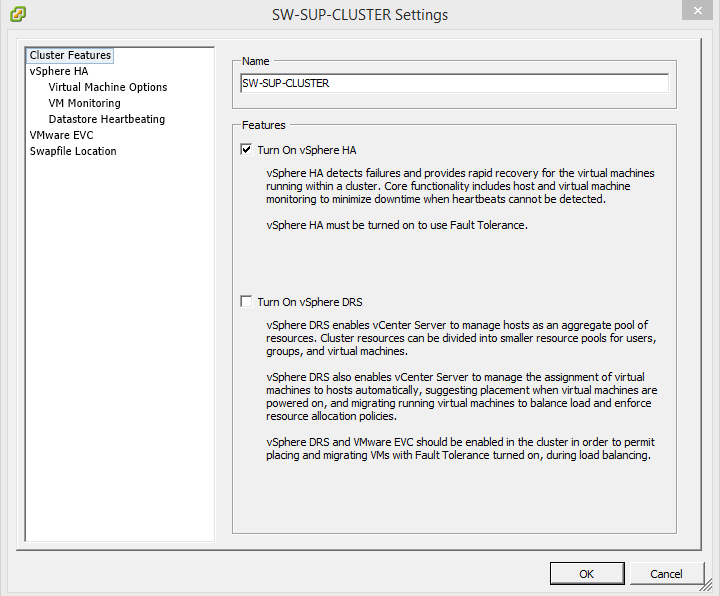
Turn on vSphere HA Feature
99. Open the cluster Edit Settings and click Turn on vSphere HA. Press OK.
CONCLUSION
This technical paper covers StarWind VSAN configuration with VMware vSphere 6.0 and below for minimalistic hyperconverged 2-node scenario. In this setup, all virtual machines are stored on the shared storage provided by StarWind. VMware HA ensures VMs redundancy, while StarWind is responsible for the storage uptime. The combination of StarWind shared storage and VMware HA delivers high availability for applications and data across the entire virtualized environment. Using StarWind VSAN, the local storage resources of both ESXi hosts are turned into a fault-tolerant shared storage synchronously ”mirrored” between the nodes. Being nested inside a VM and run on both ESXi hosts, StarWind VSAN ensures data safety and maintains the continuous application availability.


